Cabin Fever

This site may earn a commission from merchant affiliate
links, including eBay, Amazon, Skimlinks, and others.

Joined
Apr 24, 2003
Threads
323
Messages
5,695
Location
Southwest Oregon
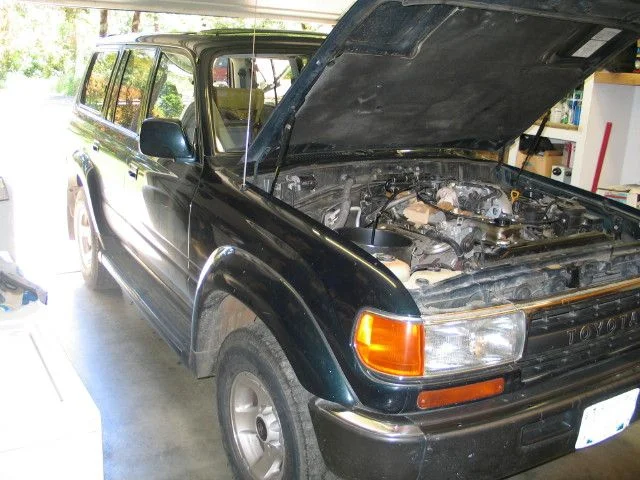
This is a build/rehab thread for my 1994 '80. AKA "D2" or as the plates read- Cabin Fever. Last fall I picked up a red 94 with lockers to swap onto my 1993 w/0 lockers- then Flyrod posted up this one with a blown headgasket and before you know it I was 80 poor.. I spent a lot of my winter working on the red one and just sold it to finance this build. I eventually would like to swap a diesel in with a NV4500 and a part time case. This will be a build on a budget and subject to whatever time constraints come up.
First I have to fix the headgasket get it on the road and see what else needs attention. It came with a stack of receipts of repairs from the dealer. Overall its pretty clean but not a gem. With 220,000 it has faired pretty well. A lot of parts were taken off of it to fix the one I just sold. So the first items things to get fixed will be to do the HG, front engine oil leaks, flush fluids, detail interior, install Atlas's seat covers, new DS seat belt and maybe some tires and then go from there.
Once this one is roadworthy the unlocked 93 will need some work and then it will be sold.
small0002.webp
small0004.webp
 
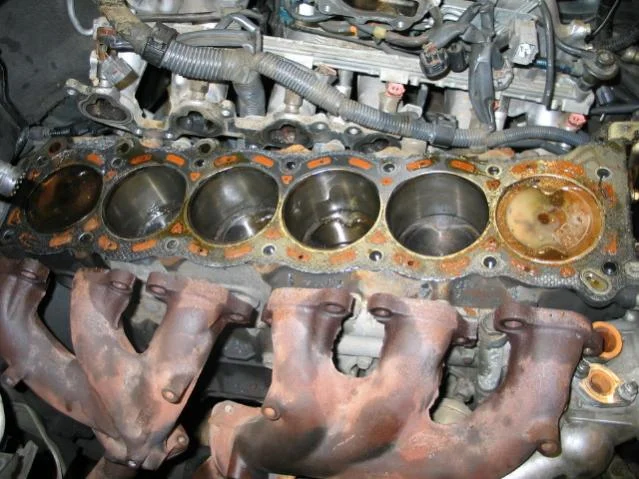
block and head

still can see the cross-hatch and the ring ridge is barely detectable by touch- no goop or sludge - the head gasket looks like it failed at #1 and #6
small0009.webp
small0010.webp
small0006.webp
 
Shweet. Hey that color looks familiar. :D
Good luck. Let me know if I can help. I have some 80 experience. :hillbilly::banana:

:cool:
 
The above pic is the area around #1 where I believe it failed, the head is clean on the #1 cylinder and I suppose it was the failure. Any input on whether this is too much pitting? I've scrotch'ed it pretty good at this point. I will probably have the head decked but didn't want to take the block out.
 
cant wait to start this on my 3FE after vacation. Keep the pics coming! Even though its not the same engine.
 
maybe

I hope it is back together mechanically but I still have a lot of other stuff to do. If I don't work much this month then I will have time but it is amazing how long everything takes-I'm slow..
Here is the head on the bench. I went into town and was going to take it to the machine shop but figured I better look at it and see if it really need to be surfaced or anything else. I found it has a bit of a crown in it and the pitting is fairly deep on the offending #1 cylinder. I just know the machinist is going to try to sell me a $500 valve job.. I think a little lapping would be fine, there is a detectable amount of wobble on the valves but when oiled it is almost imperceptible- old school, the machinist will "mic'" it..
A friend suggested "blocking" the deck of the block and the head just to see how flat they were, I used some 600 sand paper with a marble/stone 6"x12" tile and a little WD40, it polished off the remainder of the gasket that the scotch pad didn't take off and left a nice finish. I then used an improvise straight edge that showed a little gappage in the middle.
small0007.webp
 
I'm really glad it doesn't have a lift yet btw!!

I know that feeling. Working on my 4.5 is a pain even with just a 2" lift. The 91 is a breeze to work on and get in and out of.
Hey, wonder who'll get there rig done first?:doh:

:cool:
 
I never finish anything.. most of the time

Talked to the Machinist... Head is way out- he was concerned that it would take more than spec's allow and the head is listed as not resurfacable (?). I had to pick it up and make sure the cams would spin with the arch that will be left after he surfaces the bottom- picture an arched bridge with an I-beam acrossed the deck (the cam being the I-beam). I bolted in the cams and they spin fine.
He assured me it was too much out of spec to suck down with the head bolts. I put a framing square in the cam bearings and there is a little bit of wobble- weird. Its going back to the machinist tomorrow to get surfaced. I will lap the exhaust valves vs. dump more money into a valve grind. He even mentioned that the valves can twist away from the seats and not be centered in the hole- crazy stuff.
 
I'd contact someone like Robbie (powderpig) and ask him about it. Some people deck the head a bit which will also give you a bit more compression and oomph. You might want to take a look at some of the other threads on rebuilds, lots of good discussion in them.
 
Too much contemplation already- its at the machine shop and I'm just waiting

"whistle,whistle... whistle"
 
Almost a month later...
Rig is up and running..
I had the dizzy off, not sure excactly how but I got it going.
The excessive steam on start up was a little scary but I'm hoping that is just residual from the PO losing the HG and there wasn't much coolant in the system when I drained it.
Runs good, the emission thingy on the PS by the airclean runs all the time, not just when vacuum is applied, I may just cap off the holes on the exhaust and cap the vacuum tube- the the vacuum cuts off once the rig is warm so I know the problem lies within the device.
 
Runs good, the emission thingy on the PS by the airclean runs all the time, not just when vacuum is applied, I may just cap off the holes on the exhaust and cap the vacuum tube- the the vacuum cuts off once the rig is warm so I know the problem lies within the device.

You're talking about the PAIR crap?

That actually sounds normal to me, at least from what I've read.

If I had a rig with the PAIR stuff on it, I'd update it to the '95-'97 style and eliminate it. Feel free to look at my rig if you need a comparison.
 
pics

1. almost there-- can't forget all the shims and holders! (I did the first time!) hand lapped all the valves.

2. mostly assembled
smalllIMG0002.webp
smalllIMG0005.webp
 
1. Some of the Squirrel snacks I found in the air box in the fender and in the little can on the bottom of the air cleaner.. birdseed and dog food. I found the dog out in the yard eating it- so I guess it was still good.

2. Chaos in the garage
smalllIMG0004.webp
smalllIMG0003.webp
 
Last edited:
Just a few sidenotes:
1- keep the nuts and bolts labeled and it will save more time than it takes to do
2- don't assume your rig is still in factory configuration (distributor off a tooth, no intake manifold brace, routing of hoses and wires/harnesses)
3- Don't spend a lot of money on parts, pieces and machine work without having the head checked for cracks- I assumed the machinist did and never really asked so now I'm hoping its good!
4- If you don't have a spare 80 series around take notes and pictures just to make sure and take note how things are routed.
5- the wire that goes back behind the head over the tranny and to the cat is pretty tricky to get out- I pulled everything out and not just off to the side so I used a string tied on it when I pulled it out so I could just pull it back in.

Now for the interior- shampoo'd the carpet and now to scrub out the slime inside.. Then I get to put on Shane's seat covers
smalllIMG0006.webp
smalllIMG0007.webp
 
The torque on the head bolts was something else- 90+90 was a lot of grunt! This was definitely not a job I could have whipped out in a weekend, my hats off to you guys who can crank this stuff out!
I purchased a new radiator from RadiatorBarn.com and got it 3 or 4 days later, 3 row copper with brass tanks, CSI brand, made in Indonesia for $237ish shipped. Quality and fit look fine. A local dealer could get me an all metal for $400ish and $221 for Aluminum core and plastic tanks, Koyo was $300 online plus shipping.. FYI..
 
Nice work. My head work over the past few weeks didnt go fast either. First day and a half was taking everything off. I got the head back from the shop in one week and still awaiting more parts to replace while i have everything apart. Wish I had Shane's covers to put on :(

Keep the progress posted. My head thread is a few pages back, need to take some pics of the cleaned injectors and the gunk in the screens of the old ones.
 
I found pecans in the support for the front drivers seat, a lot.. the holes were barely big enough to get them out, and they were under the carpet. This rig was haunted by some determined mighty little mouse..
I forgot to mention other things I did while it was apart- new front main seal,valve guide seals, oil pump seal and the metal one below it, distributor "O" ring of course. It looks like the rear main needs to get replaced.. Grrr.
No steam after running more today nor any water loss.

I found a nut on the tranny tho' that was loose and it is on the part which the wires plug into- all of that looks really shiny/new. I took it off with my fingers and there is some sort of locknut on it- I tightened it up but have no idea what it is for.. Need a picture? any ideas?
 
Back
Top Bottom