I never planned on restoring this thing, but as with most projects they seem to get a life of their own.
Here's where I'm at:

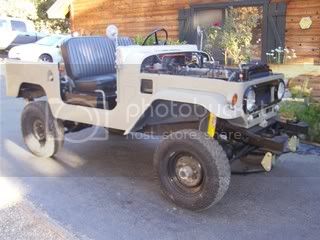
I had originally decided to paint it myself with Hot Rod Flatz desert tan paint, but after looking at the color in person I decided to go with Dune Beige instead. I painted it in the driveway and had to wait until about 7:45 pm when the breeze died down. Only got 3 runs and a bug to deal with.


The original brake lines were replaced by a Downey kit that was designed specifically for this year. Jim was a huge help on this and the lines were individually tagged with detailed instructions. The Man A Fre brake line kit (that was included with the Safari 4" suspension kit) was incomplete and for a later model. If anyone else has bought this kit from MAF, did it come with 3 brake lines or 2? When I called MAF on this the sales rep said only 2 (a long one and a short one) came with the kit. Anyways, the fittings were wrong.

Rear line required cutting the steel line west of the fitting.


Radiator catch bottle. This is the wife's beer. I drink Johnny Walker and that bottle is a little large.

Header wrap and intake manifold sitting in place. The orange wrap on the wiring harness is something our aircraft mechanic came up with. It's used on turbine engines, adheres to itself as you wrap it and is high temp resistant. Neat stuff.


The Dash painted and mostly back together. The gray is just a standard Rustoleum color.


I still have a ton of stuff to do, but reassembly is a hell of a lot more fun than sanding and stripping.
Here's where I'm at:
I had originally decided to paint it myself with Hot Rod Flatz desert tan paint, but after looking at the color in person I decided to go with Dune Beige instead. I painted it in the driveway and had to wait until about 7:45 pm when the breeze died down. Only got 3 runs and a bug to deal with.
The original brake lines were replaced by a Downey kit that was designed specifically for this year. Jim was a huge help on this and the lines were individually tagged with detailed instructions. The Man A Fre brake line kit (that was included with the Safari 4" suspension kit) was incomplete and for a later model. If anyone else has bought this kit from MAF, did it come with 3 brake lines or 2? When I called MAF on this the sales rep said only 2 (a long one and a short one) came with the kit. Anyways, the fittings were wrong.
Rear line required cutting the steel line west of the fitting.
Radiator catch bottle. This is the wife's beer. I drink Johnny Walker and that bottle is a little large.
Header wrap and intake manifold sitting in place. The orange wrap on the wiring harness is something our aircraft mechanic came up with. It's used on turbine engines, adheres to itself as you wrap it and is high temp resistant. Neat stuff.
The Dash painted and mostly back together. The gray is just a standard Rustoleum color.
I still have a ton of stuff to do, but reassembly is a hell of a lot more fun than sanding and stripping.


 for not looking it up first
 ")