PTO Winch Removal - Stuck -

This site may earn a commission from merchant affiliate
links, including eBay, Amazon, Skimlinks, and others.

Joined
Aug 22, 2007
Threads
107
Messages
1,132
Location
Phoenix, Arizona
Any help appreciated...

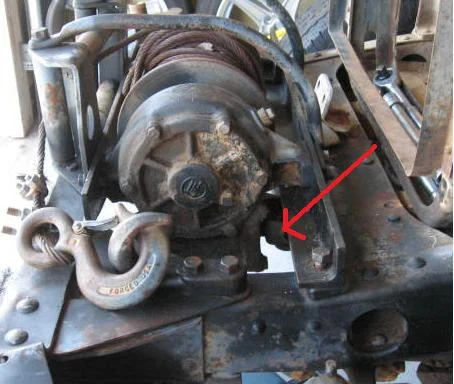
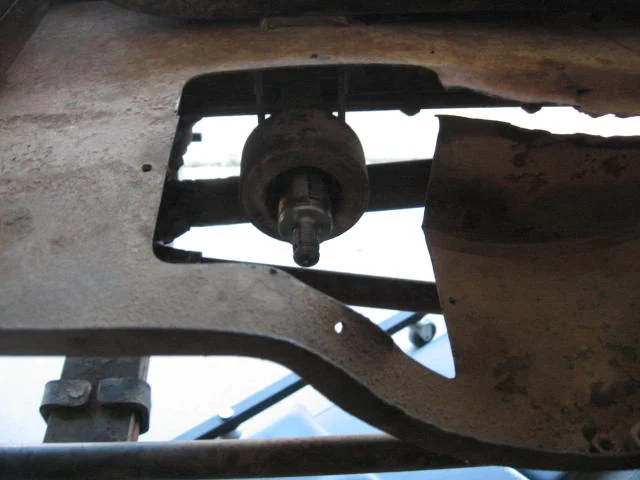
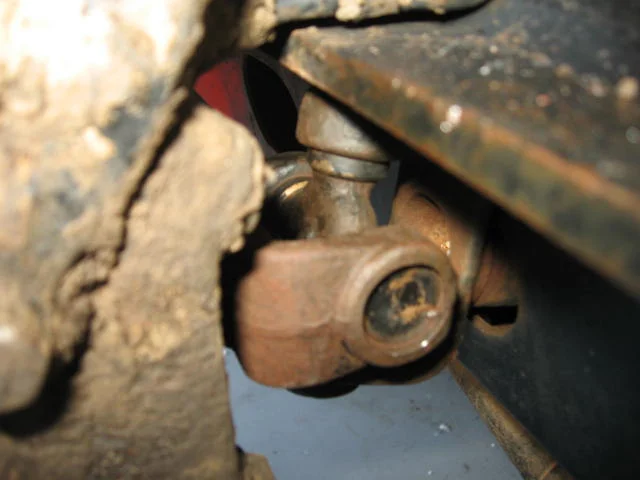
I can't seem to find any info searching. Do I have to take this u joint apart? If yes, how to do? The short shaft in the picture is what I can't seem to separate. I have removed the castle nut and collar.

pto_winch (3).webp

pto_winch (2).webp


pto_winch.webp

Thank you!
pto_winch (3).webp
pto_winch (2).webp
pto_winch.webp
 
There should be a shear pin that retains the end yoke of the PTO shaft to the PTO winch input shaft. Remove the cotter pins that prevent the shear pin from falling out and slide that coupler off, after removing the bolt retaining the hanger bearing to the frame.

You should then be able to remove the bolts retaining the winch to the front frame section and lift it off the frame.
 
I have found that the stock shear pins bend slightly even under minor loads, and are hard to remove. so you may need to use a bit of cursing and force to get it out.

Also, the short yoke you have attached to the winch should slide out of the shaft that you removed the yoke and castle nut from. kinda like two havles of a driveshaft.

removing the front bumper may ease the need to lift the winch up, and allow you to slide straight forward.
 
I got further - but can't see a pin

Hey Guys,

I whizz wheeled the bolt heads from the radiator frame, removed it, and the rock shield and now I can see a little better.

I couldn't see a shear pin or cotter holding that sucker on there.

I did remove the crecent key hoping to pull the hangar bearing but that didn't work out too good.

Am I looking in the right spot for the shear pin? If its back on the sleeve over those coarse splines, I don't know how I would get at it. Any other ideas?

ZIMG_2810.webp

ZIMG_2813.webp

View attachment 323469
ZIMG_2810.webp
ZIMG_2813.webp
ZZIMG_2814.webp
 
The shear pin/cotter pin affair is forward of that spline coupling area...The winch input shaft is not very long, nor is the end yoke that pins into it.

Clean the end yoke of the PTO shaft off right were it meets up with the winch, and you should see a hole, or a pin with a cotter pin retaining it.

You need to remove that shear pin in the end yoke right at the input shaft of the winch, and then you can remove the bolts that secure the winch to the front frame and slide it up and out.
 
I don't know whether this helps: (Probably turn out too small to see the detail)

PTO1a.webp


This image may be better:

shear pin.webp
PTO1a.webp
shear pin.webp
 
Last edited:
Not sure why your removing radiator support. Never had to do anything from the bib back to remove a PTO winch. Unbolt the winch and just try pull it forward. It should slide off the front splines. If it doesn't slide forward you probably have the same problem I've got with one. The splines are rusted up. If that's the case your going to have to get that spear pin out which right at the back of the winch. My plan for removing the rusted splines if to take the ujoint apart, heat the yolk sticking out thru the frame. Then drive the inner shaft torward the back, hopefully without damaging the yolk. This is on a FJ25 and that outer yolk is very long and makes contact with inner spline for long way compared to the later ones. Anyone have a better idea?
 
No luck yet

Hey guys,

Gary, I like your idea of freeing up the splines with heat and pounding through.

I went and got some long punches and bent one while trying to remove the shear pin. Maybe I will try another long punch.

So my shear pin is still in. I will try again tomorrow. I did unbolt the entire winch and it didn't come out. I also attached a piece of metal plate and tried to hammer it with a heave mallet. It has been soaked in liquid wrench, but still looks like it has become one part.

I was looking at a hydraulic bearing puller and thinking of trying to pull the hangar bearing off and then pull the whole shaft through from the front. I just don't know if it would be able to pull that collar.

I started down the path of trying to separate the u-joint. The clips were pretty rust and just broke off. I'm not sure what to do there, as I've never pulled one apart.

Thanks for all the help, guys. I'll keep figuring.
 
As soon as you get the remaining pieces of the shear pin removed, the winch assembly will pull right off that PTO shaft end yoke.


Heat and beat may end up being your only option.

The u-joints are still available from Toyota, and are not that much money, iirc.


:beer:
 
So what part of the valley do you live in? I'm in the south Peoria area. Could probably give you a hand getting this apart. If you do get the ujoint apart and the winch out of the way I would start soaking the splines with PB blaser. While the ujoint rebuild kit is available the whole ujoint isn't. Be carefull not to destroy it. That's why mine isn't apart yet. I'm not in any hurry to get it out and don't want to hurry only to destroy it. I spray it with PB every once in a while if I remember.
 
got it off with one casualty

Hi Guys,

Thanks for the offer Gary, I'm over at 51 and Greenway. I did get it off today after a little bit of luck.

My morning started heading to ACE to buy some more punches and I was working on that shear pin. I bent a punch. I used small, medium, and big hammers and that sucker didn't budge.

I noticed the back of the yoke looks like it may have been welded or soldered. I'm wondering if that is why the shear pin was so tough.

So I went to plan B. I didn't want to break anything and I thought about trying to pull the hangar bearing or pillow bearing again, but with a different puller.

I removed the dust seal and the snap ring inside the bearing housing and put a big bearing puller on. I soon found out that the bearing housing was made of aluminum and this was a bad plan from the beginning. The bearing housing broke and I cut the remainder from the shaft.

This allowed me to pull the winch with shaft(s) through from the front. In the picture below you can see the flare in the shaft that would make pulling the bearing housing forward impossible.

Also, you can see the splined joint rusted as one. The good news is the spider joint is intact. I'll inspect that a bit more now that I can work on a bench.

I really wish I could have kept all the parts in one piece, but I guess it worked out OK. I spent the next couple of hours clearing the steering and getting a few odds and ends off the frame so it can go to the sand blaster.

I am going to drop the springs and axles once at the blaster so he can get the bottom of the frame real good.

Thanks again, Poser, Living In Past, and Coolerman for your advise. I figured I'd post these pics so people can no what NOT to do. :)

:beer:
IMG_2821.webp
IMG_2827.webp
IMG_2839.webp
 
Hi Guys,

Thanks for the offer Gary, I'm over at 51 and Greenway. I did get it off today after a little bit of luck.

My morning started heading to ACE to buy some more punches and I was working on that shear pin. I bent a punch. I used small, medium, and big hammers and that sucker didn't budge.

I noticed the back of the yoke looks like it may have been welded or soldered. I'm wondering if that is why the shear pin was so tough.

So I went to plan B. I didn't want to break anything and I thought about trying to pull the hangar bearing or pillow bearing again, but with a different puller.

I removed the dust seal and the snap ring inside the bearing housing and put a big bearing puller on. I soon found out that the bearing housing was made of aluminum and this was a bad plan from the beginning. The bearing housing broke and I cut the remainder from the shaft.

This allowed me to pull the winch with shaft(s) through from the front. In the picture below you can see the flare in the shaft that would make pulling the bearing housing forward impossible.

Also, you can see the splined joint rusted as one. The good news is the spider joint is intact. I'll inspect that a bit more now that I can work on a bench.

I really wish I could have kept all the parts in one piece, but I guess it worked out OK. I spent the next couple of hours clearing the steering and getting a few odds and ends off the frame so it can go to the sand blaster.

I am going to drop the springs and axles once at the blaster so he can get the bottom of the frame real good.

Thanks again, Poser, Living In Past, and Coolerman for your advise. I figured I'd post these pics so people can no what NOT to do. :)

:beer:

So why not show us the stubborn shear pin (both ends)?
 
I had the same thing happen to mine recently, the aluminum housing broke when removing. I ended up using a bearing block from an agriculture shop and building different brackets to attach it to the frame.
 
Close ups of both sides of the shear pin

So why not show us the stubborn shear pin (both ends)?

Ask, and ye shall receive. :)

You can see both sides and the solder like mass underneith.

Also, you can see the tools I tried to use on this.

IMG_2850.webp

IMG_2851.webp

IMG_2853.webp
IMG_2850.webp
IMG_2851.webp
IMG_2853.webp
 
I figured I could probably find a bearing block someplace.

I had the same thing happen to mine recently, the aluminum housing broke when removing. I ended up using a bearing block from an agriculture shop and building different brackets to attach it to the frame.

Yes, I agree. The world of PTO devices extends far beyond Toyota landcruisers. I think I should be able to find something that will work just fine, if not find another donor part someplace.

Thank you for the tip. ;)

Oh , BTW, this is the puller kit I used that actually broke the housing.
IMG_2852.webp
 
So someone welded the end yoke to the input shaft of the winch...


Brilliant.

Hahahah! Yeah, that's what I thought too. Well, this is on a rig that had some pretty awesome welds in weird places. They probably sheared the pin a few times and thought to themselves, "I know how to keep THAT from happening again." Doh!

Thank you for the help, Poser.

:beer:
 
So someone welded the end yoke to the input shaft of the winch...


Brilliant.

He he.

No wonder the punches wouldn't work!

That photo is ideally suited to a "Show us the crimes committed by your cruiser's PO" thread.
 
Glad to see you got it off. I was corrected about the Ujoint not being available it looks like it is. Thanks Poser, always like finding out parts are still available. So I guess at this point if your going to keep the winch you can order a new one. then once you get a new Ujoint (always have the part in hand before destroying the old part on these cruisers) you can grind away at the Ujoint so as not to damage the winch input shaft. Looks like your's is the early style with the long splined piece. I bet the replacements are the short style. Probably why Toyota changed the design because the longer one rusted up with lack of use. I'll order a replacement for my frozen one then I tackle the removal of the old one. That way it will just pop apart. Murphy's law, buy a replacement and won't need it:cheers:

I think Poser's comment was right on "BRILLIANT"

The shear pins on The PTO winches always seem to break sooner then they need to. It is very common to find the hole drill out and a case hardened bolt in there. This is the first time I ever heard anybody weld the Ujoint on.:confused:

I still use the shear pins even thought they are weaker than they need to be. While they aren't cheap and a pain to change in their location in bad weather they are still the cheapest piece to replace in the whole winch system. By design there are the "weakest link".:cheers:
 
Last edited:
Back
Top Bottom