In dash USB, on the cheap, in a factory location. It's pretty easy to do and if you take your time, it looks pretty good. Cost less than $20 USD. (Cheaper of you only buy one USB charger and already have epoxy.)
Here's a pic:
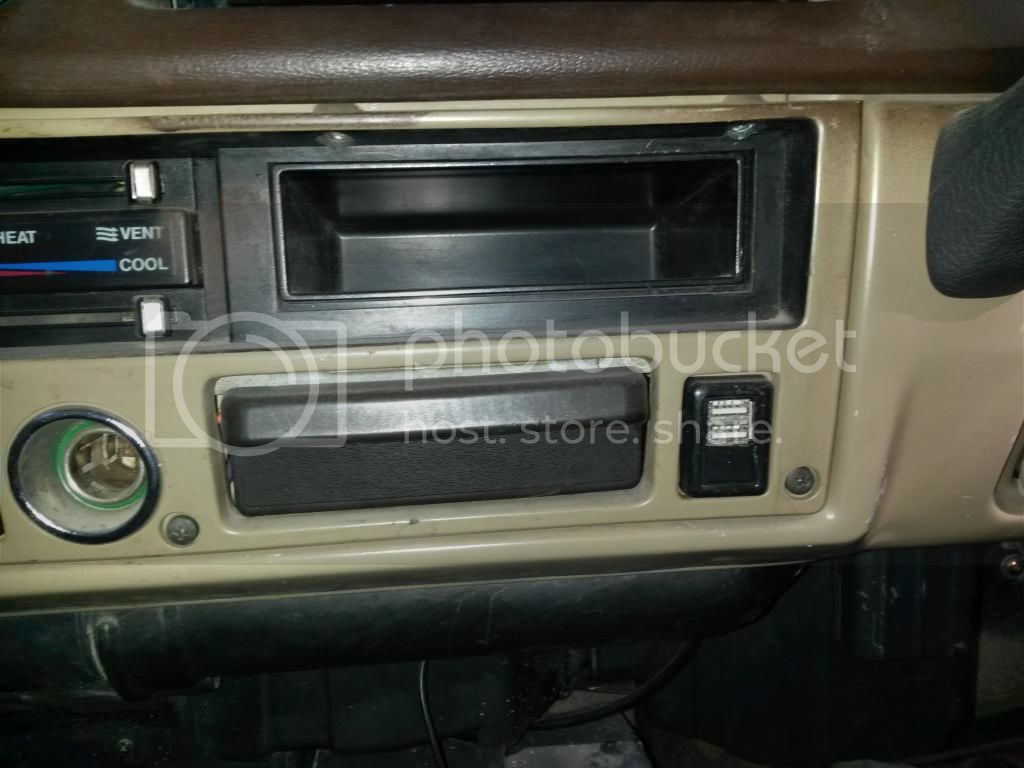
MUD has been so helpful to me I want to give back. Here's what I did to have an in-dash USB socket for my GPS unit and my phone. Using this leaves my cig lighter open for temporary items. I really like that my power cords are far away from the shifter and I don't have to wonder if they will get wrapped around it if I go over bumps.
Items needed:
1. wire
2. Dual USB Car Charger (see photo below)
3. solder iron or gun
4. electrical tape or heatshrink tubing
5. dremel tool set ( I used the cheap HF fake dremel set, on sale for $7)
6. 5 minute epoxy (i used the two part kind that looks like a dual tube syringe with one side clear and the other had a yellowish tint, brand unknown)
7. small zip ties
8. switch hole cover (I don't really know what to call it so I may also refer to it as a switch blank, or a blank switch hole plug)
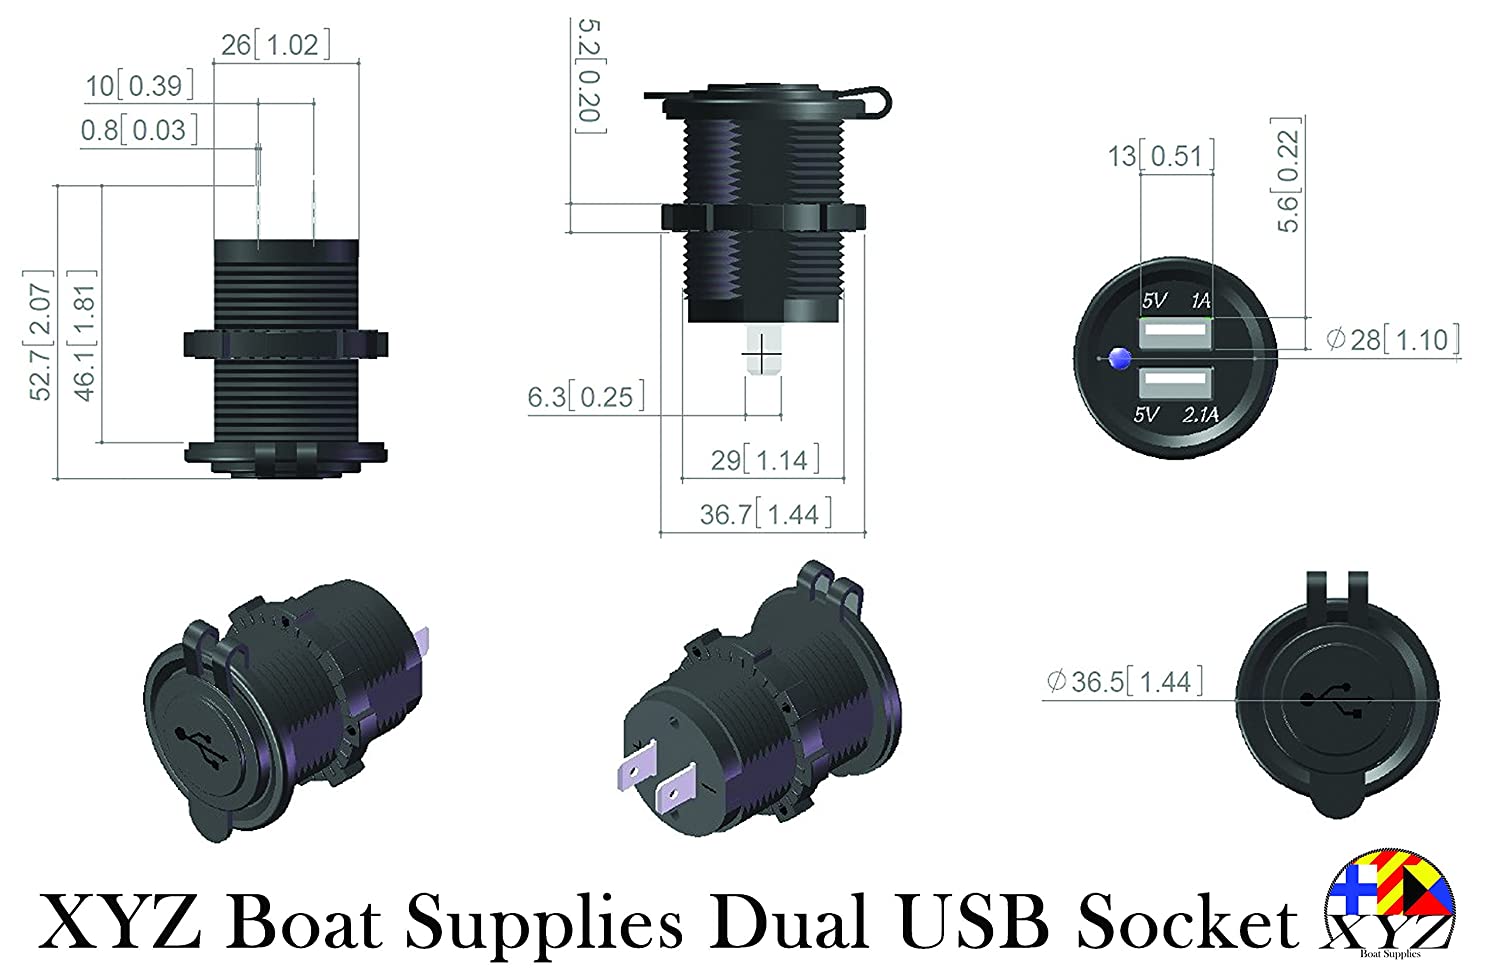
Here's the USB charger I bought. this style worked pretty good for me, I don't know if any other style would work better or worse.

http://www.ebay.com/sch/i.html?&_nkw=Dual+USB+Car+Charger+2.1A+1A
I bought five of these from ebay for $10 USD with free shipping. Looks like the price has gone down since I bought mine. I didn't know if they were decently made or junk, and I didn't know if I'd have to destroy a few before figuring out how to disassemble them properly. I also may put on in my upper and lower consoles.
How to install it:
1. Take apart the "Dual USB Car Charger" and cut the wires going from the power and ground contacts, so the USB sockets and the little circuit board they were mounted to is all that's left. Mark it as you disassemble it so you know which socket carries higher amperage. The front pops off and the two halves pop apart.
2. Solder new longer wires in place of the old ones, you may want to add an inline fuse to the power wire. 10 to 15 inches of each wire should be plenty. Use a different color wire for power and ground and remember which color is which.
3. Remove the entire A/C-heat-fan-ashtray-cubby hole-switch panel.
4. Remove a blank switch hole plug from the panel and cut a square hole in it with a dremel tool. I originally thought I could squeeze two charger boards in it for a total of 4 USB sockets, but after cutting and trial fitting the first Charger, I didn't think two would work well. That's why my sockets are all the way to the top of the switch blank.
5. Try to seal up any corners or holes in the bottom, top and sides of the USB sockets to prevent them from filling with epoxy. If there are holes in the circuit board side of the socket you may have to coat a junk USB cord with oil or something the epoxy won't stick to and leave it plugged into the socket while the epoxy sets up.
6. Trial fit the switch blank and USB sockets together and dremel in any more spots where it's needed. As you are holding them together, have your USB cords that power you electronics close so you can verify they can plug in all the way into the socket and the edge of the switch blank is not blocking it from going in all the way. If you are unsure, you could electrically test it now before you epoxy it.
7. Mix up your epoxy and let it set up just until it starts to act more like jelly (or marmalade for our UK friends). If it's really thin and runny, it's a lot more likely to find it's way inside a socket.
8. epoxy them together. My epoxy started out too runny so I had to continuously change the angle I was holding it to prevent it from filling a socket.
9. After the epoxy has completely set/dried, test each socket by connecting the wires to your battery, check your notes on the wire colors so you don't fry it. If you find a thin layer of epoxy covering the USB contacts in the socket, trim your wife's nail file so it's narrow enough to fit in there and sand away the epoxy.
10. Stick the assembly into the switch hole and solder your wires to the back of the cig lighter socket and cover your connections with heatshrink tubing or electrical tape. Route them so they won't get pinched by the ashtray as it opens and closes. Zip ties can help here.
11. Do a final test of the sockets using the USB cords from your electrical items before you replace the A/C-heat-fan-ashtray-cubby hole-switch panel.
Enjoy!!
FYI: I do all these steps in this format so I have a record what I need to do to make another, and I know I can find it again on MUD no matter what happens to my hard drives or backups. I didn't search before posting this, so I apologize of it's a repeat, I did this months ago.
Here's a pic:
MUD has been so helpful to me I want to give back. Here's what I did to have an in-dash USB socket for my GPS unit and my phone. Using this leaves my cig lighter open for temporary items. I really like that my power cords are far away from the shifter and I don't have to wonder if they will get wrapped around it if I go over bumps.
Items needed:
1. wire
2. Dual USB Car Charger (see photo below)
3. solder iron or gun
4. electrical tape or heatshrink tubing
5. dremel tool set ( I used the cheap HF fake dremel set, on sale for $7)
6. 5 minute epoxy (i used the two part kind that looks like a dual tube syringe with one side clear and the other had a yellowish tint, brand unknown)
7. small zip ties
8. switch hole cover (I don't really know what to call it so I may also refer to it as a switch blank, or a blank switch hole plug)
Here's the USB charger I bought. this style worked pretty good for me, I don't know if any other style would work better or worse.
http://www.ebay.com/sch/i.html?&_nkw=Dual+USB+Car+Charger+2.1A+1A
I bought five of these from ebay for $10 USD with free shipping. Looks like the price has gone down since I bought mine. I didn't know if they were decently made or junk, and I didn't know if I'd have to destroy a few before figuring out how to disassemble them properly. I also may put on in my upper and lower consoles.
How to install it:
1. Take apart the "Dual USB Car Charger" and cut the wires going from the power and ground contacts, so the USB sockets and the little circuit board they were mounted to is all that's left. Mark it as you disassemble it so you know which socket carries higher amperage. The front pops off and the two halves pop apart.
2. Solder new longer wires in place of the old ones, you may want to add an inline fuse to the power wire. 10 to 15 inches of each wire should be plenty. Use a different color wire for power and ground and remember which color is which.
3. Remove the entire A/C-heat-fan-ashtray-cubby hole-switch panel.
4. Remove a blank switch hole plug from the panel and cut a square hole in it with a dremel tool. I originally thought I could squeeze two charger boards in it for a total of 4 USB sockets, but after cutting and trial fitting the first Charger, I didn't think two would work well. That's why my sockets are all the way to the top of the switch blank.
5. Try to seal up any corners or holes in the bottom, top and sides of the USB sockets to prevent them from filling with epoxy. If there are holes in the circuit board side of the socket you may have to coat a junk USB cord with oil or something the epoxy won't stick to and leave it plugged into the socket while the epoxy sets up.
6. Trial fit the switch blank and USB sockets together and dremel in any more spots where it's needed. As you are holding them together, have your USB cords that power you electronics close so you can verify they can plug in all the way into the socket and the edge of the switch blank is not blocking it from going in all the way. If you are unsure, you could electrically test it now before you epoxy it.
7. Mix up your epoxy and let it set up just until it starts to act more like jelly (or marmalade for our UK friends). If it's really thin and runny, it's a lot more likely to find it's way inside a socket.
8. epoxy them together. My epoxy started out too runny so I had to continuously change the angle I was holding it to prevent it from filling a socket.
9. After the epoxy has completely set/dried, test each socket by connecting the wires to your battery, check your notes on the wire colors so you don't fry it. If you find a thin layer of epoxy covering the USB contacts in the socket, trim your wife's nail file so it's narrow enough to fit in there and sand away the epoxy.
10. Stick the assembly into the switch hole and solder your wires to the back of the cig lighter socket and cover your connections with heatshrink tubing or electrical tape. Route them so they won't get pinched by the ashtray as it opens and closes. Zip ties can help here.
11. Do a final test of the sockets using the USB cords from your electrical items before you replace the A/C-heat-fan-ashtray-cubby hole-switch panel.
Enjoy!!
FYI: I do all these steps in this format so I have a record what I need to do to make another, and I know I can find it again on MUD no matter what happens to my hard drives or backups. I didn't search before posting this, so I apologize of it's a repeat, I did this months ago.
")