



Some of you may remember that I once had a homemade drawer system in the back of my 80. During one of the harder wheeling trips, it died... Ever since, I've been trying to come up with a solution to my storage needs. I decided that I didn't need a drawer as there were times were it was a pain to pull it out. I wanted enough room for my hi-lift and chainsaw. I still wanted to use it as a sleeping platform and I needed a way to keep my tools organized. (I hate digging for sockets...) After much planning and ideas being thrown around, I decided that I could make the deck 1/2" taller than ideal for sleeping and it would be the same height as my Craftsman tool box that I have grown to love. That got the wheels spinning even more. Finally, I was bouncing ideas off of Aaron when we realized that we probably had everything that we would need! A couple days later, armed with tools for step #6 and sections of treated 2x12 scrap that Aaron picked up for $.55 each, we were ready to build!
We backed it up to the shop and cleaned the back out.

Next we shuffled the tool box every which way but loose. This took a few Step #6's! We were trying to find the best way to use the space we had. And although it would have been nice to make it so the drawers of the toolbox were accessible without moving the box, it would have been a pain to try and keep the drawers in and tie the box down. This is what we came up with:

Aaron came up with the great idea to build a box for fluids behind the toolbox... So I started there. I was able to find some old deck screws in my Dad's old bolt bin.

I also came up with a backing plate of sorts for the toolbox. This will make double sure that it doesn't move! The angle I used was taken out of my scrap pile.

To give the plywood top some support, we butchered a bed frame and used some more scrap angle to tie the two 2x12s together.
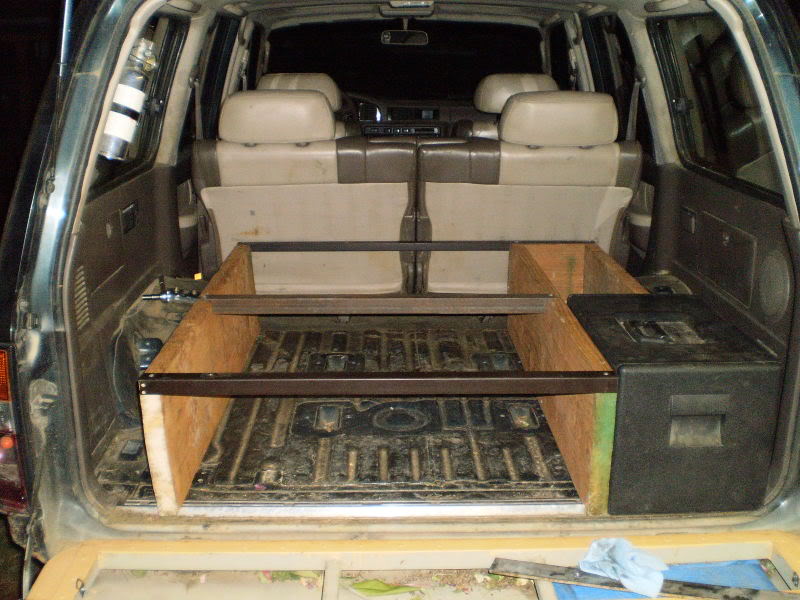
Using some 2-1/4" wide flat bar that was about 3/16" thick and some more angle iron, (both of which were found in the scrap metal pile) we were able to pick up the bolts that used to hold my 3rd row seats down. This was all fabbed up by Aaron.

And this is how it looks without the deck:

I had some old 1/2" plywood lying around that we used for the deck... Secured with screws from the bolt bin...

I even found most of an old, heavy duty piano hinge so that I could make the door to the box. (I love that bolt bin!)

Here it is back in the 80. If you look closely, you can see the piece of scrap angle iron that is holding down the top of the toolbox. There is no wiggle room in that thing! You have to really want it out, but it shouldn't move in a roll.

Here it is! You can see that the top of the deck is almost perfect with the top of the toolbox.

As you can see, the back of the 2nd row keeps the door shut. However, I will probably buy a latch for it. I should probably buy at least one thing for this!

Here is another shot of the main mounting points. I think it's strong enough!

And another shot showing off the cubby hole.

Like I said, I will end up buying a locking latch for the cubby and I have a 1/2 gal of bed liner that I will coat it in. So far the total investment is ... FREE! After the latch and a roller and brush for the bed liner, I may be into it $30... That is if you don’t count the $10.49 for the Step #6 tools! My thanks go out to Aaron for all his hard work. We were up until 5am working on it to get it done in one night. That's a good friend!
We backed it up to the shop and cleaned the back out.
Next we shuffled the tool box every which way but loose. This took a few Step #6's! We were trying to find the best way to use the space we had. And although it would have been nice to make it so the drawers of the toolbox were accessible without moving the box, it would have been a pain to try and keep the drawers in and tie the box down. This is what we came up with:
Aaron came up with the great idea to build a box for fluids behind the toolbox... So I started there. I was able to find some old deck screws in my Dad's old bolt bin.
I also came up with a backing plate of sorts for the toolbox. This will make double sure that it doesn't move! The angle I used was taken out of my scrap pile.
To give the plywood top some support, we butchered a bed frame and used some more scrap angle to tie the two 2x12s together.
Using some 2-1/4" wide flat bar that was about 3/16" thick and some more angle iron, (both of which were found in the scrap metal pile) we were able to pick up the bolts that used to hold my 3rd row seats down. This was all fabbed up by Aaron.
And this is how it looks without the deck:
I had some old 1/2" plywood lying around that we used for the deck... Secured with screws from the bolt bin...
I even found most of an old, heavy duty piano hinge so that I could make the door to the box. (I love that bolt bin!)
Here it is back in the 80. If you look closely, you can see the piece of scrap angle iron that is holding down the top of the toolbox. There is no wiggle room in that thing! You have to really want it out, but it shouldn't move in a roll.
Here it is! You can see that the top of the deck is almost perfect with the top of the toolbox.
As you can see, the back of the 2nd row keeps the door shut. However, I will probably buy a latch for it. I should probably buy at least one thing for this!
Here is another shot of the main mounting points. I think it's strong enough!
And another shot showing off the cubby hole.
Like I said, I will end up buying a locking latch for the cubby and I have a 1/2 gal of bed liner that I will coat it in. So far the total investment is ... FREE! After the latch and a roller and brush for the bed liner, I may be into it $30... That is if you don’t count the $10.49 for the Step #6 tools! My thanks go out to Aaron for all his hard work. We were up until 5am working on it to get it done in one night. That's a good friend!


 didn't you?


