1985 4Runner Build

This site may earn a commission from merchant affiliate
links, including eBay, Amazon, Skimlinks, and others.

Joined
Mar 3, 2014
Threads
7
Messages
325
Location
Houston, TX
Hey everyone. Been floating around for a while, and after some pressure from my land cruiser buds, decided to create an account here. Decided I'd add a build thread while I am at it.

Truck is going on 5 years in my hands (about 3 of actively working on it). Both of us have been through a LOT, so I won't go into detail on the older mods, and eventually update with new stuff as I go. My more detailed build can be found on my website SWDR4x4.com

1985 Runner. Completely stock when I got it, w/ timing chain causing coolant to dump into the oil pan.

DSCF3093.JPG


DSCF2718.JPG


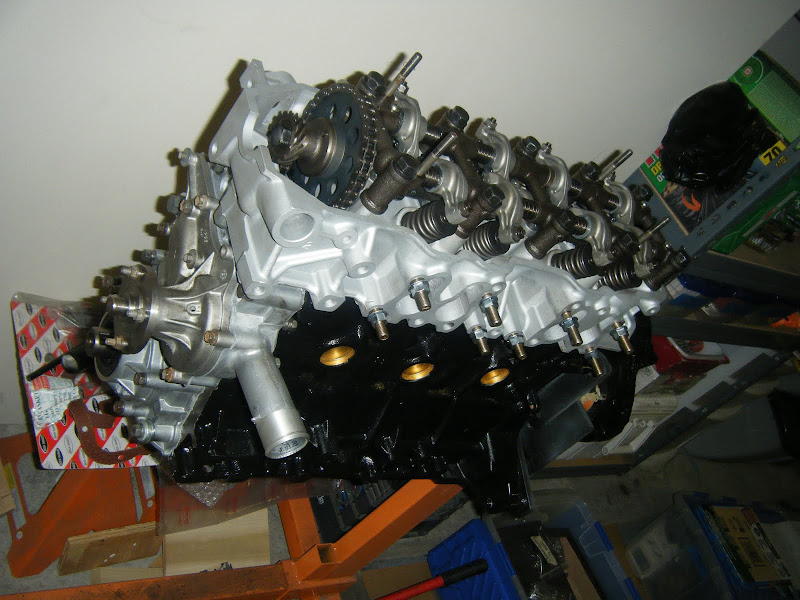
Lots of cleaning, head cleaned and tested, new internals, engine was ready to do another 200k miles

DSCF4924.JPG


DSCF5087.JPG


Dual cases and twin sticks:

DSCF5281.JPG


Sky Manufacturing Skid to protect everything:
DSCF5276.JPG


Time for all the suspension work:
DSCF5320.JPG


DSCF5324.JPG


DSCF5355.JPG


DSCF5501.JPG


2011-11-03_18-38-35_115.jpg


More to come!!
 
Gotta have some way of monitoring the blood line in my motor
DSCF7103.JPG


DSCF7091.JPG


Front shocks being set:
DSCF7163.JPG


First drive.. pretty ugly, and too tall. Glad the springs settled a bit!
2012-01-02_16-11-43_48.jpg


2012-01-08_13-24-44_869.jpg


2012-03-18%252013.00.52.jpg


Beef for the front shaft:
2012-03-31%252019.03.28.jpg


2012-04-01%252014.22.49.jpg


Maiden voyage out to big bend TX
2012-04-15%252019.18.14.jpg


4.88 gears installed and new to me beadlocks:
2012-06-17%252020.21.23.jpg
 
Got a bender to do the fab work on my own
2012-09-18%252021.41.07.jpg


Cut out the rust all over the body, and got it ready for a new look:
2012-11-02%252012.06.00.jpg


2012-11-03%252015.14.17.jpg


2013-03-02+11.22.07.jpg


2013-03-02+16.27.13.jpg


2013-03-02+16.27.01.jpg


Lots of time spent doing this kind of stuff:
2013-03-04+10.23.27.jpg


2013-03-06+21.35.14.jpg


Raptor lines the exterior, and most of the interior:
2013-03-29+15.06.28.jpg


Kid inspecting my work
2012-11-06%252008.08.50.jpg
 
Another trip out to big bend (been doing them yearly for 6 years now)
IMAG1011.jpg


YPb7yf2XaEP3c23uDSr_FXwBZJPkGVb5d4upmc02Lxk.jpg


YAJy_EAmob-rhbYtfDctPKvRxck8qrTC8BNiPpKk1EU%2CArbf2BWry9JUKZlKVp3l1VHDqE1t6JD8Jxq_ufB-iIE.jpg


The reason I go out every year.. our little piece of heaven out in the desert
885154_136578386524674_284758426_o.jpg
 
Finally getting to use my bender:
2013-07-06+14.01.22.jpg


2013-08-11+16.16.51.jpg


Out with the weak:
2013-09-07%252019.58.43.jpg


In with the beef:
2013-09-09%252021.32.09.jpg


2013-09-16%252001.38.58.jpg


2013-09-16%252001.40.06.jpg


How many tube benders can open beers for you? Rogue fab, all the way!
BenderAssembly.jpg
 
Rear disc conversion, using all custom/junkyard parts. Cougar calipers, w/ stock toyota rotors
2013-11-22+15.13.08.jpg


My bench is filled with diff parts.. two e lockers that are in need of some attention before I put them in
2014-01-01+20.32.37.jpg


On board air also needs to be thrown into the rig
2013-12-26+20.14.00.jpg


Out with the old:
2014-03-07+15.11.05.jpg


New Cooper STTs, with the same beadlocks, just modified and cleaned up again:
2014-03-14+16.03.08.jpg


2014-03-21+23.04.39.jpg


And that is where I stand at the moment.. lots on the to do list, but it's been a good truck thus far. I daily drive it, so it's got about 17k miles on the rebuild motor, going strong. Probably taking it on another big bend trip next month (if I finish everything I want to in time)

To do:
-Fix broken motor mount
-New front shackle bushing
-Re-weld exhaust (I removed the plugged cat)
-Set rear bump stops (adjustable)
-E lockers w/ some not electrical goodies.. also a re-gear
-On board air
-All new interior panels
 
Nice job all around!

I'm doing a similar build but keeping a stock suspension for now...
I should have my windshield out tonight, just need to finish cutting the top. Couple questions:
Did you do raptor liner before or after the windshield install?
How hard was it to find a windshield installer that knew what was going on?

Thanks
 
Nice looking build. What did you use to box the front of the frame? I need to do this on my 91 and it looks like you used some square tubing.
 
Nice job all around!

I'm doing a similar build but keeping a stock suspension for now...
I should have my windshield out tonight, just need to finish cutting the top. Couple questions:
Did you do raptor liner before or after the windshield install?
How hard was it to find a windshield installer that knew what was going on?

Thanks

I raptor lined everything after the new windshield was in. It was not too difficult to get someone who knew what I meant on getting rid of the stock trim piece, and replace it with a rubber mold. They did a good job, and no leaks. Just make sure that you really repair the area well, and paint is 100% dry. I used no filler where the windshield was in contact, i just welded in new metal and made sure it was smooth.

Do yourself a favor, and get a good huge tarp to cover everything inside the cab (if you plan on demolishing the winshield like I did). The extremely fine particles of glass get everywhere!! Also, make sure you have a good mask and eye protection, so you keep that stuff out of your lungs and eyes. Good luck!
 
Nice looking build. What did you use to box the front of the frame? I need to do this on my 91 and it looks like you used some square tubing.

It was 2.5" 1/4 wall square tube. Fit right in place, once I got the weak stock crossmember out. Really would have made life easier, had I done that before I installed the front spring hanger. Lesson learned.
 
Back
Top Bottom