I am tired of the lean to the driver side. After all the work i decided to arch my rear left spring and try to get my truck straight.
-
North American Clubhouses - East RegionCA.ON- SOTEC CA.ON- Upper Canada Land Cruisers CA.QC- Club TORQ CA.QC- Quebec Cruisers AL- DixieLand Cruisers AL- Hot South Cruisers FL- Florida Land Cruiser Association FL- Northwest Florida Toyota 4WD FL- Tampa Bay Land Cruiser Association GA- Pavement Pounders GA- Georgia Cruisers GA/FL/AL- Red Hills Land Cruiser Club GA- YOTA IL- Windy City Land Cruisers IN- Hoosier Cruisers IN- Indiana Land Cruisers KY- Kentucky Landcruiser MA/NH- Yankee Toys MI- Lake Michigan Land Cruisers MS- CottonLand Cruisers NC- Olde North State Cruisers NJ- Garden State Land Cruisers NY/CT/MA- FJNortheasters NY- Gotham City Land Cruisers OH- The Buckeye Birfield Syndicate PA- Keystone Cruisers PA- Steel City Land Cruiser Club SC- Palmetto State Land Cruiser Association SC- Upstate Cruisers SC- Swamp Fox Land Cruisers SC- Low Country Land Cruisers TN- Appalachia Cruisers TN- Bluff City Cruisers TN- STLCA VA- Bay to Blue Ridge Cruisers VA- COVA CRUISERS VA/DC/MD- Capital Land Cruiser Club VA/NC- Mid-Atlantic TLCA VA- Star City Land Cruisers VT/NH/MA/ME Acadian Overlanders WI- Land Cruiser Legends WV- Mountaineer Cruisers
-
North American Clubhouses - Central RegionCA.AB- Oil Country Cruisers CA.AB- Rocky Mountain Land Cruiser Association CA.AB- Toyota Ghost Wheelers AR- Razorback Land Cruisers AR/MO- Ozark Mountain Cruisers CO- BookCliff Cruisers CO- Colorado Land Cruisers CO- Derailed Cruisers CO- Rising Sun 4WD Club CO/WY- Horsetooth 4 Wheelers Cruiser Club IA- Tall Corn Cruisers KS/MO- Tornado Alley Cruisers LA- Bayou State Land Cruisers LA- Louisiana Land Krewesers MO- Gateway Cruisers MT- 406 Cruisers MT- Big Sky Cruisers NE- Flat Land Cruisers NM- High Desert Cruisers OK- Green Country Cruisers SD- Dakota Territory Cruisers TX- Alamo City Land Cruisers TX- Bayou City Land Cruisers TX- Lone Star Land Cruisers TX- Lone Star Land Cruisers - Austin Chapter TX- The White Trash of the Elwood Chapter TX- Toyota Trail Riders
-
North American Clubhouses - West RegionCA.BC- Coastal Cruisers CA.BC- Okanagan-Similkameen Land Cruisers CA.BC- Peace Canyon Toyota Swamp Donkeys CA.BC- Calgary Chapter: Swamp Donkeys
CA.BC- Vancouver Island Cruisers AZ- Copper State Cruisers CA- Beach-n-Toys CA- Central Coast Land Cruisers CA- Central Valley Crawlers CA- Gold Country Cruisers CA- Inland Empire Cruisers CA- L.A. County Trailcrew CA- Mountain Transit Authority CA- Pacific Mountain Cruisers CA- San Diego Cruisers CA - Santa Cruz Land Cruisers CA- SoCal 80's CA- Southern California Land Cruisers CA- Toyotally Awesome Cruisers HI- Hawaiian Island Land Cruisers ID- Treasure Valley Land Cruisers NV- Battle Born Cruisers of Northern Nevada NV- Southern Nevada Land Cruisers OR/CA- Jefferson State Cruisers OR- Cascade Cruisers OR- Central Oregon Cruisers OR- Portland Metro Cruisers UT- Red Rock Cruiser Club UT- Wasatch Cruisers WA- Central Washington Cruisers WA- North Sound Cruisers WA- South Sound Cruisers WA- Spokane Land Cruisers
Navigation
Install the app
How to install the app on iOS
Follow along with the video below to see how to install our site as a web app on your home screen.
Note: This feature may not be available in some browsers.
More options
You are using an out of date browser. It may not display this or other websites correctly.
You should upgrade or use an alternative browser.
You should upgrade or use an alternative browser.
TWT -- The Wrenching Thread (15 Viewers)
- Thread starter jfz80
- Start date
This site may earn a commission from merchant affiliate
links, including eBay, Amazon, Skimlinks, and others.
More options
Who Replied?I picked up some lucas assembly lube and coated the cams and caps. It's up on end in the garage. they put a lot of masking tape on the bottom where they trued it up. Said they took off a few thou and it pressure tested clean. they got the valve stem seals in and set the valves to spec. very reasonable on price. Don't know if they cut me a break because I wasn't in a rush, and let them move a few race motors in front of me
.just for a learning moment.... why stand on end instead of flat? the mating surface?
I have some STP cam break in lube you are welcome too even though they arent new or polished.
Picture

jfz80
Cruisin’
- Thread starter
- #2,764
I picked up some lucas assembly lube and coated the cams and caps. It's up on end in the garage. they put a lot of masking tape on the bottom where they trued it up. Said they took off a few thou and it pressure tested clean. they got the valve stem seals in and set the valves to spec. very reasonable on price. Don't know if they cut me a break because I wasn't in a rush, and let them move a few race motors in front of me
.
I think its cause he felt bad for holding it hostage all summer
")
Saw him at breakfast a week or so back and he was embarrassed to still have it. Evidently got way busy past the race season.
Last he told me is that it was gonna be a good bit more than steves cause he didnt realize it was DOHC and lost his ass lol
Can someone tell me or provide a link on how to set up simple bench testing unit for the various electrical components on my rig. Heater blower, carb cooling fan, plugs, etc.....As I take this stuff off I want to verify the working condition or ID any issues I need to address. Thanks
Can someone tell me or provide a link on how to set up simple bench testing unit for the various electrical components on my rig. Heater blower, carb cooling fan, plugs, etc.....As I take this stuff off I want to verify the working condition or ID any issues I need to address. Thanks
Here you go:
https://smile.amazon.com/gp/product/B00NPY02EW
Really! That's all I need? No power source? Thanks
That's the bee's knees!
You do need 12v power into that tool, but the tool should take care of the rest.
NCFJ
Supporting Vendor
Handy tool for sure. You can get it with a multi meter as well. Comes with more wire set ups than you can imagine, enough to go from the battery and work on the tail lights in place on an 80 series with slack in the cables. Nice stuff.
S4Cruiser
SILVER Star
Laying flat for extended periods can allow a head to warp under its own weight. The same goes for cranks.
Well, s***....hopefully I did no harm to my 2f head letting it sit flat for a week or 3.
Crazy how much I learn in this board. If only I spent as much time on a forum related to my day job...id be top of class!!
Done. That solved the problem. I am .5” higher on the driver side but i can live with it. In the worst case, i can gain a couple of lbs.
It took me only 6yrs
Last edited:
Well, s***....hopefully I did no harm to my 2f head letting it sit flat for a week or 3.
Crazy how much I learn in this board. If only I spent as much time on a forum related to my day job...id be top of class!!
Sleep easy and enjoy the ride.
Well, s***....hopefully I did no harm to my 2f head letting it sit flat for a week or 3.
Crazy how much I learn in this board. If only I spent as much time on a forum related to my day job...id be top of class!!
Ignorance is bliss...lather, rinse, repeat
lumbee1
Native American
I took apart my steering box for the 3rd time yesterday and I've gotten so familiar with the process I can pull it from the truck, rebuild it, and reinstall it in 2.5 hours.
My first attempt consisted of looking at pictures online and purchasing the Gates steering box kit from Rockauto. The rebuild took forever but I learned a lot. My mistake was not checking the input shaft play. OEM is 0.15mm. I put my match marks together but didn't realize I was three full turns away from contacting the bearing. I reinstalled the steering box but had 130 degrees of sweep in the steering wheel with no movement in the pittman arm. I tried to clean up the free play with the adjustment nut but it made no difference.
On my second attempt, I pulled the steering box, opened it up, and found I had 4mm of play in the input shaft and valve body. I rotated the preload nut around to the match marks. The problem this time was that I thought the preload on the bearing was too high so I backed it off just a few degrees (maybe 10). I buttoned everything back up again, bled the system, and went for a drive. I was constantly turning the adjustment nut to reduce the dead zone and remove free play in the steering wheel. I couldn't feel the dead zone when parked but driving at speed and straight required a lot of correction from the driver. I was turning the adjustment screw a little too low for comfort and knew I had to open up the steering box again. It took me 6 hours from uninstall to reinstall on this attempt.
3rd and final attempt. Pulled the steering box and opened it enough to get to the preload nut. I put the preload nut and lock ring back to the original match marks like I should have done. Reassembled and reinstalled. The adjustment screw is currently higher and there's approximately 50mm of play but the mysterious dead zone I had before is gone.
There are two different ways the steering wheel can have a dead zone or free play and each feels very different than the other.
- Like before, if the preload nut is not tightened down to the match marks, there is no amount of tightening the adjustment nut that will make the dead zone go away. This dead zone is much harder to detect and correct. It is more of a feeling you get in the steering wheel when driving. The steering feels tight but wanders slightly on straight roads. We drove the Cruiser to the Christmas party like this and I didn't have a lot of confidence with the steering.
- If the preload is correct, then the other dead zone is reduced through the steering box adjustment screw. This dead zone has a cleaned defined edges in the steering wheel feel and while it requires a lot of correction when driving, the Cruiser behaves very differently and is much easier to control. The dead zone feeling is the gap between the input shaft teeth and the sector shaft teeth. Adjusting the screw down pushes the teeth closer together reducing the gap and tightening the steering feel.
Reference
Steering gear box rebuild
There's a lot of gaps in the documentation but it is still very helpful.
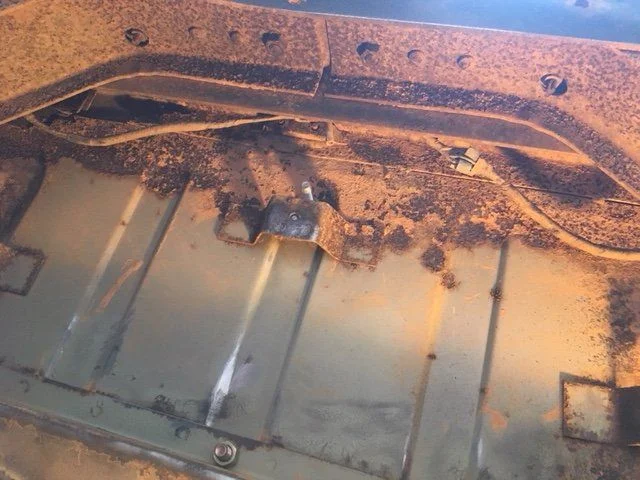
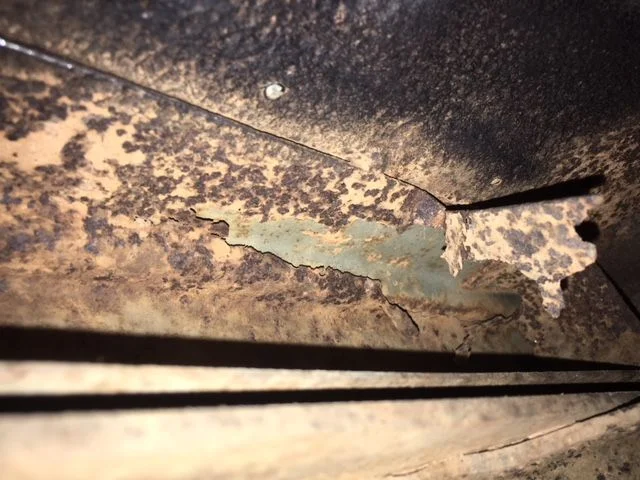
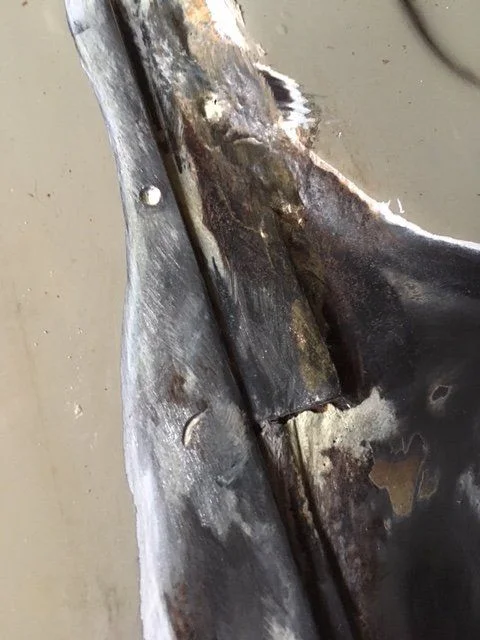
While awaiting the trimming of the POs prior custom drive shaft back to stock length, I decided to tackle a bit of the underbody rust today with the cup brush, angle grinder and patience. I was pleasantly surprised to find that 3/4 of what I thought was rust was actually crusted clay on top of black rubberized underbody spray that was peeling; however turns out from the bottom much of the rear sill is custom as well. To his credit he did tell me that the first owner told him he did the bottoms of the doors, a spot under the drivers pedals and he thought something to the rear sill. From what I can tell so far they just replaced new metal atop the old because after grinding away a glob of bondo where the rear sill meets the rear floor turns out to be just sandwiched metal with a few beads of welding. Made for a fun afternoon while I couldn't drive it anywhere. Always wanted to learn mig welding, guess now's my chance.
Gave my 40 a much needed face lift as my Christmas present to myself... finally hacked off the custom air restricting stadium seating style winch bimper and swapped in a new Oem bumper I bought from @tgadd several months ago.
Btw this process has taken me three days since the PO put this bumper on with no intention of it ever coming off... The weld beads were meaty as was his choice of steel supplies.
Today I salvaged the triangle brackets(kind of) and wire wheeled the sheet out of the front rails and hit it with some rust converter before installation.
I have dreams of welding a winch plate behind this bumper for my old pre-8274 warn (aka bell view or warn 5600) similar to how @Kayaker has his set up. But for now I will just bask in the glory of having a shiny part with a red and white Toyota sticker on my basket case of a rig.
The after - thankful for the guidance from @roadstr6 @fj40alex @Roxx @Rice @NCFJ @JohnVee
Btw why are ther so many holes, and even more bizarre is that there isn't any symmetry. Fog lights and license plate holder are the only factory add ons I can think of.

The before
In process
Btw this process has taken me three days since the PO put this bumper on with no intention of it ever coming off... The weld beads were meaty as was his choice of steel supplies.
Today I salvaged the triangle brackets(kind of) and wire wheeled the sheet out of the front rails and hit it with some rust converter before installation.
I have dreams of welding a winch plate behind this bumper for my old pre-8274 warn (aka bell view or warn 5600) similar to how @Kayaker has his set up. But for now I will just bask in the glory of having a shiny part with a red and white Toyota sticker on my basket case of a rig.
The after - thankful for the guidance from @roadstr6 @fj40alex @Roxx @Rice @NCFJ @JohnVee
Btw why are ther so many holes, and even more bizarre is that there isn't any symmetry. Fog lights and license plate holder are the only factory add ons I can think of.
The before
In process
S4Cruiser
SILVER Star
Gave my 40 a much needed face lift as my Christmas present to myself... finally hacked off the custom air restricting stadium seating style winch bimper and swapped in a new Oem bumper I bought from @tgadd several months ago.
Btw this process has taken me three days since the PO put this bumper on with no intention of it ever coming off... The weld beads were meaty as was his choice of steel supplies.
Today I salvaged the triangle brackets(kind of) and wire wheeled the sheet out of the front rails and hit it with some rust converter before installation.
I have dreams of welding a winch plate behind this bumper for my old pre-8274 warn (aka bell view or warn 5600) similar to how @Kayaker has his set up. But for now I will just bask in the glory of having a shiny part with a red and white Toyota sticker on my basket case of a rig.
The after - thankful for the guidance from @roadstr6 @fj40alex @Roxx @Rice @NCFJ @JohnVee
Btw why are ther so many holes, and even more bizarre is that there isn't any symmetry. Fog lights and license plate holder are the only factory add ons I can think of.
View attachment 1599716
The before
View attachment 1599715
In process
View attachment 1599713 View attachment 1599714
Very nice! That is odd how many extra holes there are. I'm picking up a new oem bumper one day next week and it'll be interesting if there are the same extra ones.
Btw, the triangle gussets are still available new. 52116-60010 $22.66 each from FAT.
NCFJ
Supporting Vendor
Looking like somebody cares!! Good job 
NCFJ
Supporting Vendor
This just never gets old, I love these old trucks


Similar threads
- Replies
- 0
- Views
- 301
Users who are viewing this thread
Total: 16 (members: 0, guests: 16)