Timing belt and hoses, 2000 Land Cruiser (1 Viewer)

This site may earn a commission from merchant affiliate
links, including eBay, Amazon, Skimlinks, and others.

Les Summer

SILVER Star
Joined
Apr 16, 2023
Threads
19
Messages
231
Location
Baltimore, MD
I recently acquired a 2000 series Land Cruiser. The CarFax shows my water pump being done at 230k, and the truck currently has 260k. The last time the timing belt was done according to the CarFax was around 90k. The water pump has been done 3 times, so I can't understand why there is no indication of the timing belt getting done either of the last two times the water pump was done. Why would anyone have all that work done, and not just replace the timing belt while you are already in there.

Anyway, I checked it out today. Looks ok to me, but I'm not a professional mechanic, so there is probably more that needs to be seen to tell if the belt is still plenty good or not. I didn't have the nerve to pull the timing cover back any further, because I didn't want to break it. Any input here would be appreciated. Thanks. Lester.

tempImagePqBjMr.png
 
I see the arrow marks on the belt, looks not very old. If the belt is OEM, trust me those lasts easy 15 years/ 150K miles, non OEM, I'd say 75K miles and every 5-7 years. Try rotating the crank and check for the make of the belt. Those arrows are (from my faint memory) does not look OEM.
OEM is TOYOTA and MITSUBOSHI (both will be printed), A reliable aftermarket is MITSUBOSHI. I had a Gates belt installed on my corolla and at 50 K miles, the belt had decent amount of cracks!
 
The number one reason IMO that maintenance is backlogged or done improperly on many older 100's is that many new owners bought it because of its "worlds most reliable SUV" notoriety - not because they planned to get hit with big maintenance bills. So as the repairs roll in they are surprised (or unprepared) and choose to find a shop that will do it for less (almost always = wrong); or to do less of the recommended work. In the above situation the previous owner could have been reactionary to maintenance and just done the water pumps when they started leaking, or the technician wasn't knowledgeable about Toyotas, or any number of other reasons. That being said a shop familiar with this job is not going to crack into it without having the parts needed to get it back up and running; and the parts just aren't that expensive for this job.

That belt doesn't look like a belt with 30k on it, I'll say that much. Does it look bad? No, not really. But it doesn't have OEM markings and an OEM Toyota belt with only 30k on it will look almost brand new. I have replaced a few 2UZ timing belts as a full job including lots of other accessories, and only one of them had a Toyota timing belt where I thought the belt would be the eventual cause of the systems failure. This includes timing belt jobs where almost 200k were on the original parts (including original water pump). Every job I've done (including those done by some "Asian Specialist Shops" have skimped on pulleys or have done things incorrectly, including using inferior aftermarket parts that do not hold up over time. I'm not saying I always do it all right, but I am saying that I catch the results of those that SHOULD have done it right after the fact.

In this situation I would just keep driving it on this belt without too much of a worry and collect the parts to do visit the timing system with a full refresh so that you know where things stand. Depending on how long you want to keep it.
 
Last edited:
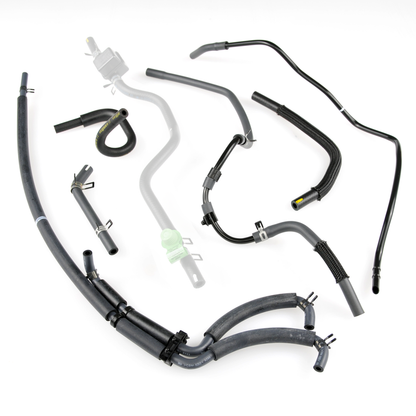
Looks like I need to replace some hoses on the top the engine soon. I just acquired this very beautiful 2000 Land Cruiser with 260k miles, and I want to freshen things up, but first I need to get the names of these hoses. Thanks to anyone willing to help try to identify these. Les.

tempImageGyxucB.png


tempImageQWRtXq.png


tempImagej6BRCR.png


tempImageFflS4C.png
 
The number one reason IMO that maintenance is backlogged or done improperly on many older 100's is that many new owners bought it because of its "worlds most reliable SUV" notoriety - not because they planned to get hit with big maintenance bills. So as the repairs roll in they are surprised (or unprepared) and choose to find a shop that will do it for less (almost always = wrong); or to do less of the recommended work. In the above situation the previous owner could have been reactionary to maintenance and just done the water pumps when they started leaking, or the technician wasn't knowledgeable about Toyotas, or any number of other reasons. That being said a shop familiar with this job is not going to crack into it without having the parts needed to get it back up and running; and the parts just aren't that expensive for this job.

That belt doesn't look like a belt with 30k on it, I'll say that much. Does it look bad? No, not really. But it doesn't have OEM markings and an OEM Toyota belt with only 30k on it will look almost brand new. I have replaced a few 2UZ timing belts as a full job including lots of other accessories, and only one of them had a Toyota timing belt where I thought the belt would be the eventual cause of the systems failure. This includes timing belt jobs where almost 200k were on the original parts (including original water pump). That being said, every job I've done (including those done by some "Asian Specialist Shops" have skimped on pulleys or have done things incorrectly, including using inferior aftermarket parts that do not hold up over time. I'm not saying I always do it all right, but I am saying that I catch the results of those that SHOULD have done it right after the fact.

In this situation I would just keep driving it on this belt without too much of a worry and collect the parts to do visit the timing system with a full refresh so that you know where things stand. Depending on how long you want to keep it.
Thank you, and you make good sense. I plan to do just this, and I'm going with ALL TOYOTA parts. I love the truck... I plan to keep it until I die🍒. 🙂
 
Thank you, and you make good sense. I plan to do just this, and I'm going with ALL TOYOTA parts. I love the truck... I plan to keep it until I die🍒. 🙂
The really good news for you as well based on your area is that if you don't want to do all of this work yourself, OTRAMM is down the road in Bealeton Virginia and is one of the foremost experts on this platform. They produce some of the most referenced videos on the 2UZ motor on Youtube for example.
 
The really good news for you as well based on your area is that if you don't want to do all of this work yourself, OTRAMM is down the road in Bealeton Virginia and is one of the foremost experts on this platform. They produce some of the most referenced videos on the 2UZ motor on Youtube for example.
I've recently watched two of his videos on the timing belt process from start to finish. I might consider doing the job myself. I might consider letting the expert do it. It's a tough call. Lucky for me, my truck has ZERO rust. I got it from Alabama. I just did all the gear oils today, and nothing was seized at all. I got lucky, even though the miles are very high.
 
All the parts you are pointing at are still available form Partsouq.com. I'd also do the PCV valve and the hose.

The hose from the charcoal canister to intake manifold (house between the solenoid and canister): the remainder of the hose shown in 2nd pic in post-4 is now available, so I ended up using a hose form a 3rd gen 4runner. Had to cut but all fits well!
 
Looks like I need to replace some hoses on the top the engine soon. I just acquired this very beautiful 2000 Land Cruiser with 260k miles, and I want to freshen things up, but first I need to get the names of these hoses. Thanks to anyone willing to help try to identify these. Les.

View attachment 3310772

View attachment 3310774

View attachment 3310775

View attachment 3310776

I haven't kept up on how the sellers customer service is lately but that should cover most of the commonly replaced hoses on the top end. Looks like reference parts numbers are there.

Additionally, you can buy high quality vacuum hose by the foot from many of the euro/import performance shops as well if you want to save some money. The vane pumps idle up hoses are pretty unique though and have sharp turns so I'd use OEM there.

If you pull the air intake box you will find several more hoses under there and they are likely cracked.
 
Last edited:
I watched the OTRAMM videos again. I took notes, and thought it would be useful to post them here for anyone who might attempt doing the timing belt job on their LC. I can't promise accuracy on my notes. The grammar is crude. I made these notes for when I attempt to do this... Looks like the tough parts are going to be removing the crank pulley, removing the water pump without damaging, and removing the fan bracket. Of course you are going to have to acquire a manual to see how to properly remove your timing belt too, so you don't destroy your engine. All in all, great videos by OTRAMM. It would probably be best to follow along my notes and watch his video at the same time if you plan to use these notes. Or you can copy paste them to your own word sheet, and modify them to make them better.

Land Cruiser Timing Belt Job


Disconnect battery

Take off fan:

Long 12mm box wrench

Pry bar

Long 14 wrench ratchet to take tension off tensioner and remove serpentine belt

Take pulley off where fan was

Take off hose that connects to upper water outlet, throttle body, oil cooler. Need 10mm socket

3 12mm nuts to remove thermostat housing, wiggle carefully

Remove idler pulley 14mm bolt

Remove passenger timing cover 10mm acorn nut and bolts

Power steering pump by removing 3 14mm nuts, swing pump to the side out of the way

Remove alternator 14mm nut, 14mm bolt (lower 14mm bolt likes to seize and break off, be careful)

Take off upper plastic timing cover x2 12mm bolts

Take off tensioner x2 12mm nuts and x1 12mm bolt

Unplug cam position sensor and remove grommet and set aside

Remove x4 10mm bolts to remove driver’s side cam cover

Remove x2 AC bolts in front, and only loosen x1 in the rear by oil dipstick to get out the fan bracket. Use angled ratchet with extension

Fan Bracket: 12mm nut off top and 12mm long bolt, plus x1 14mm nut above ac compressor and x1 14mm bolt down below. Unplug ac compressor, bend metal tab back and wiring bracket bend back to snake out the fan bracket.


Turn crank to get crank mark to line up with zero. The cam marks should line up with the corresponding lines (not the T’s), and if they don’t, then do another revolution of the crank so they do.

Apply crank holding tool this should thread into 2 holes in front of crank.

Check alignment.

May need harmonic balance removal tool to get crank pulley off. Use penetrating oil in center of pulley before trying to take off.

Remove x4 10mm bolts and remove cover around crank pulley.

Remove timing sensor wheel (BE DELICATE) wiggle out. Ditched MUST FACE you when you reinstall it.

Remove triangle between water pump.

Loosen hydraulic tensioner it’s x2 12mm bolts, remove evenly to back off pressure.

Remove pulley 14mm

10mm hex key and loosen tensioner pulley. Don’t lose the washer.

Remove cog pulley that was under crank pulley.

Remove cam trigger. Stud goes in lower hole.

Remove water pump x2 10mm studs. Place bolts and studs in new water pump.


INSTALL

Install water pump. Scrape and scuff old residue before installing new water pump. Make sure gasket fits on alignment dowel. Put O ring on coolant pipe. Use silicone grease for coolant pipe O ring. Slide on water pump and make sure it’s seated. Add nuts and bolts.

See video #3 at 8:45. Two of the water pump bolts are 12 ft. Lbs. all the others are 15 ft. lbs.

Install idler pulley 14mm socket. Make sure it tightens up straight. Torque 25 ft. lbs.

Install tensioner pulley. Torque 25 ft. Lbs.

Put mouse cover plate back in and tuck wire back into groove.

Start putting belt on. Crank front lines up with dot on crank pulley. Key way and bolt holes. Left cam will face your right hand. Right cam will face your left hand.

Adjust cams as needed to line up with marks on belt.

Install hydraulic tensioner bolts evenly and to 19 ft. Lbs.

Double check everything then pull pin from tensioner to put tension on the belt.

Put on timing while, line up with key way, and put on so ditch is pointing out. Install lower timing cover.

Put on damper pulley and line up with key way. Double check timing is all good by doing 2 revolutions on the crank. Torque up to 181 ft.lbs. using crank holding tool.

Install serpentine belt tensioner. 12mm bolt on bottom and 2 nuts at top. (Make sure the nuts are not the serrated ones) torque to 12 ft. Lbs.

Install alternator. 14mm bolt and 14mm nut. Torque to just snug up.

Install power steering pump. 14mm bolts. Torque to 13 ft. Lbs.

Tuck wiring back in grooves and place fan bracket on studs. Install long 14mm bolt and 14mm nut, then a long 12mm bolt and 12mm nut (see video at 26:25) 12 ft. Lbs. on 12mm and 24 ft. Lbs. on the 14mm.

Bend back bracket on ac compressor and snap ac wiring back on. Then bolt the ac back together. Torque to 36 ft. Lbs.

Install cam position sensor. Snug up. 10mm deep socket.

Install belt cover and fish in cam sensor wire. Hook wire in clip. Put grommet back in. Install x4 10mm cover bolts.

Install center cover. Torque 12ft. Lbs.

Install right timing cover. 3 bolts and 1 nut. Snug up.

Install water outlet. Put on new O ring and install new sealer. Remove old with a screwdriver.

Degrease water outlet and water pump side also. Get proper sealer for your water pump. Torque water outlet down to 15ft. Lbs. use bolts to guide it on so you don’t smear sealer.

Install water outlet pipe.

Install idler pulley to 27 ft. Lbs.

Install thermostat nipple going straight up. Torque 12ft. Lbs.

Put fan on and serpentine belt back on.
 
Nice write up. Thanks for doing it. I’ll be doing my timing belt in the next few weeks. It’s helpful
 

Users who are viewing this thread

Back
Top Bottom