Navigation
Install the app
How to install the app on iOS
Follow along with the video below to see how to install our site as a web app on your home screen.
Note: This feature may not be available in some browsers.
More options
You are using an out of date browser. It may not display this or other websites correctly.
You should upgrade or use an alternative browser.
You should upgrade or use an alternative browser.
This site may earn a commission from merchant affiliate
links, including eBay, Amazon, Skimlinks, and others.
More options
Who Replied?- Thread starter
- #23
I've gotten a few questions about how I bent this bracket...here's the method that works for me. Different brakes might be able to do things differently. Mine is a box and pan brake with removable fingers, very similar to this stolen-from-the-internet picture:

In this case, I needed to remove just one finger section, exact position doesn't matter. I also had to remove the angle iron stiffener on the front. Then follow the bend order in this diagram:
http://s87.photobucket.com/user/cbwhitmore/media/Cruiser%20stuff/Sub%20Bracket%20Bend%20order_zpsygzgphyz.png.html] [/URL]
Bends #2 and #5 are around 70 degrees, (to match the gusset that gets welded in) #7 is more like 20-30 degrees. I didn't measure or mark the bend location for #7, I just did that by hand when fitting it into place. The rest are 90 degree bends.
Bends #1, 2, 3 all bend "down" when you're viewing the piece as it's oriented in the drawing. So the piece of metal will be in the brake with the back side facing up. Then #4, 5, and 6 bend "up", so flip the piece over so the front side is up to complete them. Bend #7 is much easier and less critical, so I did it in the vehicle with hand tools.
After bending, the only remaining step is to weld in the gusset--make sure it's all the way out to the edge so it doesn't interfere with the subwoofer box...I only gave it like 1/4" of space. (if using the same Rockford Fosgate box I did) Test-fit and fine tune the bends if needed to make the holes line up, paint and finish as desired.
Final step is to post pictures here of what you did.

In this case, I needed to remove just one finger section, exact position doesn't matter. I also had to remove the angle iron stiffener on the front. Then follow the bend order in this diagram:
http://s87.photobucket.com/user/cbwhitmore/media/Cruiser%20stuff/Sub%20Bracket%20Bend%20order_zpsygzgphyz.png.html]
 [/URL]
Bends #2 and #5 are around 70 degrees, (to match the gusset that gets welded in) #7 is more like 20-30 degrees. I didn't measure or mark the bend location for #7, I just did that by hand when fitting it into place. The rest are 90 degree bends.
Bends #1, 2, 3 all bend "down" when you're viewing the piece as it's oriented in the drawing. So the piece of metal will be in the brake with the back side facing up. Then #4, 5, and 6 bend "up", so flip the piece over so the front side is up to complete them. Bend #7 is much easier and less critical, so I did it in the vehicle with hand tools.
After bending, the only remaining step is to weld in the gusset--make sure it's all the way out to the edge so it doesn't interfere with the subwoofer box...I only gave it like 1/4" of space. (if using the same Rockford Fosgate box I did) Test-fit and fine tune the bends if needed to make the holes line up, paint and finish as desired.
Final step is to post pictures here of what you did.
Thank you for this write up! I did this today- not as slick as yours- I did the bends on my work bench- but it came out ok! And sounds a lot better than it did before.


Super cool. I used the Whole Hog bracket as a starting point on two LC's with a Kicker Sub. Fiberglassed box around an 8" in each. Kicker FTW.
- Thread starter
- #27
Thank you for this write up! I did this today- not as slick as yours- I did the bends on my work bench- but it came out ok! And sounds a lot better than it did before.
Looks good! Once the panel is back on, it doesn't really matter anyway...as long as the sound is there.
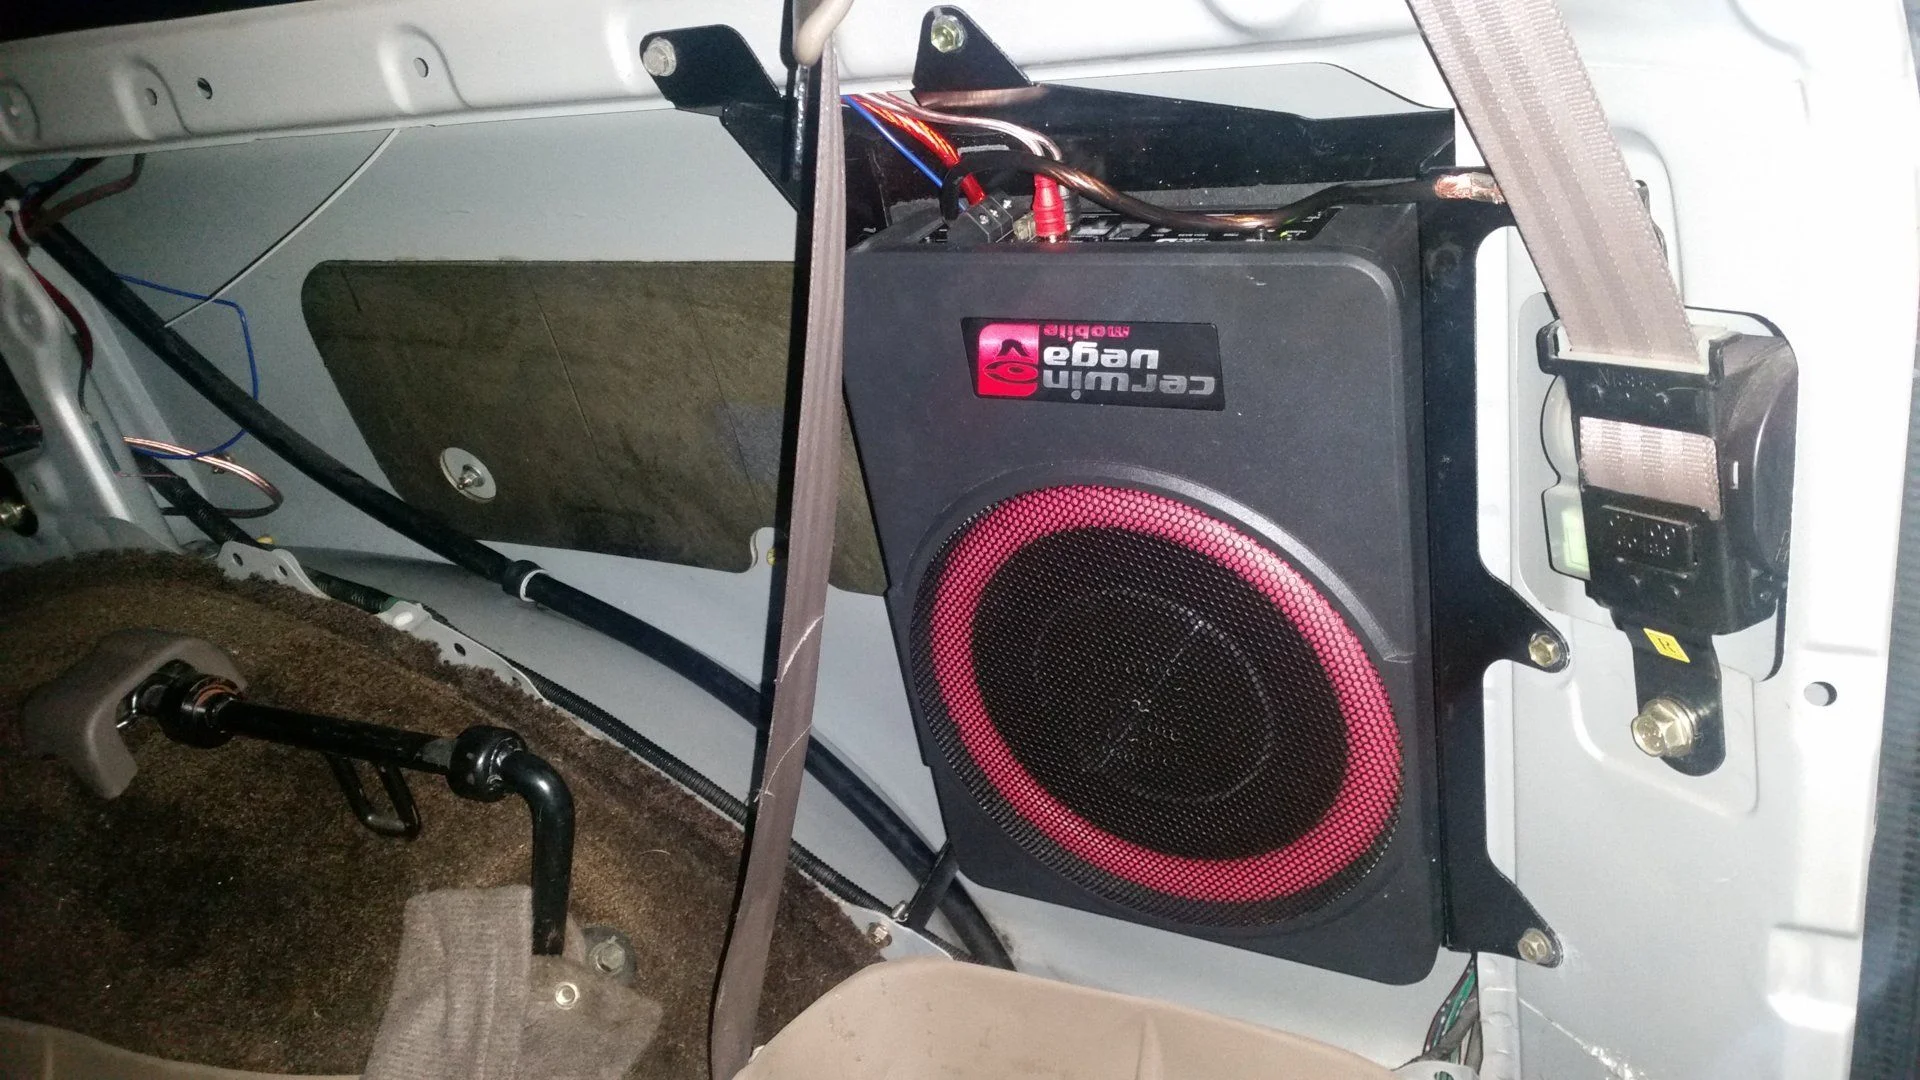
Finally got around to using the bracket I got from I Lean (thanks again) to install a Cerwin Vega Vpas10 in the stock 80 sub location. Went with this one due to my past experience with Vega subs and the 10" speaker size. Worked perfect.
Hey @Haspin FJ, I got @I Lean's bracket too but haven't gotten around to installing it.
Does the Cerwin Vega (it's 5" deep, right?) allow the plastic body panel to fit over it???
Does the Cerwin Vega (it's 5" deep, right?) allow the plastic body panel to fit over it???
I'd have to take a measurement but I'd say it's less then 5 inches in depth. Not as deep as the bracket itself. Panel fits over it just fine. The mounting points from the speaker to the bracket were a little tricky but able to be worked out. I mounted it upside down to more easily be able to access the controls and keep the electonics out of the water longer if I ever get stuck submerged.Hey @Haspin FJ, I got @I Lean's bracket too but haven't gotten around to installing it.
Does the Cerwin Vega (it's 5" deep, right?) allow the plastic body panel to fit over it???
Last edited:
Would you mind sending me that dxf file as well. Your inbox is full so let me know how you want to get my email address
Thanks
Thanks
I've gotten a few questions about how I bent this bracket...here's the method that works for me. Different brakes might be able to do things differently. Mine is a box and pan brake with removable fingers, very similar to this stolen-from-the-internet picture:

In this case, I needed to remove just one finger section, exact position doesn't matter. I also had to remove the angle iron stiffener on the front. Then follow the bend order in this diagram:
http://s87.photobucket.com/user/cbwhitmore/media/Cruiser%20stuff/Sub%20Bracket%20Bend%20order_zpsygzgphyz.png.html][/URL]
Bends #2 and #5 are around 70 degrees, (to match the gusset that gets welded in) #7 is more like 20-30 degrees. I didn't measure or mark the bend location for #7, I just did that by hand when fitting it into place. The rest are 90 degree bends.
Bends #1, 2, 3 all bend "down" when you're viewing the piece as it's oriented in the drawing. So the piece of metal will be in the brake with the back side facing up. Then #4, 5, and 6 bend "up", so flip the piece over so the front side is up to complete them. Bend #7 is much easier and less critical, so I did it in the vehicle with hand tools.
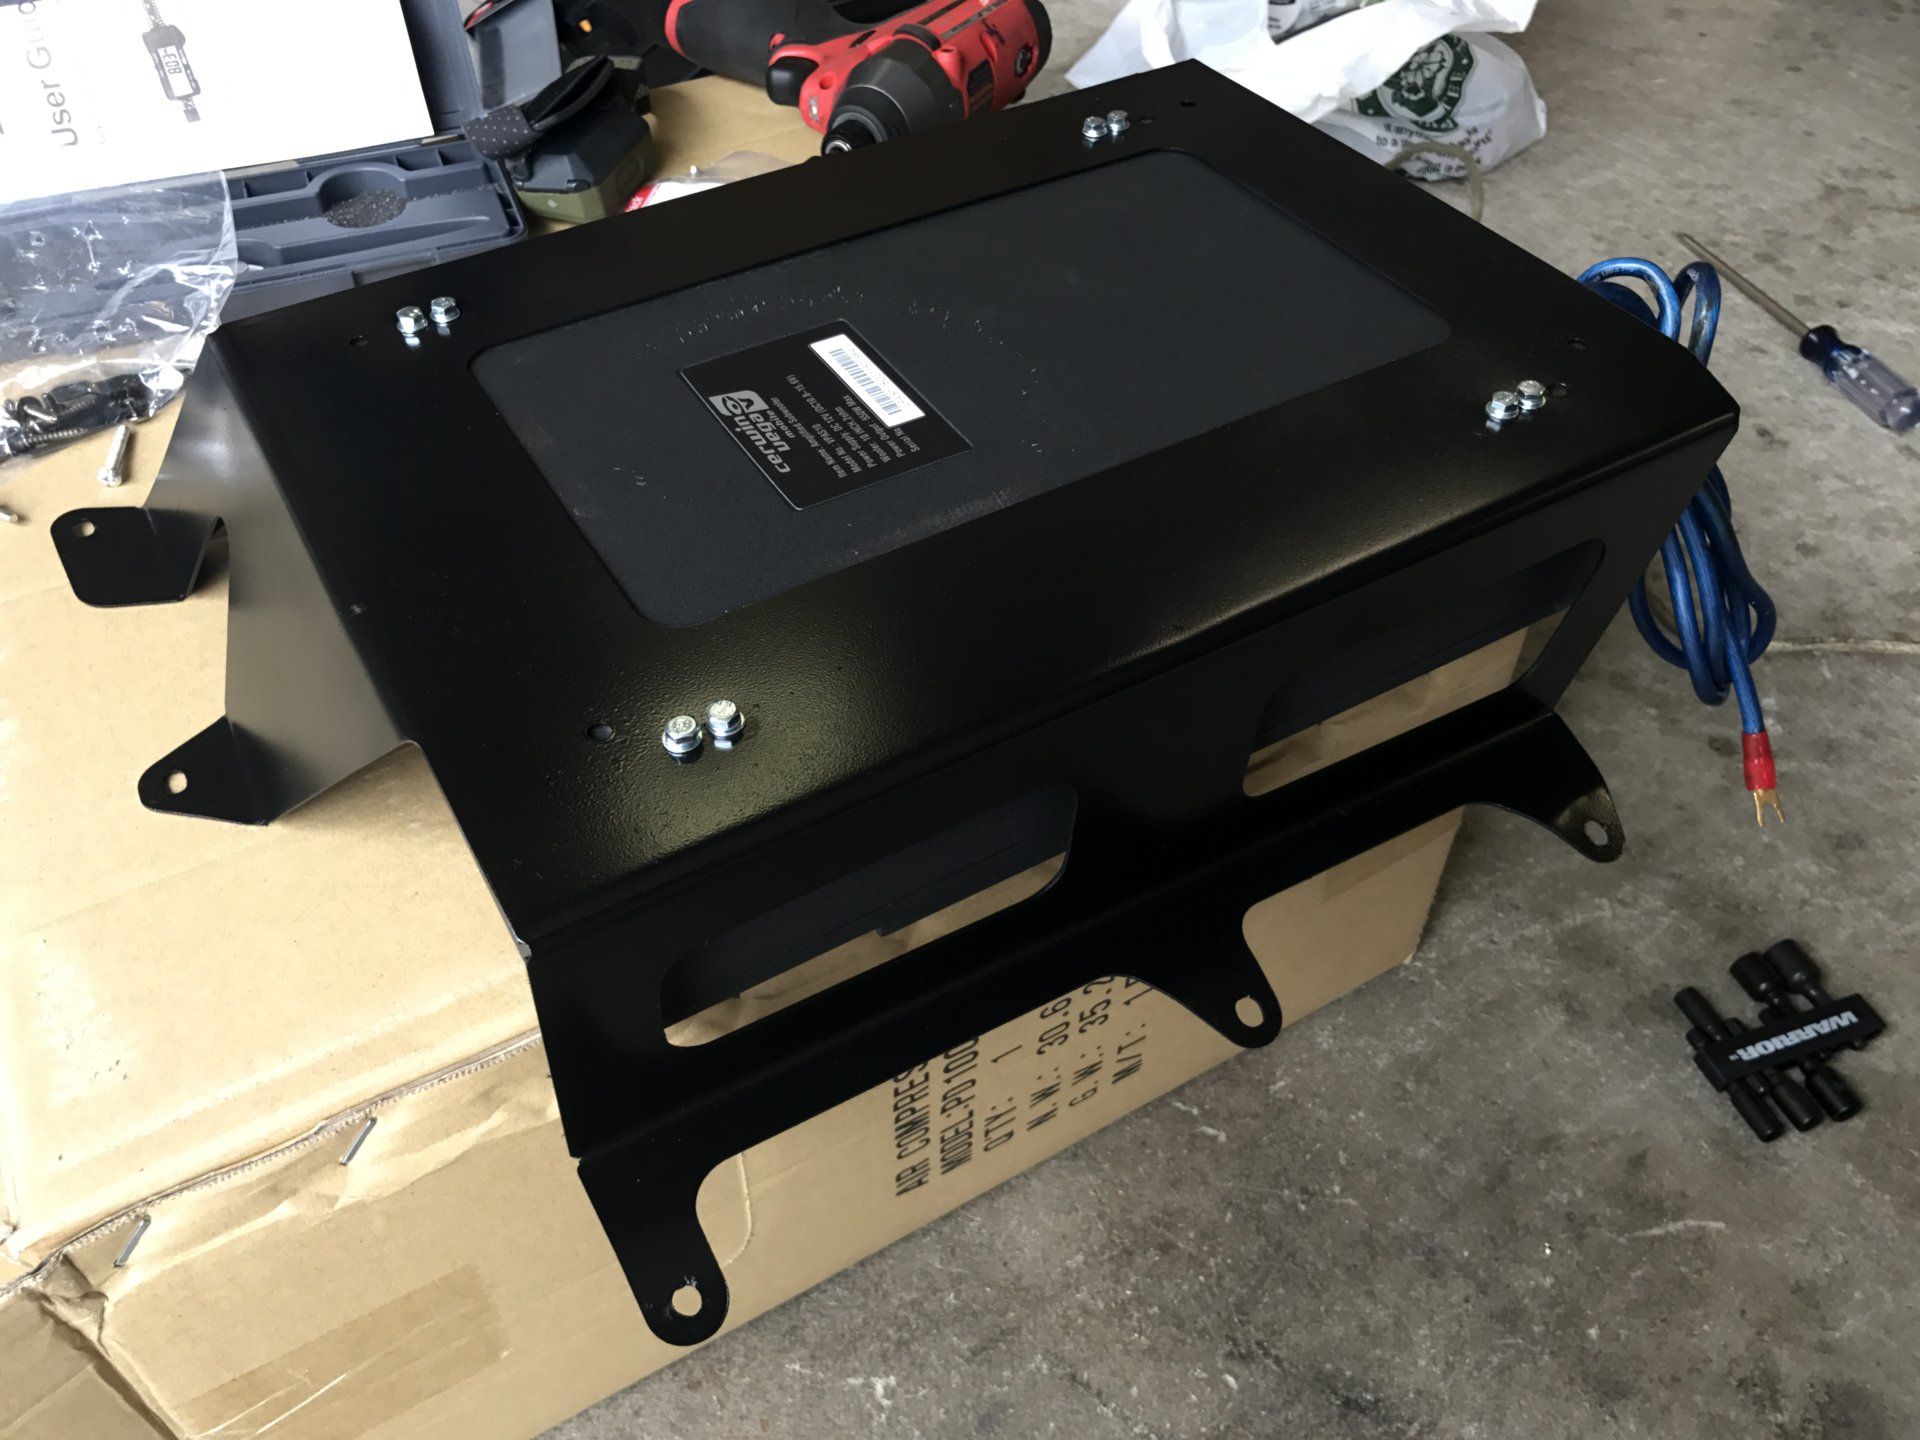
After bending, the only remaining step is to weld in the gusset--make sure it's all the way out to the edge so it doesn't interfere with the subwoofer box...I only gave it like 1/4" of space. (if using the same Rockford Fosgate box I did) Test-fit and fine tune the bends if needed to make the holes line up, paint and finish as desired.
Final step is to post pictures here of what you did.
I measured the factory bracket, and measured where the additional holes were in the truck, and drew the hole pattern in CAD. Cut out a flat sample piece out of thin 20ga steel on my plasma table to verify the hole locations. I adjusted them appropriately, then added the space to allow for the bends, and recessing the sub-mount part back to where it needs to be. That part was a little harder than it should have been, since the sub is recessed more at the bottom than it is at the top. (3D modeling software would have made things easier, I suspect) Then cut this version from 16ga steel, bent it up, and weld in the gusset you can see up top.
Yes, all in one unit.
I can make you one, especially if you're local to me (SLC, UT area). Shipping one might be more hassle than it's worth, but I can provide the .dxf file if you want to have it cut/bent locally...
I’d be interested in and am in the SLC area. Let me know cost.
- Thread starter
- #33
Would you mind sending me that dxf file as well. Your inbox is full so let me know how you want to get my email address
Thanks
I’d be interested in and am in the SLC area. Let me know cost.
Sorry, didn't realize my inbox was full. It's fixed now.
I went with the CV subwoofer as well. I probably should have mounted upside down as well to make access to the dials more accessible (whoops).
I've read through this thread but didn't see mention of a way to buy the bracket, only to get the .dxf file and have a bracket cut bent locally. Is that right or is it possible to order one of these brackets from @I Lean or someone else? If the bracket can be ordered what's the price on it?
Any suggestions on finding a place to do the work using the .dxf file if that's the best route to go?
Thanks
Any suggestions on finding a place to do the work using the .dxf file if that's the best route to go?
Thanks
***updated: sent***I've read through this thread but didn't see mention of a way to buy the bracket, only to get the .dxf file and have a bracket cut bent locally. Is that right or is it possible to order one of these brackets from @I Lean or someone else? If the bracket can be ordered what's the price on it?
Any suggestions on finding a place to do the work using the .dxf file if that's the best route to go?
Thanks
PM me if you'd like. I have a spare bracket. Ended up mounting an ARB in the rear quarter panel instead. Would love to see this nice piece of kit put to a good use.
Last edited:
EPIC Cruisers
Supporting Vendor
Anyone tried this with an LX450? I know the speaker hole isn't there but it seems like you could just cut it out and put the speaker grill in. I believe the mounting points for this bracket should fit the LX as well.
Scott Norquist
SILVER Star
This company makes a custom bracket that fits in that area to accommodate an aftermarket 8 inch sub.
Whole Hog FJ80 Toyota LandCruiser Products
Whole Hog FJ80 Toyota LandCruiser Products
This is awesome. I didn't see much in the way of reviews/performance of the actual different products, though. Good bass?
Similar threads
- Replies
- 3
- Views
- 633
Users who are viewing this thread
Total: 2 (members: 0, guests: 2)


