Builds Steve's HDJ81 build (1 Viewer)

This site may earn a commission from merchant affiliate
links, including eBay, Amazon, Skimlinks, and others.

Joined
Oct 21, 2013
Threads
82
Messages
1,142
Location
Utah
Website
www.landcruisersdirect.com
1990-2179-ih8mud-1.jpg


Land Cruisers Direct HDJ81 Build

With the HDJ81 finally being legal for import, I started planning for this build over a year ago. While I was already ordering parts, I hadn't yet picked which truck I would build. This was a fun problem to have, and I went over each truck in the inventory to find the perfect candidate. Contrary to conventional wisdom, I didn't just pick the nicest one with the lowest mileage. I knew I would paint the truck, so exterior condition didn't matter. I was also planning an extensive mechanical overhaul so mileage didn't matter. I looked at a couple of the 5-speeds in stock, my previous truck was a 5-speed HJ61, but leaned towards an automatic so it would be easier for my wife to drive. In the end, I chose HDJ810002179 for my build. It had e-lockers, around 250K KM's, zero rust, and faded paint on the roof and hood.

My objective was to build an "Aussie" inspired overland build with capability, reliability and capacity for our family of 7. My wife and I are blessed with four daughters and one son who share our passion for exploring the outdoors. We need 7 seat belts and plenty of storage space even for the shortest adventure. While I considered building a Troopy, I landed on building an HDJ81 for a myriad of different reasons which I won't bore anyone with at this point. So with a good platform base and a room full of ordered parts, the HDJ81 build project "Weighty Eighty" began. Many vendors were used to source OEM and aftermarket parts for this build. But special thanks go to Cruiser Outfitters, ARB and Long Range Automotive. In the end, I built the truck that I wanted, that suited my needs. There are many ways to go with an 80 series build and many great vendors with a variety of great products. This is the route I chose.

1990-2179-ih8mud-2.jpg

Fresh from the auction in Japan.


1990-2179-ih8mud-3.jpg

Toyota data plate.


1990 Toyota Land Cruiser HDJ81 VX Limited
VIN HDJ810002179
Model HDJ81V-RNPEX
Engine 4.2L 1HD-T Turbo Diesel
Transmission A442F 4-Speed Automatic
Axle Code K294
Color Code 183
Trim Code FC10

1990-2179-ih8mud-4.jpg

A view of the stack of parts for the HDJ81 build.


1990-2179-ih8mud-5.jpg

More parts.


1990-2179-ih8mud-6.jpg

Toyota OE parts.


Step one began in November 2015, a complete respray of the entire truck. I've been in classic and collectible cars for over a decade, and we've done all type of restorations from OE correct Mopars to slick-custom Mustangs. We've done projects where the paint and materials alone cost in excess of $10,000. For a 1990 Land Cruiser, we didn't have to break out the rotisserie, but we wanted to have a respectable result since the truck would represent LCD at events and activities across the country. Luckily the truck was very straight and clean to begin with. There was zero rust and only a few door dings and deep scratches that needed bodywork. For this truck, we removed the seals, door handles, and trim from the body but left the glass in place. We also didn't paint the jambs as we were sticking with the original color.

1990-2179-ih8mud-7.jpg

Beginning disassembly and bodywork.


1990-2179-ih8mud-8.jpg

Starting body work and paint prep.


Paint color is Toyota code 183, Medium Gray Metallic. We use primarily Dupont products and ordered Chromabase body paint and Chromaclear from our local paint supplier. This is a quality paint that gave us excellent results.

1990-2179-ih8mud-9.jpg

After paint and installing the flares with new molding, painted door handles and mirrors, and body lights.


1990-2179-ih8mud-10.jpg

Hood pic.


Once the body was painted and mostly reassembled, the mechanical refurb phase began. I had driven this truck for about 500 total KM before beginning the build and felt like it was in excellent mechanical condition overall. But with plans for several years of use and long trips, it was wise to do some mechanical refurbishment along with all the aftermarket upgrades. I had ordered a big list of OEM Toyota parts from Cruiser Outfitters and Toyota Japan so it was time to began the installs. Water pump, fan clutch, rebuilt injectors, timing belt, timing belt pulley, glow plugs, drive belts, belt tensioner, radiator hoses and all heater hoses were installed. Other maintenance included tie rod ends, complete knuckle rebuild, front and rear hubs rebuilt, all new OEM bushings for the LCA's, UCA's, sway bars and panhard bars. It rides like new.

1990-2179-ih8mud-11.jpg

Mechanical work for days.


Next up was building a secondary electrical system to support all the add-on items. I chose to add a third battery with a very basic on/off isolator. This would keep the secondary system separate from the main starting system whenever the truck is off, but recharge the system when the truck was running. There is also a manual cutoff switch to disable the isolator and keep the systems completely separate. A bussman fuse/relay panel and a waterproof 80 amp breaker are installed on a custom bracket that mounts to the inner fender and the fuel filter housing. The third battery is mounted on a custom bracket that also holds the hot water exchanger and water tank filler neck. It's a pretty clean install and very little had to be moved to make this location work.

I chose to go with a Group 51 yellow-top Optima for the third battery. This was the smallest battery I could find. In retrospect, I should have been more willing to move things in the engine bay and make room for a larger battery. The ARB twin compressor can put a hurt on this battery pretty quickly if the truck isn't running. It's not a problem so far, but something I'll consider addressing in the future.

The heat exchanger is a Helton hot water kit from Cruiser Outfitters. It's capable of bringing the water close to the operating temperature of the vehicle. Even for an HDJ81 on a cold morning, this can mean water temps between 120 and 140 degrees. When the truck is warmed up, water from the hot water faucet can be scalding. I might turn down the exchange flow a little to avoid any injuries. The kit was easy to install and works great!

1990-2179-ih8mud-12.jpg

Third battery, fuse/relay panel, hot water exchanger.


1990-2179-ih8mud-13.jpg

Just some of the PO-added wiring that was removed. The Japanese love their add-on electronics.


1990-2179-ih8mud-14.jpg

New batteries!


1990-2179-ih8mud-15.jpg

Building the third battery mounting bracket.


With space at a premium, every effort was made to use every bit of available space. We came up with a great location for the ARB twin compressor. It is mounted on a custom bracket and bolted where the clutch booster is installed on a 5-speed model. This worked out great! From the compressor, a braided line connects to a one gallon tank mounted under the driver side. From there, lines go to quick connect ports on the front and rear bumpers. An ARB diff breather is mounted on the compressor bracket and plumbed to the front and rear axles. The transmission and transfer case vent lines are already plumbed to the transmission filler tube so I considered this to be sufficient for now.

1990-2179-ih8mud-16.jpg

Mounting the ARB twin compressor.


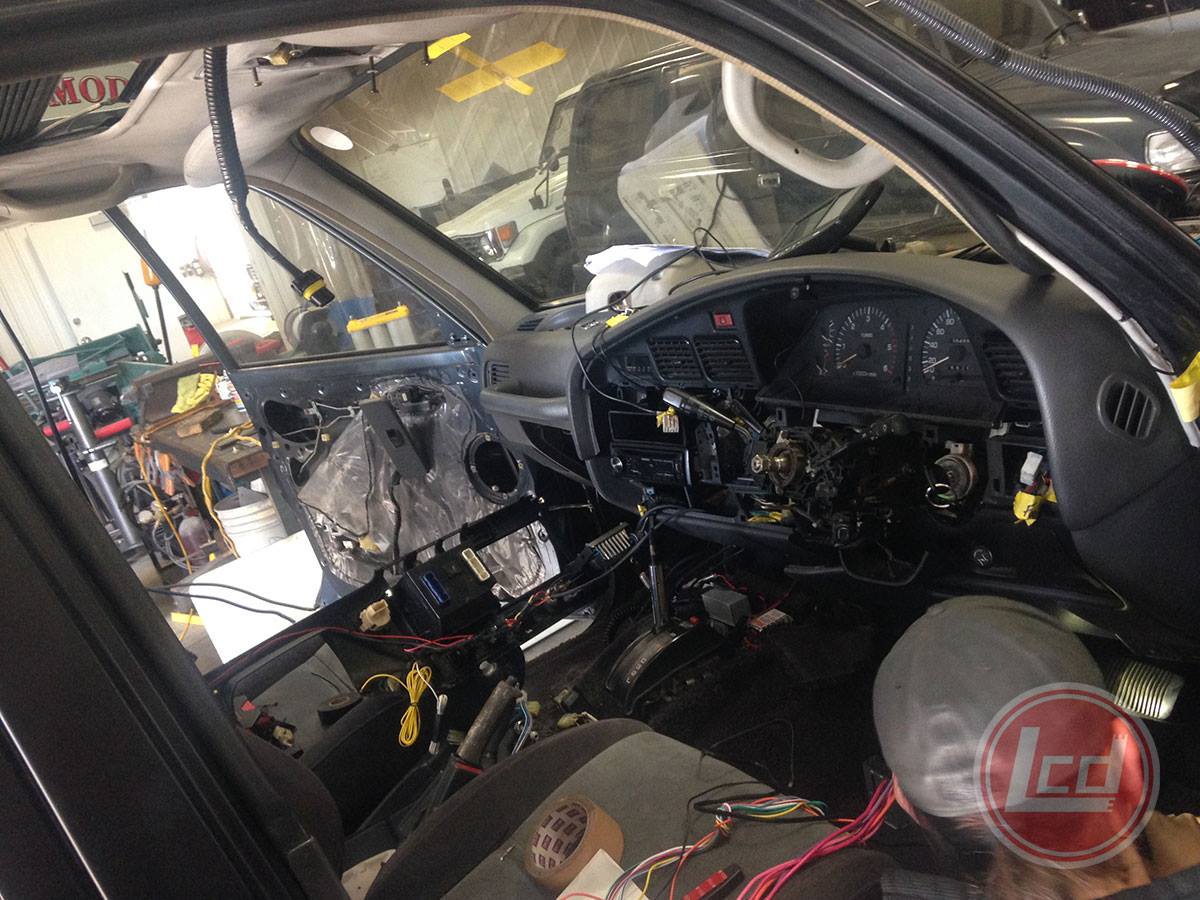
With most of the mechanical work complete and all the wiring installed, it was time to turn to the dash and interior. The plan was to be minimally intrusive and as clean as possible. Using existing locations in the dash, I added carling switches for the spotlights, camp lights and compressor. Tunes are delivered via a simple Kenwood single-din receiver with new Kenwood speakers and has inputs for Bluetooth, 1/8 jack, and USB. A custom radio mounting bracket is installed into the upper din pocket and has spots for a Baofeng portable ham radio, a Wilson cell-phone amplifier and a Cobra handheld CB radio. Power and antenna wiring travels through a hole in one blank switch and behind the dash. The ashtray was replaced with dual 12v cig lighter outlets. The steering wheel and shifter were warn and cracking so I had both recovered with new leather. Other goodies added to the interior include a rearview mirror with built in GPS and rearview camera along with a Viper 4105 remote start and auto-lock kit. The remote start feature works great and is a necessity on cold mornings!
1990-2179-ih8mud-17.jpg

Progress on the interior.


1990-2179-ih8mud-18.jpg

Radios mounted and ready.
 
Last edited:
This HDJ81 did not have third row seats, and I'm not sure third row seats were ever an option in any JDM 80. With five squishes in tow, the third row is a necessity for me. Installing a third row of seats in an 80 that didn't originally have them was not quite as easy as I originally thought. Yes, you can buy the seats, seatbelts and round mounting brackets used. But there are a series of brackets spot-welded on the wheel well beneath the carpet, the strikers on the floor and the seat belt mount points on the upper c-pillar. Luckily I had a donor FZJ80 in the yard and was able to use several pieces to install the third row. The end result appears factory. The seats are gray leather, and cracking a little. But the third row is for 2 toddlers in car seats so it'll work out great.

1990-2179-ih8mud-19.jpg

Installing the third row seats.


1990-2179-ih8mud-20.jpg

Fabbing and installing the striker pockets.


1990-2179-ih8mud-21.jpg

Striker pockets installed.


1990-2179-ih8mud-22.jpg

The end result.


I had grand plans of building a complete shelf and drawer set in the rear area behind the third row, but time restraints won out and I came up with a quicker solution for now. I found a bedrail toolbox from Northern Tool that would fit behind the third row and have enough room to mount the water faucet, inverter, power outlets and volt meter. Using the existing tie-down mounting points, we mounted the box to the floor of the truck. It's raised off the floor 1/8" with spacers to allow extended straps through the opening that can actuate the third row seat latches. A small 400w inverter is mounted on the side of the box above the generic RV water faucet box. A sheet metal cover panel was fabricated and attached to house the outlets and hide the wiring. The box has just enough room for my kitchen set, tools and recovery gear.

At this point, the RV water system was installed. A standard Sureflo pump was installed on a custom bracket in place of the stock jack. The pump takes water from a 30L tank mounted outside the frame rail on the passenger side. This tank is made by The Long Ranger and sold through Out of Town 4WD in Australia. Mounting the tank was easy, but the mounting of the ARB steps had to be slightly modified to fit around the tank and onto the factory cross member. The faucet is plumbed with cold water directly from the tank and hot water that is pumped through the Helton heat exchanger under the hood. The dual knobs give you complete temperature control, from scalding hot to tank temperature.

1990-2179-ih8mud-23.jpg

Mounting the faucet, inverter and outlets to the box.


1990-2179-ih8mud-24.jpg

Setting up wiring and plumbing.


1990-2179-ih8mud-25.jpg

The water pump installed in place of the stock jack.


1990-2179-ih8mud-26.jpg

Installed in the rear of the truck.


Next it was time to install the fuel tanks from Long Range Automotive. There are a few choices if you want added fuel capacity. The factory Toyota subtank setup is a good way to go, but only adds 13 gallons of capacity. In the end I went with the LRA tanks. I used a 38 gallon replacement main tank and a 24 gallon subtank (although up to 44 gallon subtanks are available). The stock float and pickup are modified to read correctly on the factory gauge. The subtank has a button with an integrated fuel level light. The switch and pump are aftermarket components of the kit from LRA. I went with a Toyota stock dual filler neck because it fit better than the one in the LRA kit.

1990-2179-ih8mud-30.jpg

38 gallon replacement main tank.


1990-2179-ih8mud-31.jpg

24 gallon subtank.


1990-2179-ih8mud-33.jpg

Modifying the pickup and float to work with the factory gauge.


1990-2179-ih8mud-32.jpg

LRA fuel tanks installed.


The 1990 JDM HDJ81 has 4-wheel disc brakes, but the rotors are smaller than the later model HDJ81 and North American FZJ80. Thanks to other Mud members, there's plenty of great tech about fitting the larger brakes on an earlier truck. With larger tires and increased weight, upgrading the brake system was definitely on the list. After some quick reading, I was ordering parts. One of my first jobs at the age of 16 was working at a place called "Just Brakes" in Lewisville, TX as a brake technician. Up to that point, my only experience was changing the front pads on my 1983 Nissan Sentra. Doing this brake conversion brought me back to my younger days sweating in that little shop in Texas learning to be a roughneck mechanic. I won't include all the tech details here, there is plenty of information elsewhere, but I will say it's a pretty easy and straight forward job. I ordered the front backing plates and new rear caliper brackets from Toyota. The rotors, calipers, pads and hardware were ordered through my commercial Oreilly's account. The rear backing plates are available, but very expensive. Luckily I had a 1997 FZJ80 parts truck to source the backing plates.

I'll digress and talk about the amazing and immaculate condition of JDM vehicles. My 1997 FZJ80 parts truck is from the Chicago area, I bought it at an insurance auction a couple years ago. To remove the rear brakes, hubs and backing plates took me over 4 hours. It took another 2 hours to clean, blast and paint the backing plates. I disassembled the entire rear axle on my JDM HDJ81 in 35 minutes. Not one bolt or nut was seized. Nothing was rusted in place. Everything came apart textbook (or in this case FSM) perfect.

During the brake conversion, we rebuilt the knuckles and all the hubs. We used Slee braided steel lines for the axle-caliper lines and frame-axle lines.

1990-2179-ih8mud-27.jpg

Crusty FZJ80 donor truck.


1990-2179-ih8mud-28.jpg

The JDM trucks are so clean and easy to work on.


1990-2179-ih8mud-29.jpg

Backing plates upgraded, new brakes installed.


By this point, we were ready for the "bolt-on" projects. For suspension I went with the heavy-load/level-stance kit from Old Man Emu suspension and Cruiser Outfitters. With 2850J springs in the front and 2864 springs in the rear. Slee caster plates on the front, and all new bushings all around makes for a super smooth ride on the road.

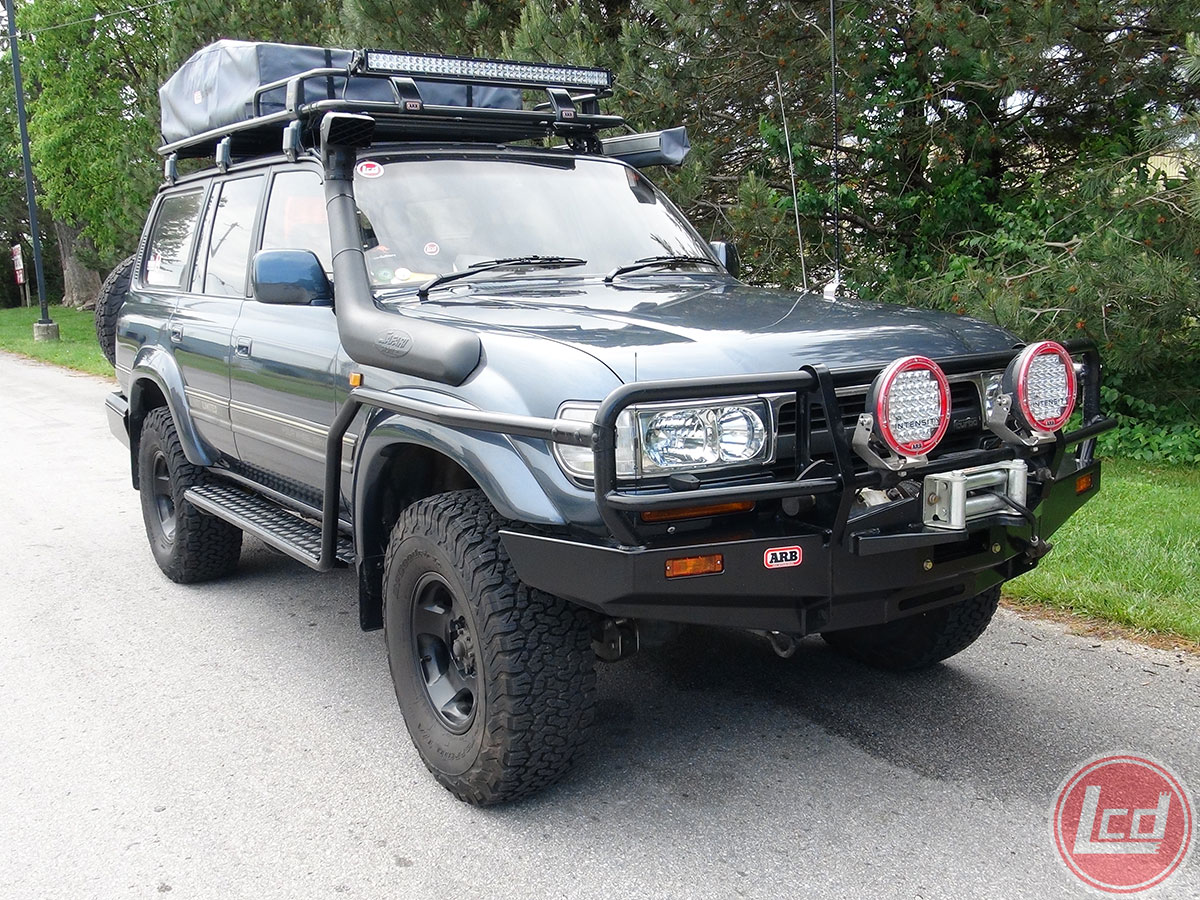
The front bumper, factory winch install, ARB intensity lights and ARB steps/fender-rails went on without much of a fight. One of the step mounting brackets had to be modified to work with the location of the water tank on the passenger side frame rail. The factory Aisin winch can be mounted in the ARB bumper with a slight modification and a custom bracket. We've used this setup in several previous trucks and it works great.

1990-2179-ih8mud-38.jpg

Winch mounted, bumper ready to hang on the front end.


1990-2179-ih8mud-39.jpg

Front end is done.

After the front bumper was on, it was time for the rear bumper. I chose the ARB rear bar setup with dual tire carrier swingouts. In sticking with the long-travel/Aussie theme, I felt dual spares was a necessity. As usual with stuff from ARB, install was pretty easy and within a few hours it was time to mount the Maxtrax and Hi-Lift. Maxtrax are a necessity, especially with a heavy rig like this one.

1990-2179-ih8mud-36.jpg

Rear bumper finished, tires mounted, Maxtrax and Hi-Lift mounted.


At this point we were in the final stretch, a week before Cruise Moab. All that was left was installing the roof rack, ARB Simpson roof-top-tent and a 42" OPT7 (Mid-Price) LED light bar. Everything went on nice and easy. We did run out of time and didn't have a chance to mount the camp lights on the roof rack. Everything is wired, just waiting to mount the lights. I'll get this project done before its next outing.

1990-2179-ih8mud-37.jpg

Roof rack installed, ARB tent setup.


There are so many great wheel/tire combos for the 80 series. I spent a little time looking at all the options, but in the end I decided on a stock 16x8 LC wheel. Maybe boring to some, but it's the perfect wheel for the application. Lightweight, correct backspacing and large enough to cover the new brakes. I took a quick trip to the powder coater and then to the tire store to mount the BFG KO2's. Tire size is 295/75r16, about 33.4" diameter. Obviously I wanted to go with bigger tires, but I felt the 295/75 was the best fit for the setup without going to a size that requires regearing to maintain the same driving characteristics.

1990-2179-ih8mud-34.jpg

Six 16x8 LC wheels with BFG KO2's.
 
Last edited:
1990-2179-ih8mud-35.jpg

Phase 1 complete.

The build (up to this point) was completed on a Thursday, the truck went for AC service and alignment on Friday and then began a 1,100KM 2-day shakedown run on Saturday. On Monday it was back in the shop to re-torque the suspension and make a final inspection. We headed out at 4:30AM the following day for Cruise Moab. The truck performed flawlessly. While I can usually find something to complain about, I had to stretch to find any issues worth mentioning in the HDJ81. An off-center bump stop was rubbing on the inside of one front spring under tight compression, the on/off button on the rearview mirror GPS lightly rattles under certain conditions, and everything is so cleanly installed and tucked away that most people don't even notice the details and features built into this truck. So if that's all I can find to complain about, I'm pretty satisfied. In the end, the truck came out as it was designed and performed as intended (that's how we do it at LCD!). Budget was over only 6%, and I could live with that considering some changes I made along the way. Schedule was definitely tight, but that was due to capacity shortage in the shop (being too busy with customer builds, which I can't complain about!).

This truck was silently smooth on the highway, in it's element doing high-speed in the dirt, and boringly masterful on the rocks. I'm in love and looking forward to future family and solo trips with this beauty.

The round trip to Cruise Moab was 4,031KM, two travel days, two days on trails in the San Rafael Swell and one day of trails in Moab. We stopped for fuel 3 times, and arrived home half full. Overall fuel economy was 26.8KM/gallon (16.7 MPG). Typical highway speed was 70-80, max speed was 98. Up I70 west of Denver, the truck performed better than I expected for being 7,580lbs loaded weight. The HDJ81 maintained 45-55 on the steepest sections and was only slowed down by being caught behind slower moving trucks.

I have plenty of future plans for this truck, but for the moment I'm just enjoying driving it. Stay tuned.

1990-2179-ih8mud-40.jpg

Long Canyon in Moab.


1990-2179-ih8mud-41.jpg

Long Canyon in Moab.


1990-2179-ih8mud-47.jpg

Black Dragon Canyon, San Rafael Swell.


1990-2179-ih8mud-45.jpg

Devils Racetrack, San Rafael Swell.


1990-2179-ih8mud-56.jpg

Passenger front quarter.


1990-2179-ih8mud-57.jpg

Passenger side.


1990-2179-ih8mud-58.jpg

Passenger rear quarter.


1990-2179-ih8mud-59.jpg

Rear.


1990-2179-ih8mud-60.jpg

Driver rear quarter.


1990-2179-ih8mud-62.jpg

Driver side.


1990-2179-ih8mud-61.jpg

Driver front quarter.


1990-2179-ih8mud-64.jpg

Front.


1990-2179-ih8mud-49.jpg

Rear box mounted.


1990-2179-ih8mud-48.jpg

Rear air quick connect.


1990-2179-ih8mud-51.jpg

Front air quick connect.


1990-2179-ih8mud-52.jpg

Front winch and lights.


1990-2179-ih8mud-53.jpg

ARB twin compressor and diff breather.


1990-2179-ih8mud-50.jpg

New TLCA sticker.
 
Last edited:
My HDJ81 has been finished for a little over a year and I've been meaning to update the build thread with the latest photos and report on the spring dry-dock projects.

Since finishing the truck right before Cruise Moab 2016, I've driven about 41,000KM. A lot of dirt miles and a lot of highway miles zig-zagging across the country.

A few pics from the last year.

Up American Fork Canyon with @cruiseroutfit
1990-2179-ih8mud-70-1024x768.jpg


At the Vernon Wonderstone quarry
1990-2179-ih8mud-71-1024x768.jpg


Getting stuck on a road covered in snow
1990-2179-ih8mud-73-1024x768.jpg


In March 2017, I brought the truck in for a dry-dock session to make some upgrades and minor repairs.

First on the project list was rebuilding the transfer case with a Trail Gear 3.11:1 low range gear set from Cruiser Outfitters. Sorry no pictures, it's pretty boring and straight forward. I will say that the performance upgrade was definitely worth the investment. I highly recommend it!

My water system had one casualty over the winter. The plastic check valve froze and split. I replaced it with a metal one, but I'll have to remember to do a better job of blowing the water out of the system when it's not in use.

As with many 80's, my radio antenna would not retract all the way. A new antenna mast solved the problem.

I took the time to remove the dreaded ACSD and finished the delete with the kit from Radd Cruisers.

I did have a problem with the license plate bracket on my ARB rear bumper. It's a bent sheet metal bracket and it broke off right along one of the bends. Luckily, Cruiser Outfitters and ARB stand behind their products and I got a new one right away. I added a little gusset to avoid the problem in the future.

1990-2179-ih8mud-78-1024x768.jpg


I upgraded to a Warn VR12000 winch and installed a front plate that I got off of eBay Australia (to go along with the Aussie theme).

1990-2179-ih8mud-76-1024x768.jpg


I moved the light bar to below the roof rack and further back. From where it was positioned, the glare off the hood made it unusable. Now it’s much more comfortable to drive at night with the off-road lights engaged.

I had one "failure" that I wasn't expecting to fix. On my way to dry-dock, my truck started leaking oil, pretty badly. Turned out to be the oil inlet pipe for the turbo. You can see the old design and the new design in the photo. The line with the banjo fitting cracked at the base of the mounting point near the main tube. The new design has a little support bracket that connects the banjo line to the main tube. This was a quick and easy project and might be a good idea for preventive maintenance on other HDJ81’s.

1990-2179-ih8mud-79-1024x768.jpg


Lastly I installed a Kenwood 710 dual-band ham radio and browning antenna. I also got my vanity ham call sign, K7HDJ.

I still didn't have time to finish the camp light system or a few other projects, so those will have to wait for another day. In the meantime, this truck gets plenty of use so there's very little time to be down.

Finished and back on the San Rafael Swell run for Cruise Moab 2017
1990-2179-ih8mud-74-1024x768.jpg


At Overland Expo West in May
1990-2179-ih8mud-75-1024x768.jpg
 
Last edited:
Place holder post for future updates. Enjoy this pic of the HDJ81 in Long Canyon.

1990-2179-ih8mud-42.jpg
 
Amazing build Steve.

Care to bore me with some details on why you went with an HDJ81 over a Troopy? For my RTW overland trip in 5 years I've been contemplating both the Troopy and an 80. Although I've never driven a Troopy and seldom an 80 so my internalized debate is mostly theoretical.
 
Amazing build Steve.

Care to bore me with some details on why you went with an HDJ81 over a Troopy? For my RTW overland trip in 5 years I've been contemplating both the Troopy and an 80. Although I've never driven a Troopy and seldom an 80 so my internalized debate is mostly theoretical.
Coil springs, direct injected factory turbo diesel, more parts availability in North America are a few good reasons.
 
Amazing build Steve.

Care to bore me with some details on why you went with an HDJ81 over a Troopy? For my RTW overland trip in 5 years I've been contemplating both the Troopy and an 80. Although I've never driven a Troopy and seldom an 80 so my internalized debate is mostly theoretical.

Coil springs, direct injected factory turbo diesel, more parts availability in North America are a few good reasons.

For marketing purposes, a Troopy is probably a better fit for me. The 70 series trucks are our primary focus. But with five kids to load in and out, the lack of doors and the side facing seats presented a problem (one of the girls gets seriously car sick!). Yes I could have modified the seats, but I already had a giant list of accessories and mods in mind. The idea was to start with a truck out of inventory and build it with readily available components. I went overboard a little, but the idea is still the same. You can buy an HDJ81 and outfit it like this after placing an order at Cruiser Outfitters for almost everything we used.

The coils are a huge reason, with a lot of highway miles between events, comfort plays a role.

The factory turbo was also a huge reason. Yes you can add a turbo to a 1HZ Troopy, but it adds considerable cost.

Availability of a truck with e-lockers was a big reason. Locked Troopy's are harder to come by so extra cost would have been necessary for ARB lockers.

The final deciding factor was transmission choice. I wanted to go with an automatic this time so my wife would feel more comfortable driving the truck (this truck is one of our family vehicles, so it's an option when one of us feels too cool for the minivan lol). HZJ75's aren't available with automatics.

So really the decision was about personal factors and preferences. Either would be great platform choices. In the end, family requirements leaned my decision towards the HDJ81. Also, with seeing the huge interest in the HDJ81's as they were becoming available, I wanted to build a truck that showcased the bolt-on aftermarket support available for these vehicles.

All said, I think an HZJ75 is an equally good platform choice, just depends on your personal requirements.
 
I'm building my FZJ for expedition use, I'm doing it on a tighter budget, but if I had "fxxx it" money I'd build something very close to this, well done and bravo.

Have you packed the whole family in for a extended trip yet?
 
Hey Steve, fan-frickin-tastic work. Gives me something to aspire to. Can you give any insight on using the ARB swingout over factory? And how do you like the ARB rear bumper vs 4x4 labs?
 
I'm building my FZJ for expedition use, I'm doing it on a tighter budget, but if I had "**** it" money I'd build something very close to this, well done and bravo.

Have you packed the whole family in for a extended trip yet?

Thank you! First voyage with all the kiddos is tonight for our weekly trip out to dinner. Spent this week cleaning the truck, installing a stock trans cooler (from my FZJ80 parts truck), and taking pictures. We'll take it out this weekend for a little dirt driving I'm sure.

Hey Steve, fan-frickin-tastic work. Gives me something to aspire to. Can you give any insight on using the ARB swingout over factory? And how do you like the ARB rear bumper vs 4x4 labs?

I absolutely love the ARB bumper, but I love the 4x4 Labs bumpers too! This truck had a factory swingout (notice the allen head bolts in the former mounting locations) and I really like the factory swingout. But there is a limitation on tire size/weight. Also I wanted to carry two spares so I had to upgrade. I went with the ARB bumper because ARB is available off the shelf, no wait time for production, and my relationship with ARB and Cruiser Outfitters means I can get a pretty good deal on price. For departure angle, the 4x4 Labs bumper wins out. It's tighter to the rear of the body, mainly because you cut out the rear cross member and replace it with the bumper. The swingouts are easier to operate on the ARB bumper, just a little smoother operation. We've installed the 4x4 Labs bumpers on other trucks, and they are fantastic. For this project, I went with the ARB.
 
Great build, amazing truck!
 
Very very nice.
 
There are those unobtanium ladder steps you can install. Only work if you have the reinforcement from the swingout.

I checked out the numbers in that thread and those are available in Japan. I'm thinking about ordering the steps and checking them out. I've also considered several other ideas for mounting something to the swingout reinforcements. Lots of options.

Many people have asked about the water tank. It's a 30L (7 gallon) stainless steel tank made by The Long Ranger and Out of Town 4WD (http://www.oot4wd.com.au/). The tank mounts on the outside of the frame rail on the passenger side under the front floor. It is designed to have a gravity fed outlet directly behind the front passenger mud flap. We mounted the filler tube on the third battery bracket under the hood and the outlet feeds an RV Sureflo pump, hot water exchanger and dual temperature control faucet in the rear.

1990-2179-ih8mud-65.jpg

The stainless steel water tank.


1990-2179-ih8mud-66.jpg

Front mount.


1990-2179-ih8mud-67.jpg

Rear mount.


1990-2179-ih8mud-68.jpg

Dirty undercarriage.


Also a few questions about the air tank. I had an aluminum ARB 1-gallon tank ready to go. But I ended up using a steel 1-gallon tank that came equipped with multiple ports. Also we were able to modify the mounting bracket to find a tight spot to tuck away the tank.

1990-2179-ih8mud-69.jpg

Steel air tank.
 
Subscribed. Love the build. My family being in the same boat is why I bought an 80. Will be watching your build!
 
Cool buid man. I'm contemplating picking up an hdj81 for a build. II've toyed with the idea of an fzj80 lsx or 4bt swap, slapping a turbo onto a 1fz-fe but Ireally think iIwould be happiest with a hopped up 1hd-t. No spliced wiring harness or subpar ecu piggyback/tuning systems. I think 300hp shouldn'tbe too hard to ssqueeze out of these mmotors. I will need third row seating as well. I didn'tthink it was going to be so in depth adding a third row!
 
Cool buid man.

Thanks!

I'm contemplating picking up an hdj81 for a build. II've toyed with the idea of an fzj80 lsx or 4bt swap, slapping a turbo onto a 1fz-fe

All cool projects!

but I really think I would be happiest with a hopped up 1hd-t. No spliced wiring harness or subpar ecu piggyback/tuning systems.

Agreed.

I will need third row seating as well. I didn'tthink it was going to be so in depth adding a third row!

Yeah...it's not very fun!
 

Users who are viewing this thread

Back
Top Bottom