Land Cruisers Direct HDJ81 Build
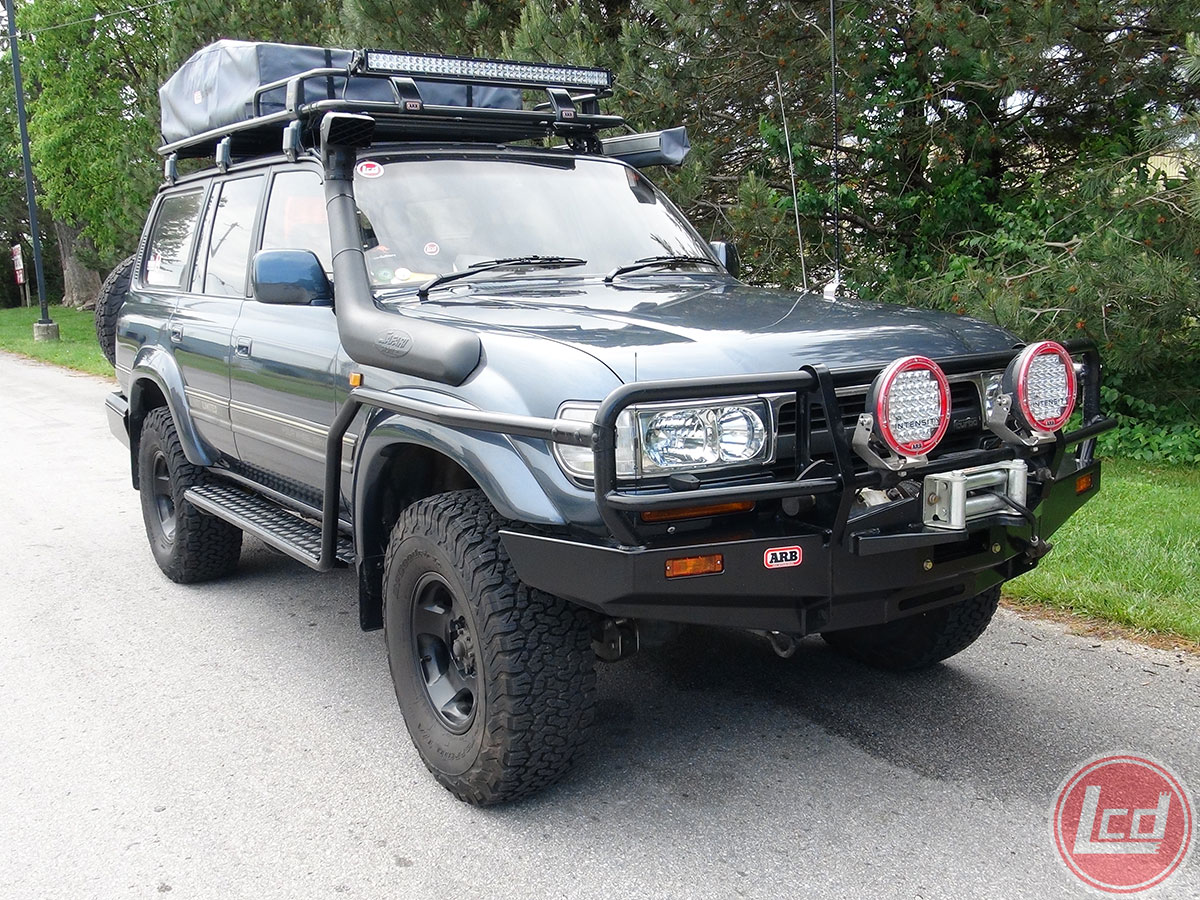
With the HDJ81 finally being legal for import, I started planning for this build over a year ago. While I was already ordering parts, I hadn't yet picked which truck I would build. This was a fun problem to have, and I went over each truck in the inventory to find the perfect candidate. Contrary to conventional wisdom, I didn't just pick the nicest one with the lowest mileage. I knew I would paint the truck, so exterior condition didn't matter. I was also planning an extensive mechanical overhaul so mileage didn't matter. I looked at a couple of the 5-speeds in stock, my previous truck was a 5-speed HJ61, but leaned towards an automatic so it would be easier for my wife to drive. In the end, I chose HDJ810002179 for my build. It had e-lockers, around 250K KM's, zero rust, and faded paint on the roof and hood.
My objective was to build an "Aussie" inspired overland build with capability, reliability and capacity for our family of 7. My wife and I are blessed with four daughters and one son who share our passion for exploring the outdoors. We need 7 seat belts and plenty of storage space even for the shortest adventure. While I considered building a Troopy, I landed on building an HDJ81 for a myriad of different reasons which I won't bore anyone with at this point. So with a good platform base and a room full of ordered parts, the HDJ81 build project "Weighty Eighty" began. Many vendors were used to source OEM and aftermarket parts for this build. But special thanks go to Cruiser Outfitters, ARB and Long Range Automotive. In the end, I built the truck that I wanted, that suited my needs. There are many ways to go with an 80 series build and many great vendors with a variety of great products. This is the route I chose.

Fresh from the auction in Japan.

Toyota data plate.
1990 Toyota Land Cruiser HDJ81 VX Limited
VIN HDJ810002179
Model HDJ81V-RNPEX
Engine 4.2L 1HD-T Turbo Diesel
Transmission A442F 4-Speed Automatic
Axle Code K294
Color Code 183
Trim Code FC10

A view of the stack of parts for the HDJ81 build.

More parts.

Toyota OE parts.
Step one began in November 2015, a complete respray of the entire truck. I've been in classic and collectible cars for over a decade, and we've done all type of restorations from OE correct Mopars to slick-custom Mustangs. We've done projects where the paint and materials alone cost in excess of $10,000. For a 1990 Land Cruiser, we didn't have to break out the rotisserie, but we wanted to have a respectable result since the truck would represent LCD at events and activities across the country. Luckily the truck was very straight and clean to begin with. There was zero rust and only a few door dings and deep scratches that needed bodywork. For this truck, we removed the seals, door handles, and trim from the body but left the glass in place. We also didn't paint the jambs as we were sticking with the original color.

Beginning disassembly and bodywork.

Starting body work and paint prep.
Paint color is Toyota code 183, Medium Gray Metallic. We use primarily Dupont products and ordered Chromabase body paint and Chromaclear from our local paint supplier. This is a quality paint that gave us excellent results.

After paint and installing the flares with new molding, painted door handles and mirrors, and body lights.

Hood pic.
Once the body was painted and mostly reassembled, the mechanical refurb phase began. I had driven this truck for about 500 total KM before beginning the build and felt like it was in excellent mechanical condition overall. But with plans for several years of use and long trips, it was wise to do some mechanical refurbishment along with all the aftermarket upgrades. I had ordered a big list of OEM Toyota parts from Cruiser Outfitters and Toyota Japan so it was time to began the installs. Water pump, fan clutch, rebuilt injectors, timing belt, timing belt pulley, glow plugs, drive belts, belt tensioner, radiator hoses and all heater hoses were installed. Other maintenance included tie rod ends, complete knuckle rebuild, front and rear hubs rebuilt, all new OEM bushings for the LCA's, UCA's, sway bars and panhard bars. It rides like new.

Mechanical work for days.
Next up was building a secondary electrical system to support all the add-on items. I chose to add a third battery with a very basic on/off isolator. This would keep the secondary system separate from the main starting system whenever the truck is off, but recharge the system when the truck was running. There is also a manual cutoff switch to disable the isolator and keep the systems completely separate. A bussman fuse/relay panel and a waterproof 80 amp breaker are installed on a custom bracket that mounts to the inner fender and the fuel filter housing. The third battery is mounted on a custom bracket that also holds the hot water exchanger and water tank filler neck. It's a pretty clean install and very little had to be moved to make this location work.
I chose to go with a Group 51 yellow-top Optima for the third battery. This was the smallest battery I could find. In retrospect, I should have been more willing to move things in the engine bay and make room for a larger battery. The ARB twin compressor can put a hurt on this battery pretty quickly if the truck isn't running. It's not a problem so far, but something I'll consider addressing in the future.
The heat exchanger is a Helton hot water kit from Cruiser Outfitters. It's capable of bringing the water close to the operating temperature of the vehicle. Even for an HDJ81 on a cold morning, this can mean water temps between 120 and 140 degrees. When the truck is warmed up, water from the hot water faucet can be scalding. I might turn down the exchange flow a little to avoid any injuries. The kit was easy to install and works great!

Third battery, fuse/relay panel, hot water exchanger.

Just some of the PO-added wiring that was removed. The Japanese love their add-on electronics.

New batteries!

Building the third battery mounting bracket.
With space at a premium, every effort was made to use every bit of available space. We came up with a great location for the ARB twin compressor. It is mounted on a custom bracket and bolted where the clutch booster is installed on a 5-speed model. This worked out great! From the compressor, a braided line connects to a one gallon tank mounted under the driver side. From there, lines go to quick connect ports on the front and rear bumpers. An ARB diff breather is mounted on the compressor bracket and plumbed to the front and rear axles. The transmission and transfer case vent lines are already plumbed to the transmission filler tube so I considered this to be sufficient for now.

Mounting the ARB twin compressor.
With most of the mechanical work complete and all the wiring installed, it was time to turn to the dash and interior. The plan was to be minimally intrusive and as clean as possible. Using existing locations in the dash, I added carling switches for the spotlights, camp lights and compressor. Tunes are delivered via a simple Kenwood single-din receiver with new Kenwood speakers and has inputs for Bluetooth, 1/8 jack, and USB. A custom radio mounting bracket is installed into the upper din pocket and has spots for a Baofeng portable ham radio, a Wilson cell-phone amplifier and a Cobra handheld CB radio. Power and antenna wiring travels through a hole in one blank switch and behind the dash. The ashtray was replaced with dual 12v cig lighter outlets. The steering wheel and shifter were warn and cracking so I had both recovered with new leather. Other goodies added to the interior include a rearview mirror with built in GPS and rearview camera along with a Viper 4105 remote start and auto-lock kit. The remote start feature works great and is a necessity on cold mornings!
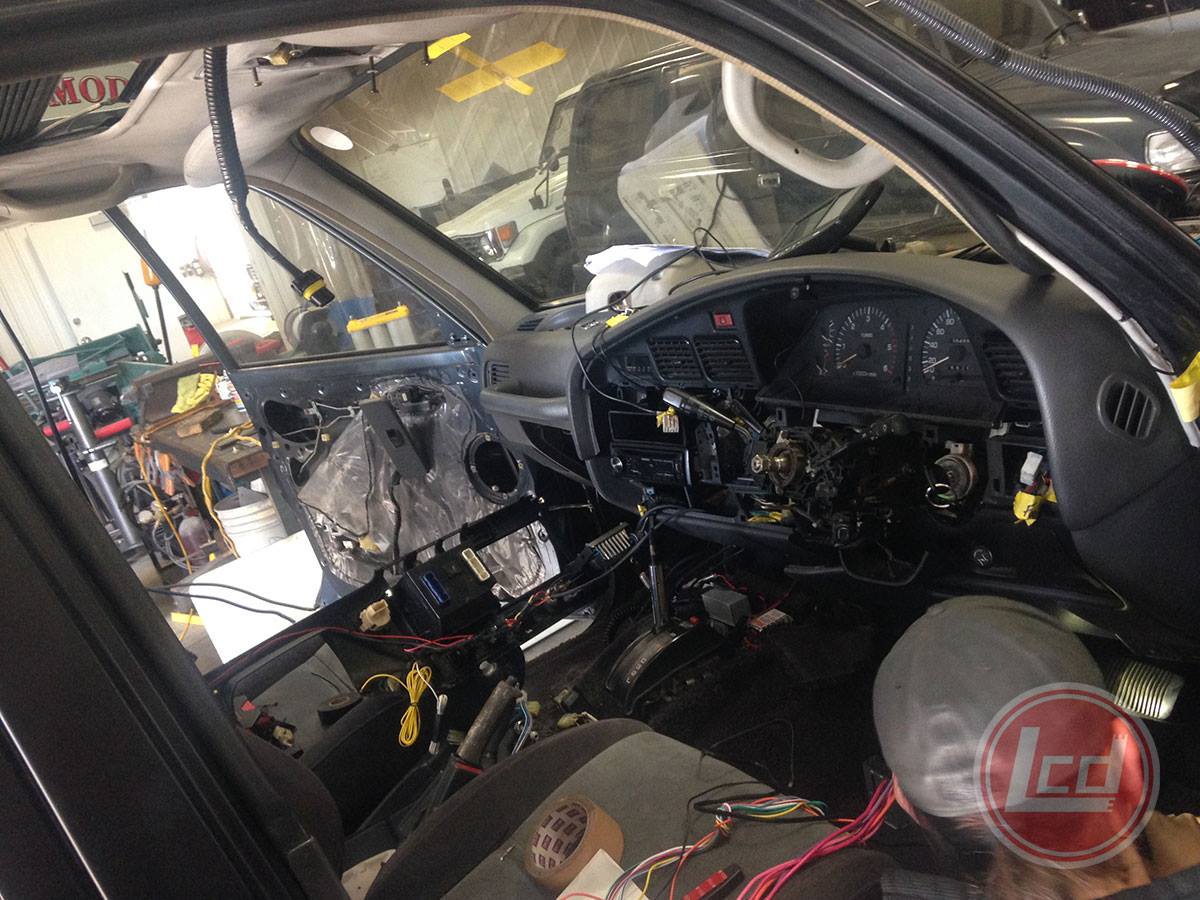
Progress on the interior.

Radios mounted and ready.
Last edited: