
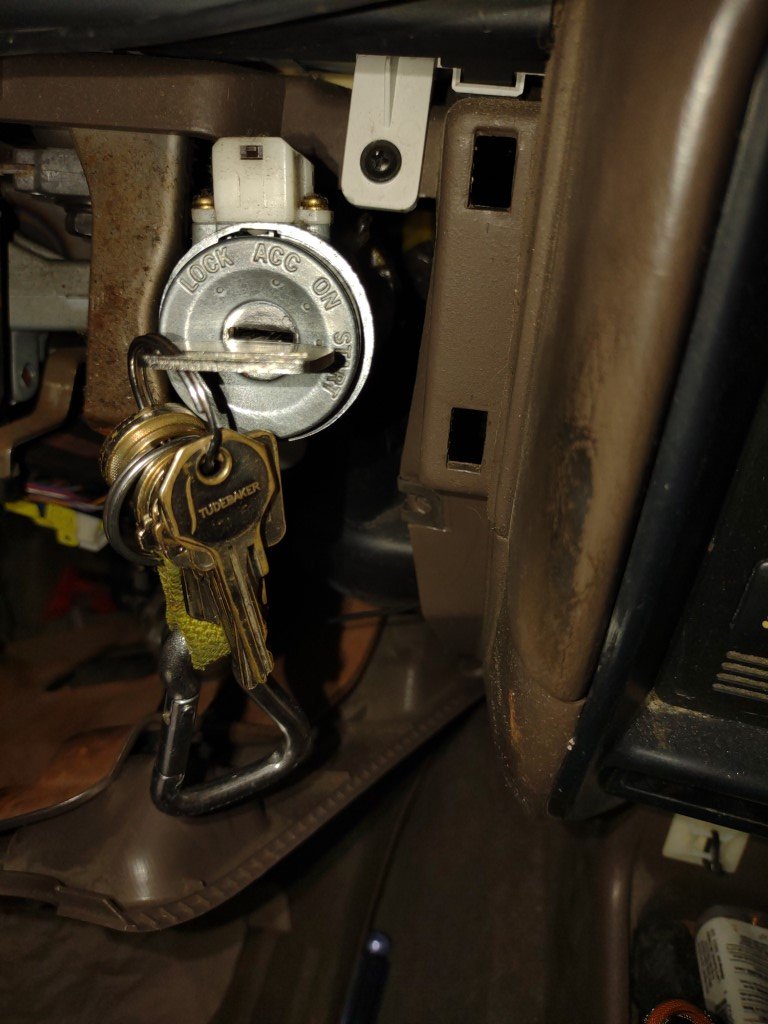
This is something 80 owners may never have to do but as I had the panels off and had been working in that area (see Bilt4Me's "My Ignition Broke" thread) I decided to take a look at the guts of the actual ignition switch while it was still attached to the cowl harness.
Here's a link if you want to get acquainted with the ignition parts (lock cylinder, rod, upper bracket, ignition switch)
 forum.ih8mud.com
-------------------------------------------------------------------------
Servicing your ignition switch:
Short story: don't mess with it unless you see sparks. IMHO it's unlikely very many people will have an issue with this part until you reach very high miles. The 80 this switch is attached to has 385,000 miles on it.
Long story: I decided to check out the switch because it was all in front of me due to a broken ignition rod.
There is a white plastic cap that holds the guts of the switch together that can be gently pried off by using a small blade or pick or just your fingers. It's the type of job that probably should be done on a bench but can be done with the switch in place if you're very careful (not to lose parts).
(see the link above before starting to get oriented to the ignition components)
WARNING: I disconnected the negative battery clamp/cable first so I didn't produce sparks or blow fuses.
The small parts inside are lightly spring loaded and parts will go flying if you aren't super careful. I cleaned off the floor of the footwell first and put down new (flat) papertowels to catch anything that might pop out (a white sheet would work also), but if you slowly remove the white cap you should be able to capture everything.
TIP: I kept the switch/cap pointing downward (open side up) as best I could as I removed the cap to help prevent losing parts. Also I worked on the switch with it 100% of the time on/over the front seat. If the small springs or ball bearings drop on the ground you're done.
The photos tell the story. I didn't take an initial photo of the slightly burned contacts and some blackened grease before cleaning it off but you'll get the idea; there is bound to be some oxidation after 25+ years of power going through this switch.
First photo shows what you should see if you don't lose anything, two copper contact plates and some old grease. The top plate is not held in place by anything. Caution: there are two very small springs under that plate.
As always, double click on the photo to get a magnified view:
Note the darker contact areas/streaks and old grease.
![WP_20230605_18_04_33_Rich[1].jpg](data:image/svg+xml;charset=utf-8,%3Csvg xmlns%3D'http%3A%2F%2Fwww.w3.org%2F2000%2Fsvg' width='1920' height='1080' viewBox%3D'0 0 1920 1080'%2F%3E "WP_20230605_18_04_33_Rich[1].jpg")
This shows the top plate removed, note the two small springs which will fall out if you tip things over. The top plate came off easy; there is a small tab you can see, that fits into a slot of the center black assembly. The larger plate can be lifted using a small pick.
Both plates removed; magnify and look closely, there are three more small springs sitting vertically in holes in the black center section. These can fall out. They may also come up with the plate so work carefully.
This next photo below shows the center section removed.
WARNING: There are two spring loaded ball bearings, one on either side of the black assembly, hold your fingers over the balls as you remove the assembly. These spring loaded bearings roll into successive vertical grooves in the white cap as you turn the key which gives you that tactile feedback when you're in the next location ie: ACC ON Start. Sorry, didn't get a photo showing the spring loaded holes in the sides of the assembly but it's obvious how it works once you have it in front of you.
Note: I kept that black center assembly upright at all times:
Also, after cleaning up the cap using a plastic safe solvent I smeared some DEOXIT grease on the inside with attention to the grooves the ball bearings sit in and anywhere there's contact between moving parts. (note: the photo of the white cap below shows it as found, not cleaned or regreased yet)
![WP_20230605_18_08_17_Rich[1].jpg](data:image/svg+xml;charset=utf-8,%3Csvg xmlns%3D'http%3A%2F%2Fwww.w3.org%2F2000%2Fsvg' width='1080' height='1920' viewBox%3D'0 0 1080 1920'%2F%3E "WP_20230605_18_08_17_Rich[1].jpg")
The last photos shows the copper contact plates with the oxidation and old grease cleaned off. I removed the old grease then used a grey 3M sanding pad followed by 4-0 steel wool (followed by running a magnet over the plate to remove any tiny bits of steel wool), cleaned them off again with solvent then applied DEOXIT L260DNP grease which is made for switches like this. Applied a little fresh grease to each spring and the ball bearings (they all had old grease on them).
Be careful not to lose the two ball bearings or the five springs pointing up (magnify and count the springs) or the two springs on the sides (not shown):
FWIW after first sanding and cleaning the contact plates I applied the DEOXIT grease, let it sit a few minutes, then wiped it off, got more oxidation off on the paper towel, then reapplied the grease which is designed to remove old oxidation and help prevent it in the future.
Here's a link if you want to get acquainted with the ignition parts (lock cylinder, rod, upper bracket, ignition switch)
My Ignition Broke!
I went to restart my 96 Land Cruiser (1FZ-FE) and the switch turned on, but it wouldn't start. The key flopped all the way to the right , but wouldn't return and there was no "spring" back from the start position. I noticed that my radio had power, my ABS light was on (because it's always on)...
forum.ih8mud.com
-------------------------------------------------------------------------
Servicing your ignition switch:
Short story: don't mess with it unless you see sparks. IMHO it's unlikely very many people will have an issue with this part until you reach very high miles. The 80 this switch is attached to has 385,000 miles on it.
Long story: I decided to check out the switch because it was all in front of me due to a broken ignition rod.
There is a white plastic cap that holds the guts of the switch together that can be gently pried off by using a small blade or pick or just your fingers. It's the type of job that probably should be done on a bench but can be done with the switch in place if you're very careful (not to lose parts).
(see the link above before starting to get oriented to the ignition components)
WARNING: I disconnected the negative battery clamp/cable first so I didn't produce sparks or blow fuses.
The small parts inside are lightly spring loaded and parts will go flying if you aren't super careful. I cleaned off the floor of the footwell first and put down new (flat) papertowels to catch anything that might pop out (a white sheet would work also), but if you slowly remove the white cap you should be able to capture everything.
TIP: I kept the switch/cap pointing downward (open side up) as best I could as I removed the cap to help prevent losing parts. Also I worked on the switch with it 100% of the time on/over the front seat. If the small springs or ball bearings drop on the ground you're done.
The photos tell the story. I didn't take an initial photo of the slightly burned contacts and some blackened grease before cleaning it off but you'll get the idea; there is bound to be some oxidation after 25+ years of power going through this switch.
First photo shows what you should see if you don't lose anything, two copper contact plates and some old grease. The top plate is not held in place by anything. Caution: there are two very small springs under that plate.
As always, double click on the photo to get a magnified view:
Note the darker contact areas/streaks and old grease.
This shows the top plate removed, note the two small springs which will fall out if you tip things over. The top plate came off easy; there is a small tab you can see, that fits into a slot of the center black assembly. The larger plate can be lifted using a small pick.
Both plates removed; magnify and look closely, there are three more small springs sitting vertically in holes in the black center section. These can fall out. They may also come up with the plate so work carefully.
This next photo below shows the center section removed.
WARNING: There are two spring loaded ball bearings, one on either side of the black assembly, hold your fingers over the balls as you remove the assembly. These spring loaded bearings roll into successive vertical grooves in the white cap as you turn the key which gives you that tactile feedback when you're in the next location ie: ACC ON Start. Sorry, didn't get a photo showing the spring loaded holes in the sides of the assembly but it's obvious how it works once you have it in front of you.
Note: I kept that black center assembly upright at all times:
Also, after cleaning up the cap using a plastic safe solvent I smeared some DEOXIT grease on the inside with attention to the grooves the ball bearings sit in and anywhere there's contact between moving parts. (note: the photo of the white cap below shows it as found, not cleaned or regreased yet)
The last photos shows the copper contact plates with the oxidation and old grease cleaned off. I removed the old grease then used a grey 3M sanding pad followed by 4-0 steel wool (followed by running a magnet over the plate to remove any tiny bits of steel wool), cleaned them off again with solvent then applied DEOXIT L260DNP grease which is made for switches like this. Applied a little fresh grease to each spring and the ball bearings (they all had old grease on them).
Be careful not to lose the two ball bearings or the five springs pointing up (magnify and count the springs) or the two springs on the sides (not shown):
FWIW after first sanding and cleaning the contact plates I applied the DEOXIT grease, let it sit a few minutes, then wiped it off, got more oxidation off on the paper towel, then reapplied the grease which is designed to remove old oxidation and help prevent it in the future.
Last edited:
![WP_20230605_18_09_29_Rich[1].jpg](/data/attachments/3147/3147783-3e33c8c2fcbc5b7cd6626cfc43370899.jpg)
