Resealed my rotary injection pump (1 Viewer)

This site may earn a commission from merchant affiliate
links, including eBay, Amazon, Skimlinks, and others.

GTSSportCoupe

2LTE abuser
Joined
Mar 23, 2012
Threads
237
Messages
9,097
Location
Victoria, BC, Canada
With the cold weather we had the past week, my injection pump (which had been seeping diesel), began seriously leaking. I had bought a seal kit last year when the seeping began, but had been putting off the job. The pump had stopped seeping through the summer when it got warm, which made it easier to procrastinate.

Anyhow, this job is certainly doable by the DIY'er. It is NOT easy though. Pulling the pump took 5 hours, cleaning and resealing it took about 5 hours, and replacing it took 5 hours. Might be faster on other vehicles depending on how hard it is to get at the pump. Cleanliness while working on the pump is of the utmost importance.

Here are some pictures I took of the process. Also, this is an electronic version of the rotary pump (2LTE). Would be roughly the same job for the mechanical rotary pumps though. I had to make a special thin 32mm wrench to get the spill control valve out. Also mounted it to a piece of wood to make it easier to work on.

Removing the pump is basically the same as doing a timing belt job. Then remove the pump pulley, injector hard lines, and mounting bolts.

Here is the dirty leaky pump after removal:
SAM_0060_zpseba9612e.jpg

SAM_0062_zps2df3be40.jpg

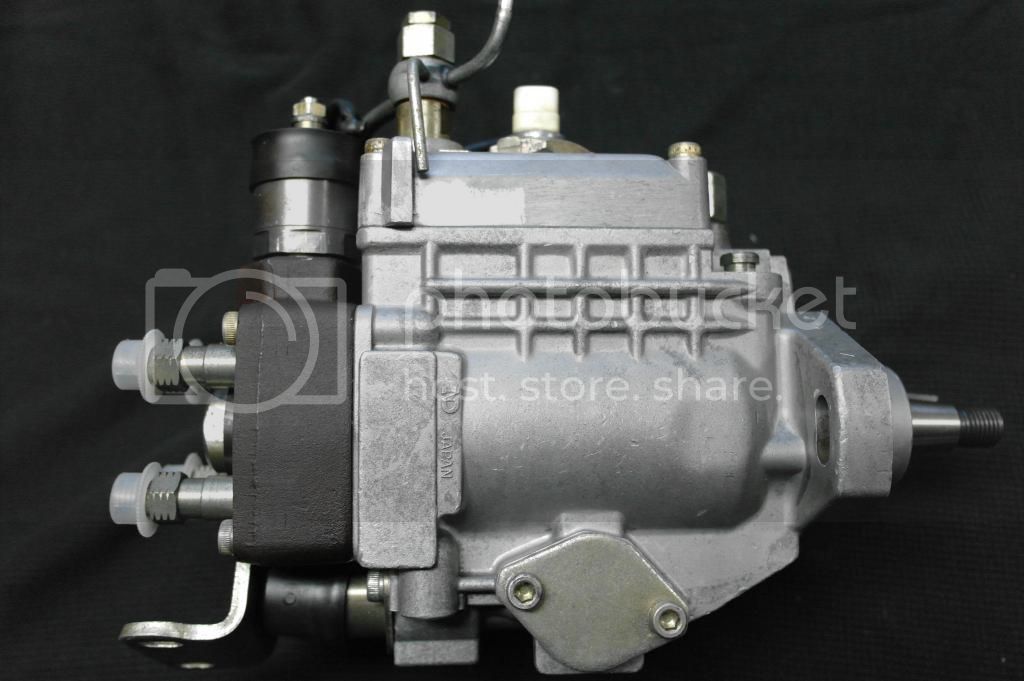
Pump after a good cleaning, blast with walnut shell and second cleaning:
SAM_0074_zps83d1377e.jpg

SAM_0075_zpsd6a3a458.jpg

Mounted it on a piece of wood (too lazy to make a metal mount).
SAM_0084_zps4029ff3c.jpg

Removed the Ne pick-up sensor and top cover to replace seals on both:
SAM_0086_zpsd9600105.jpg

SAM_0090_zps2dbfa61e.jpg

SAM_0092_zps9ac9230d.jpg

Removed lower side covers and replaced seals:
SAM_0093_zps829f5b03.jpg

SAM_0096_zps14ae23f4.jpg

Removed timing control valve and replaced seal:
SAM_0097_zps74435c4f.jpg

SAM_0098_zps7db7174f.jpg

Removed spill control valve, replaced the seal, cleaned filter mesh:
SAM_0099_zps51815416.jpg

SAM_0103_zpsf807be68.jpg


SAM_0105_zps123b317f.jpg

Lifted pump head slightly (did not remove completely), cut out old seal, rolled new seal over the head:
SAM_0109_zps00fac166.jpg

SAM_0111_zps38c8adcd.jpg

Removed front shaft seal and replaced:
SAM_0113_zps766d0eaf.jpg
 
At this point had to leave work and head home to finish putting the accessories on the pump. Here are pictures of the finished pump:
SAM_0115_zpscdcfe333.jpg

SAM_0120_zps00ae6316.jpg

SAM_0126_zps5689a522.jpg

SAM_0128_zpsc84570d2.jpg

SAM_0130_zps9a6dcc2f.jpg

SAM_0131_zps8dea77b2.jpg
 
Well done. :clap:

This should be a great help to others planning the same job..
 
Nice work! Looks like a big job, hope you had a warm place to work on the truck.
 
Well done. :clap:

This should be a great help to others planning the same job..

Thanks! And yes, anyone who is thinking about doing this job, let me know and I can give you a few tips.

Nice work! Looks like a big job, hope you had a warm place to work on the truck.

Thanks, yeah was a big job. Fortunately I have a heated garage to work in at my house. Did the rebuild in the machine shop at my work though, as the lighting is better, and more specialty tools available.
 
Very nice pictures, now add the torque settings and it is a 11+ ;) no if anyone starts this they should have the manual.
If the like button makes this kind of postings more relevant for the search engine I (finally) get the point of liking :clap:
got link below, found torque, just for fun:
torque.jpg
 
Last edited:
Very nice pictures, now add the torque settings and it is a 11+ ;) no if anyone starts this they should have the manual.
If the like button makes this kind of postings more relevant for the search engine I (finally) get the point of liking :clap:

You are right; I would not recommend doing this job without the pump service manual. In my case, I had the manual for my pump. Most of the Denso manuals are online for the V3, V4, V5 pumps. Here is the manual I used (it has torque settings also): http://www.kovsh.com/media/library/231/V 3 P5ZGR01.pdf
 
I remember doing this in 2009.. except that was when Toyota Australia were selling the complete injection pump for 2LTE (22100-5B300) for $300.000! Deal of the decade.
 
I remember doing this in 2009.. except that was when Toyota Australia were selling the complete injection pump for 2LTE (22100-5B300) for $300.000! Deal of the decade.

I read about that deal on the surf site. Wish I had my cruiser then, as I would totally have jumped on that deal.
 
i Jumped on that deal as the original pump was giving me Timer Control valve error code on warmup.
i still have the old one in a box of spares. i did swap the resistors onto the new pump.
 
i Jumped on that deal as the original pump was giving me Timer Control valve error code on warmup.
i still have the old one in a box of spares. i did swap the resistors onto the new pump.

Nice to see you on the forums still! Glad you got in on that deal back then too.

Chances are your old pump is still fine. Could be the timing mark is just out a bit. If you had retarded the timing a little, I bet your error code would have gone away. Also, any crud that settles in the pump can produce that error code. The aussies pull the timing control valve in situ and pump the fuel primer to flush crap out of the pump. Apparently 9 times out of 10 it solves that code. Good on you for keeping it for parts anyhow, as they are very expensive used/new now.
 
Fantastic work Nick. Do you have any additional hints / tips for doing the pump head seal and front shaft seal ?

Thanks

James


Hi James,

So, the trick with the pump head is to not completely remove it. What I did is completely removed two bolts, and left the other two bolts screwed a few turns in. This allowed me to lift the head from the body of the pump until I could see the seal, but not have the head come completely off. I used a dental pick (I get old ones free from my dentist) to pull the old seal out of it's groove and cut it. I removed the old seal completely. I then lubricated the new seal in some diesel, and rolled it over the top of the pump. Once it rolled down towards it's groove, the two bolts are in the way. I then re-installed the other two bolts a few threads such that seal was on the inside. Then I removed the first two bolts to allow the seal to reach it's groove. Then, I carefully dropped the head back down on the pump with the new seal in it's place. I installed all four bolts and torqued in two or three passes in an alternating sequence. I don't remember torquing to any particular specification. I just did what felt right and was consistent.

The front shaft seal was not so pretty. I think I just used a prying tool to get it out (being very careful not to scratch the shaft of the pump). I then found a piece of material in the machine shop that matched the circumference properly to press in the new seal.

When you do your spill control valve you will need a thin 32mm wrench to get it out. We milled a custom one. However, it might be easier to just buy a thick 32mm wrench and grind it down until it fits.

Feel free to ask more questions.

Cheers,
Nick
 

Users who are viewing this thread

Back
Top Bottom