
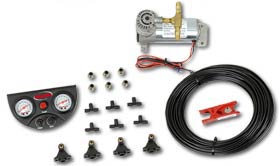
From what I can tell here at Mud, let me be the first to post up with an install and review of the Rancho RS9000 RCX in-cab air controller damping system for those of you with RS9000x 9 level shocks on their FJ. Something I would not have indulged in and purchased at retail, but did at the killer price I got it for. Though I admit, curiosity had always been killing me as I wondered if I never really used the 1-9 dial as it was a pain to get under the rig and twist the knob (over and over again to try the settings) and wondered.... IF I had this system, would I change settings more and use the RS9000x's as created?
INSTALL
difficulty: 1.5 due to all the laying of the air hose & thought process to cut the air hose correctly 1 time and think it through for travel and protection
time requirement: +5-6 hours easy!! took much longer than expected. Most of it in running the air hose, deciding where to run it, protect it, estimate for shock travel, and the slow extensive leak testing of the system.
PITA factor: 6 (on 1-10 scale) - running all that hose sucks, but leak detection is a major PITA
So, install takes some time. The 1 page directions are pretty straight forward and come in the box. It was not a real hard install, just have to find a place in the engine bay for the pump. the pump is small, and the copper t junction off of it seems kind of whack in its design as it makes a big t juncture with fittings and air hoses coming into/out of the pump - SO you need more room (away from hot headers and spinning blades and belts) than you would think.
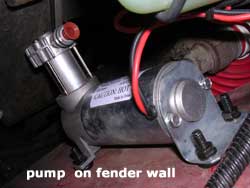
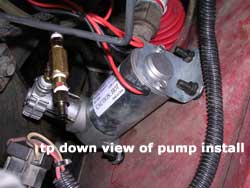
pump location - My install put the pump on the drive side front most fender wall near the bib and radiator. I had ample room, tucked out of the way, seemed to work out fine.
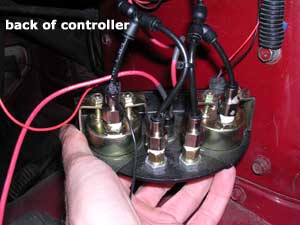
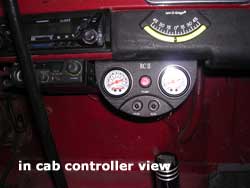
in-cab controller - I put the in-cab controller next to my CB where there just happened to be perfect space. under the dash and out of the way so that all of the air hoses and wiring can be hidden (as there is a LOT coming into that controller).
front air hoses - I ran the air hoses for the front up the shocks (attach with zip ties) to a provided T junction along the frame cross bar that the radiator bolts to. making sure to leave slack for shock travel. I sleeved them for protection where they bend and might rub the frame.
rear hoses - I ran the rear hose down the drivers side frame rail to the back from engine bay. I ran the hoses from the shocks up the shocks (attach with zip ties) to a T with some slack for travel, then tied it into the hose from the engine bay. that slack is hidden nice behind my MAF fuel tank. I sleeved them for protection where they bend and might rub the frame.
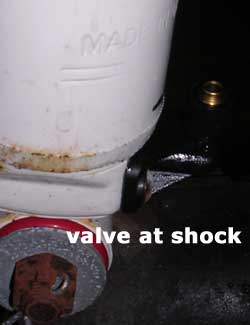
shock valves connects - bolt on after removed the knobs, be sure to use ample lube/grease to make a tight seal on the o-ring as that seemed to be a leak source for me.
REVIEW
Thus far, I only have local road usage as I just installed it yesterday during the week. Initial impression is it is a pretty rocking tool and at this time, I am glad I did it. quality seems solid. Controller seems well built (but exposed back side so you see all of its guts), the hose is stiff and hard plastic - not a flimsy rubber hose that easily kinks or folds/bends and there is like 90' of it - I had maybe 45' of that left so only used about half of it, pump seems solid and had rubber bushings to isolate it, etc. System is SO easy to use. press a button to air all 4 shocks up at 1 time (about 10 seconds), then push an air release button for the front or the back (or both) to dial in the number you want to roll at. slick as hell and works. I look forward to really using it offroad (maybe drop the pressure to hit the washboards at high speed - pump up for the road - middle ground for general off road) all from the comfort and arm reach of the cab. I dig the concept and will use the hell out of this.
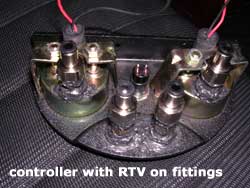
Also, the system does loose air just sitting there. I can tell that clearly. it seems that even if you have a clean install with no apparent leaks - do extensive testing with soapy bubble water, use teflon tape at ALL copper fittings, cut clean square even hose ends, make all copper fittings snug as hell - it will still have leakage. where and why I cannot tell you. I tried and tried to track a source down, but it seems that is the system. I have read this elsewhere and just confirming it. It will air down. BUT, the ease of pumping them up in 10-15 seconds, seems this can be dealt with easy, fast, and on the fly. I even resorted - just for fun as I wanted to rule out the controller as any leak source after finding most all my leaks there - to redundantly covering all of the copper fittings on the in-cab controller in black RTV to try to shut off any slow leaker I just could not detect with soapy bubble water. ugly, but a precaution to rule out any more leaks from there. time will tell on that.
I will, as always, report back my honest assement of this in real world as usage and time unfolds, so watch for this post to reappear time to time with assements.
TIPS
1. DO use the tube cutting tool they supply as it cuts the best and squarest - an exacto knife does a hack job
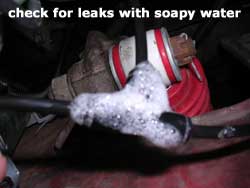
2. DO put togther soapy water mix and put the bubbles on ALL connections (t-junctions, back of in-cab controller fittings, pump fittings at pump, shock fittings at shock) to check for leaks no matter what you think.
3. surprisingly, in my case, 100% of the leaking in initial testing and install came from the copper fittings at the in-cab controller - not the hoses or t junctions! so keep that in mind and start there and put ALL of your adaptors and air fittings on while the controller is out of the truck and on the work bench.
4. use a small bit of motor oil on the tips of the hoses before pushes them into the quick release coupplers. the rancho guys told me this helps swell the o-ring in there you cannot see and helps with the seal.

INSTALL
difficulty: 1.5
due to all the laying of the air hose & thought process to cut the air hose correctly 1 time and think it through for travel and protectiontime requirement: +5-6 hours easy!! took much longer than expected. Most of it in running the air hose, deciding where to run it, protect it, estimate for shock travel, and the slow extensive leak testing of the system.
PITA factor: 6 (on 1-10 scale) - running all that hose sucks, but leak detection is a major PITA
So, install takes some time. The 1 page directions are pretty straight forward and come in the box. It was not a real hard install, just have to find a place in the engine bay for the pump. the pump is small, and the copper t junction off of it seems kind of whack in its design as it makes a big t juncture with fittings and air hoses coming into/out of the pump - SO you need more room (away from hot headers and spinning blades and belts) than you would think.
pump location - My install put the pump on the drive side front most fender wall near the bib and radiator. I had ample room, tucked out of the way, seemed to work out fine.
in-cab controller - I put the in-cab controller next to my CB where there just happened to be perfect space. under the dash and out of the way so that all of the air hoses and wiring can be hidden (as there is a LOT coming into that controller).
front air hoses - I ran the air hoses for the front up the shocks (attach with zip ties) to a provided T junction along the frame cross bar that the radiator bolts to. making sure to leave slack for shock travel. I sleeved them for protection where they bend and might rub the frame.
rear hoses - I ran the rear hose down the drivers side frame rail to the back from engine bay. I ran the hoses from the shocks up the shocks (attach with zip ties) to a T with some slack for travel, then tied it into the hose from the engine bay. that slack is hidden nice behind my MAF fuel tank. I sleeved them for protection where they bend and might rub the frame.
shock valves connects - bolt on after removed the knobs, be sure to use ample lube/grease to make a tight seal on the o-ring as that seemed to be a leak source for me.
REVIEW
Thus far, I only have local road usage as I just installed it yesterday during the week. Initial impression is it is a pretty rocking tool and at this time, I am glad I did it. quality seems solid. Controller seems well built (but exposed back side so you see all of its guts), the hose is stiff and hard plastic - not a flimsy rubber hose that easily kinks or folds/bends and there is like 90' of it - I had maybe 45' of that left so only used about half of it, pump seems solid and had rubber bushings to isolate it, etc. System is SO easy to use. press a button to air all 4 shocks up at 1 time (about 10 seconds), then push an air release button for the front or the back (or both) to dial in the number you want to roll at. slick as hell and works. I look forward to really using it offroad (maybe drop the pressure to hit the washboards at high speed - pump up for the road - middle ground for general off road) all from the comfort and arm reach of the cab. I dig the concept and will use the hell out of this.
Also, the system does loose air just sitting there. I can tell that clearly. it seems that even if you have a clean install with no apparent leaks - do extensive testing with soapy bubble water, use teflon tape at ALL copper fittings, cut clean square even hose ends, make all copper fittings snug as hell - it will still have leakage. where and why I cannot tell you. I tried and tried to track a source down, but it seems that is the system. I have read this elsewhere and just confirming it. It will air down. BUT, the ease of pumping them up in 10-15 seconds, seems this can be dealt with easy, fast, and on the fly. I even resorted - just for fun as I wanted to rule out the controller as any leak source after finding most all my leaks there - to redundantly covering all of the copper fittings on the in-cab controller in black RTV to try to shut off any slow leaker I just could not detect with soapy bubble water. ugly, but a precaution to rule out any more leaks from there. time will tell on that.
I will, as always, report back my honest assement of this in real world as usage and time unfolds, so watch for this post to reappear time to time with assements.
TIPS
1. DO use the tube cutting tool they supply as it cuts the best and squarest - an exacto knife does a hack job
2. DO put togther soapy water mix and put the bubbles on ALL connections (t-junctions, back of in-cab controller fittings, pump fittings at pump, shock fittings at shock) to check for leaks no matter what you think.
3. surprisingly, in my case, 100% of the leaking in initial testing and install came from the copper fittings at the in-cab controller - not the hoses or t junctions! so keep that in mind and start there and put ALL of your adaptors and air fittings on while the controller is out of the truck and on the work bench.
4. use a small bit of motor oil on the tips of the hoses before pushes them into the quick release coupplers. the rancho guys told me this helps swell the o-ring in there you cannot see and helps with the seal.
Last edited:


