Pertronix conversion, couple of questions (1 Viewer)

This site may earn a commission from merchant affiliate
links, including eBay, Amazon, Skimlinks, and others.

Joined
Jun 6, 2013
Threads
7
Messages
51
Location
Virginia
Website
wolfcreekrcpark.com
I've got a '72 FJ40 with the original F motor and I assume, original distributor. I'm converting to Pertronix ignition & purchased 91665A Ignitor II kit & 40511 flame thrower coil.

Everything went pretty smooth but I had a question I was hoping someone could help me with.

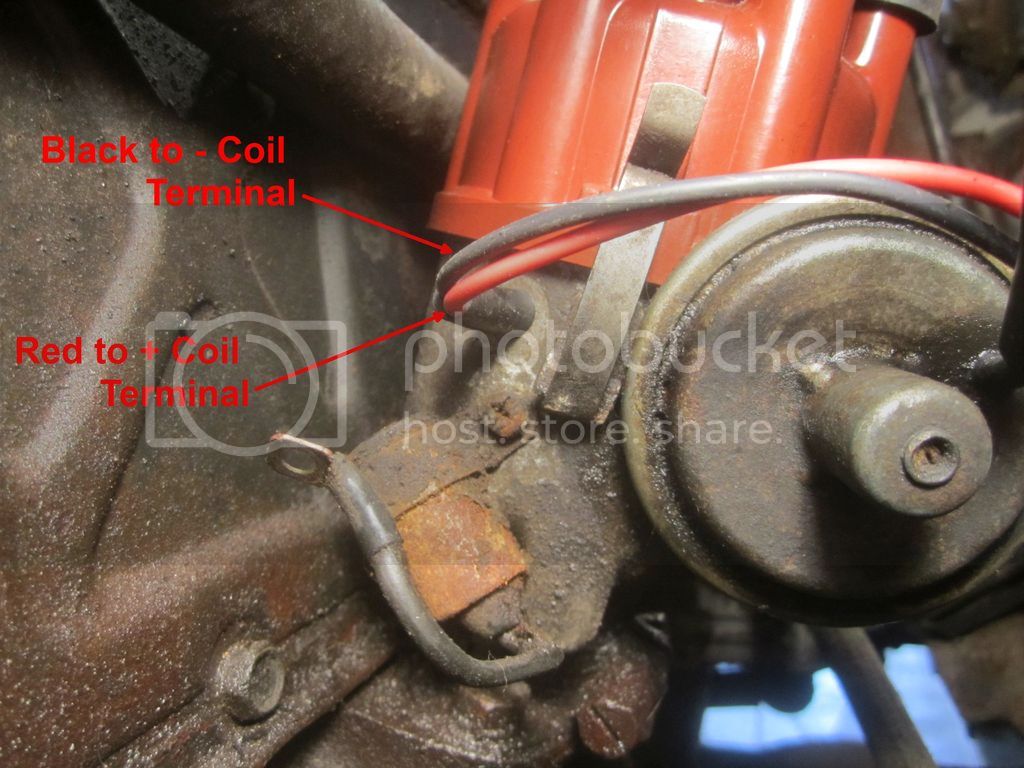
The instructions differ depending on whether a ballast resistor exists. It says "For installations that use a primary ballast resistor, connect the red Ignitor wire to the ignition switch side of the resistor" but it's just a flow chart diagram and I'm having trouble identifying this thing on my positive wire. I don't know why I didn't think of this at the time but looking at the picture now, it looks like a fuse but I'm at work & can't test that theory.

Is this a primary ballast resistor or something else and if the former, where would the red ignitor wire attach to it?

IMG_2112_zpsrvrczb61.jpg
 
I may have answered my own question. Googled "FJ40 primary ballast resistor" & it doesn't look anything like this but the Pertronix diagram just showed a long rectangular box labeled "primary ballast resistor".
 
the coil number you listed is the same one I run. It has 3.0ohm of internal primary resistance. No other resistor is needed. you need 12vdc from the ignition switch to the + on coil. Then wire ignitor to the coil.
 
For future reference, automotive primary ballast resistors are usually over 2" in length and most often look like this:
Ballast_Resistor.jpg
 
Last edited:
I picked up a B.R. at the local parts store. I think it was for a mid 70's Chevy truck. I paid under 5 bucks a few years ago and all's still well.
 
I can't believe I did this but... I took so many detailed pictures of my carb before removal that I could actually count the threads showing in the set screws and get them exactly where they were. It made putting the carb back on a sinch.

When I removed the coil, I had intentions of putting the new one right back on. Long story short, a week went by and now I'm a little confused as to what went where and both the Haynes & Toyota service manual show an ignition switch connecting directly to + terminal on the coil and I've got this bracket on the side of the coil that things were attached to including a wire from the solenoid on the carb & a wire from the starter and where the ignition comes through the firewall, it's wrapped in tape and lines split off from it and I'm having a difficult time tracing it.

I second guessed myself to the point last night that I got myself pretty confused not to mention kicking myself for not documenting better what seemed simple at the time.

Before I get into it, I should note that when I bought this truck in the late 1980's it had remnants of some sort of alternative aftermarket ignition system. I remember that was some sort of unit attached to the firewall that was no longer hooked up and it was using a conventional point system. Point is that someone a long time ago went back to points for whatever reason and it may not have been wired in a conventional way.

This is the new coil in the old bracket & it had this terminal unit attached to it. The short black wire you see in the lower right was not removed from the bracket terminal and was connected to one of the terminals on the old coil. I believe it was the positive coil terminal.

IMG_2127_zpsi3wilmxl.jpg


IMG_2125_zpspkhqzn4j.jpg


I took this picture 1 year ago when I took the carb off to document where the solenoid wire was attached so was able to confirm that two wires were attached to the top terminal on the bracket, the one in back goes to the solenoid and one in front (yellow/black wire) goes into a taped up bundle through the firewall. That bundle has two wires, the yellow/black one that you see attached to the terminal below and the other goes down to the starter (second photo below)

IMG_1849_zpsnpjpy19s.jpg


IMG_2121_zpsyknlyvgr.jpg


I think the condenser wire was the only thing connected to the negative coil terminal but when I removed the bracket that held the coil from the engine, I saw a small broken wire that looked to be grounded to a hose bracket on the block. I don't think I broke this as there was no similar wire attached to anything that was broken in the middle but figured I'd include it since it was probably related to this system at one time.

Condenser wire and mystery ground wire:

IMG_2115_zpsj6xapxf2.jpg


IMG_2123_zpsikctg8x7.jpg


This wire may not have anything to do with this but it was coming out of taped up bundle attached to the passenger side inner fender and had a lead coming out to the positive battery terminal. I broke the terminal clip & bought a new one and plan to reattach it to the positive battery terminal. I'm including the picture in case it clears up my mystery.

IMG_2133_zpszfqsa9ol.jpg


And here is the one that stumped me and led to all this confusion. This wire was connected to the old positive coil terminal and for the life of me, I have no idea what the other end was connected to. According to my service manual and the Pertronix instructions it should go to the ignition switch but where the connection to the ignition switch is in my truck isn't as clear cut as the diagram & I'm not 100% confident it wasn't wired in some weird way when I started in on it. If it was, I wouldn't have recognized that. It seemed too obvious when I took it off to document and now...

IMG_2129_zpshq1icnq9.jpg


Anyway, hoping someone can point me in the right direction. I so close to firing this up & it's been 3 years. Any help appreciated.
 
Last edited:
That is the ballast resistor on the side of the coil bracket. You will not need it. The large black/yellow stripe is from your ignition switch to the + on new coil, then your red from pertronix to + on coil, the black from pertronix to - on coil. That is all you need. The ground wire coming from harness should ground under one of the mounting screws of coil bracket. The condenser on your distributor is no longer used with electronic ignition and can be deleted or removed. Not sure about the "mystery wire" it reminds me of a set up I saw on mud of a factory radio condenser?? Not 100% sure on that, but it should not be needed to start your cruiser. As far as aby broken terminals I would do as you said and just reconnect them for now. Then you could "process of eliminate" what is not needed by disconnecting them and see what you do not need. The solenoid on carb should be an idle solenoid allowing idle fuel, don't think it was wired to the coil from the factory but not sure, it needs 12vdc while engine is running so it will idle. Check out this site Coolerman's Electrical Schematics and FSM File Retrieval
 
I don't think the wire in your last pic is OEM Toyota.
In your next to the last pic you are holding the fusible link. Nothing on the truck will work electrically until you connect that back to the battery + terminal. I sell the section that plugs into the fusible link, has 8" 10ga wire, then has a ring terminal to connect to the battery.
 
That is the ballast resistor on the side of the coil bracket. You will not need it. The large black/yellow stripe is from your ignition switch to the + on new coil, then your red from pertronix to + on coil, the black from pertronix to - on coil. That is all you need. The ground wire coming from harness should ground under one of the mounting screws of coil bracket. The condenser on your distributor is no longer used with electronic ignition and can be deleted or removed. Not sure about the "mystery wire" it reminds me of a set up I saw on mud of a factory radio condenser?? Not 100% sure on that, but it should not be needed to start your cruiser. As far as aby broken terminals I would do as you said and just reconnect them for now. Then you could "process of eliminate" what is not needed by disconnecting them and see what you do not need. The solenoid on carb should be an idle solenoid allowing idle fuel, don't think it was wired to the coil from the factory but not sure, it needs 12vdc while engine is running so it will idle. Check out this site Coolerman's Electrical Schematics and FSM File Retrieval

I thought it might be but wasn't sure of anything last night. Thank you first of all. The condenser I have removed. I've repaired the broken terminal on the fusible link (thanks coolerman). Mystery wire ignored for the moment.

My remaining two questions are where to attach the idle solenoid (I'll do some searching on that but if anyone else knows in the meantime... all the better) and two, the "large black/yellow stripe" You're referring to, is that the one from the starter solenoid in my third photo? and the "ground wire coming from harness" is that the one in the first two photos? I noticed that the large wire in the first pic is in fact black/yellow underneath the sheath.

I don't think the wire in your last pic is OEM Toyota.
In your next to the last pic you are holding the fusible link. Nothing on the truck will work electrically until you connect that back to the battery + terminal. I sell the section that plugs into the fusible link, has 8" 10ga wire, then has a ring terminal to connect to the battery.

Thanks, that helps tremendously just knowing what it's called. I see the terminology on schematics but the graphics in the schematics don't often look much like what I'm seeing under the hood. Ballast resistor was case in point. I think I'm good on that connection though, the endwire just came out of the connector which is still attached to the battery terminal.

Yes, that last wire had me scratching my head.

BTW, early in my previous post I said there was something attached to the firewall from a previous ignition mod. It was an ignitor module. It looked relatively new but was not connected to anything.

I bought the truck from a young pretty girl in a gas station parking lot in West Virginia. She had owned it less than 6 months and just driven it back from Idaho and knew nothing about anything that had ever been done to it previously. At the time, it had very little rust and Arizona radio station stickers on it so.... it's always been a mystery working on it.
 
Last edited:
Ahh the old pretty girl with a Land Cruiser for sale excuse!
If I remember correctly the idle solenoid connected to the same wire as the coil switched ignition wire (BY wire on + side of coil) However some say that is not a good idea due to the fact that if you get a short in the idle solenoid wire it can take out the ignition circuit which is NOT fused on older trucks! A better solution that I build into all my new harnesses for older trucks, is to use the 4WD light as the idle solenoid power source. I simply use a double bullet connector when I build a new harness and make up an idle solenoid wire to plug into that.

I can supply you with a small splitter adapter and a length of wire. You would unplug one side of the 4WD light, plug in the splitter adapter, plug the 4WD into one side of the splitter then plug the idle solenoid wire into the other and route it out to the idle solenoid. Th 4WD light is on a fused circuit.

Yea... I tried to get a two for one deal... got the truck & not the girl. She gave me a box of parts that was given to her when she bought it. It included a carb rebuild kit with a lot more left over pieces than there should have been but it ran well enough to get her back across the country so I figured... what the heck, right? But most of the issues were typical or easily spotted, leaking gas from the fuel pump, rotted rubber leaf spring bushings, etc. all in all there haven't been too many surprises. I've owned it almost 30 years now so they're all my problems now anyway and a lot of them, I've addressed. But in all these years, it's never not ran, until this issue, and believe it or not, I hadn't touched the points since I bought it.

Anyway, I may take you up on the splitter, I checked out your website & now understand why when I Google FJ40 wiring stuff that moss covered truck shows up.
 
That's an awesome job you did restoring your brother's '71 and an equally awesome job of documenting it. I'll be referring to that in the future. I've got a lot of similar issues with the body (don't we all) and have not been quite sure how to tackle them. Wish I had a brother I could drop mine off with and get it back like that.
 
Think I got my head around this but just to confirm, by not using the ballast resistor, nothing is connected to it anymore, correct? I think I'm going to get coolerman's splitter for the idle solenoid but wanting to try and fire it up this weekend. I'm not sure exactly which harness Georgia was referring to relative to the ground wire but this is what's in my head:

wire%201_zps3khniazz.jpg


wire%202_zps7uwzwhbp.jpg


wire%203_zpsdepqoxwc.jpg


wire%204_zpsxx23z8fa.jpg


wire%205_zpsnohn1voc.jpg
 
Thanks for the help on this. I reconnected the coil & wires as outlined above, a shot of starting fluid and it fired right up after almost 3 years. My high speed idle was a bit out of adjustment but other than that, it ran great... better than I can ever remember.
 

Users who are viewing this thread

Back
Top Bottom