
What was the cause of the spark plugs walking out of the head? Improper installation torque? Bad threads?
Navigation
Install the app
How to install the app on iOS
Follow along with the video below to see how to install our site as a web app on your home screen.
Note: This feature may not be available in some browsers.
More options
You are using an out of date browser. It may not display this or other websites correctly.
You should upgrade or use an alternative browser.
You should upgrade or use an alternative browser.
Inspecting a 100 series for "LEAKS" "Yeaks" (1 Viewer)
- Thread starter 2001LC
- Start date
This site may earn a commission from merchant affiliate
links, including eBay, Amazon, Skimlinks, and others.
More options
Who Replied?Dang it! Just found another bad ball joint. The Upper RH side. I missed in my inspection.
I been told we must pull the UCA to R&R the UBJ (upper ball joint) anyone know if that's true? If so any work around?
As I broke the nut loose, which wasn't tight at all. I was thinking how it must have not been torqued down, when someone rebooted. Wire tie on boot indicates reboot of ball joint. The the knuckle just slipped off the upper ball joint shaft. Not had one come off that easy before. In fact all three ball joint came off to easy.
So I did my usually ball joint inspect. That is by the FSM. Which has wobble the ball joint shaft 5 times. Then put on a tiny torque wrench and it must take a minimum of 5ft-lbf to rotate the ball joint shaft. Actually I never find a used ball joint that passes that test. I don't actual have a torque wrench smaller than 1/4". I just spin by hand. This one keeps spinning after my fingers leaves it.
Darn it!
Wire tie indicates a reboot.
View attachment 1984997
I don't have a picture of at the moment (Hub parts; hub flange, bearings etc.) soaking in solvent. I'll post picture of hub flange here later. Some how hub flange it took a hit on the end right were snap ring rides. This hit smashed the hub flange onto the axle, so I had to use a brass dowel to knock the axle through, to get hub flange off. The snap ring is factory size (E) 2.2mm. The grease cap it been reused many times and shot. The FDS appears to be and after market.
So I'll never know what happen here. Was it a road hazard hit the wheel, grease cap, axle hub flange. Or did someone beat the end of the hub flange with a hammer. I suspect a hammer. As also see pound marks on knuckle to release ball joints.
The wheel bearing locking nut, was on so tight I had to get my 3/4" breaker bar on it. Not seen that before. I could have broke loose with my 3/8" breaker bar, but the 3/4" leverage made short work-of-it. Seem like impact wrench used to put it on adjusting nut, who does that!
The oil seal in back of this hub flange was also in backwards. So the shop that did has miss-understand of procedure, not just one error. This seal was rubbing even more than DS.
Did I mention both hub flanges gasket are glued down with FIPG.
Seen that before the The Unicorn. Very bad practice. At-least they did not get excessive with the glue, where non should be use in the first place. I assemble with grease on both side of gasket not glue. I also grease the cone washer!
This Unicorn took so much work, hours of heat, P oils and pounding.
I video the, last few minutes of that glued down mess. Even cone washer were glued in. They didn't have a clue of how the hub flange works.
The outer boot seems to soft, not stiff like OEM. So I'm thinking aftermarket FDS.
View attachment 1985016
I serviced my wheel bearings using the advice in your numerous threads/videos. The PO had the truck serviced at an independent who specializes in domestic stuff... he was actually the seller on the PO's behalf. Generally a thorough and conscientious guy, but has no clue when it comes to wheel bearings. Mine had RTV under the hub flanges (luckily not the cone washers), too little grease, were WAY too loose, and had a far too much snap-ring endplay. In addition, the hub flanges had been removed multiple times with a cold chisel and were beat all to hell.
It is amazing how much abuse and ham-fisted mechanic-ry these trucks can put up with, though...
- Thread starter
- #23
What was the cause of the spark plugs walking out of the head? Improper installation torque? Bad threads?
Ticking time bomb TICK TICK TICK: Spark plugs Alert Alert Alert!
TICK TICK TICK POP POP POP is a ticking time bomb, often mistaken as exhaust manifold crack or gasket leak leak. ALERT, ALERT, ALERT: Spark plugs are working themselves loose. "Walking Out" Then blowing out of head, taking their female threads of head with them! Very damaging! You think TICK...
 forum.ih8mud.com
Over the years, I've found so much stuff messed up. I try to understand why!I serviced my wheel bearings using the advice in your numerous threads/videos. The PO had the truck serviced at an independent who specializes in domestic stuff... he was actually the seller on the PO's behalf. Generally a thorough and conscientious guy, but has no clue when it comes to wheel bearings. Mine had RTV under the hub flanges (luckily not the cone washers), too little grease, were WAY too loose, and had a far too much snap-ring endplay. In addition, the hub flanges had been removed multiple times with a cold chisel and were beat all to hell.
It is amazing how much abuse and ham-fisted mechanic-ry these trucks can put up with, though...
IMHO, it's one or more of these:
General mechanic specializing in Toyota, not just 100 series.
Short cuts taken, as time allowed for job just not enough.
Error, from monetary distraction.
Not reading the FSM, for proper procedure.
Lack of experience.
Lack of mechanical shills.
Incompetency.
Sabotage, to insure future jobs of great cost for repair.
Just doesn't give a dam!
Drugs!
Last edited:
- Thread starter
- #24
In my restore projects, I "try" very hard to bring all systems up to spec. I find so much wrong that would have been better if never touched. Slee and I agree: Better to have a virgin, than one every touched! They are so SWEET.
Last edited:
- Thread starter
- #25
Big THANK YOU to @bgolf247 for drop a 555 UBJ so I could get the PS button back up timely. You save the day Brain! What a great guy to have in this community.
So as I took the PS OEM replacement UBJ boot off I found it had been damaged. Seems someone re-booted UBJ covering the damage. Owner had no knowledge of a re-boot. Just that wheel bearing service (WBS) and replacement front drive shaft (FDS) was done ~10K miles ago. I have the work orders/bills and Lexus history. There is no UBJ boot mentioned that I've seen. But it was very likely recently b booted. Steering knuckle would have been pulled at that time. At minimum they'd must pull the upper ball joint to R&R FDS.
I'll never know, but looks like the typical pounding on knuckle to release the ball joint. That a few poorly guild hit took out the ball joint. This would surly cut the boot. But this boot looked new as did grease inside.
I also had to pound FDS axle through the hub flange with my brass dowel. Turns out the hub flange took a hit, square on the face that snap ring rides on. Yet snap ring was not bent and appeared to be a factory original as did grease cap. Kin of like someone beat out the old FDS axle with a steal hammer.
So we've hammer marks on UBJ, Upper knuckle at ball joint hammer marks, hub flange hammer marks, oil seal in backwards with hammer marks. BTW: PS hub oil seal was rubbing even more.
Additionally lock nut on wheel bearing of PS was so tight, I had to use "bigboy" (3/4" breaker) to remove. Hub flange gasket was glued to the hub flange very carefully. Ball joint castle nuts not torqued down. Like as if someone use an air wrench on all but then forgot to torque any.
Breakaway preload was zero (FSM 9-15lb of pull). Snap ring gap was excessive and rings were 2.2mm factory size. I use 2.6mm DS, 2.4MM PS
Hub flange were shoot as were cone washers.
One thing I did like that I found. The axle bushing and needle bearing had be grease at some point. The used a tool like the Slee tool to grease from outside through the spindle. This is one area I really see grease. KUDOS to whomever did that.
So is this a cover up? Or did this rig take a hit possible un-report accident with no history of repair. Well, I see NO evidence of an accident.

Small crack in fender plastic skirt is typical.
Hub flange was damage from hit.

So as I took the PS OEM replacement UBJ boot off I found it had been damaged. Seems someone re-booted UBJ covering the damage. Owner had no knowledge of a re-boot. Just that wheel bearing service (WBS) and replacement front drive shaft (FDS) was done ~10K miles ago. I have the work orders/bills and Lexus history. There is no UBJ boot mentioned that I've seen. But it was very likely recently b booted. Steering knuckle would have been pulled at that time. At minimum they'd must pull the upper ball joint to R&R FDS.
I'll never know, but looks like the typical pounding on knuckle to release the ball joint. That a few poorly guild hit took out the ball joint. This would surly cut the boot. But this boot looked new as did grease inside.
I also had to pound FDS axle through the hub flange with my brass dowel. Turns out the hub flange took a hit, square on the face that snap ring rides on. Yet snap ring was not bent and appeared to be a factory original as did grease cap. Kin of like someone beat out the old FDS axle with a steal hammer.
So we've hammer marks on UBJ, Upper knuckle at ball joint hammer marks, hub flange hammer marks, oil seal in backwards with hammer marks. BTW: PS hub oil seal was rubbing even more.
Additionally lock nut on wheel bearing of PS was so tight, I had to use "bigboy" (3/4" breaker) to remove. Hub flange gasket was glued to the hub flange very carefully. Ball joint castle nuts not torqued down. Like as if someone use an air wrench on all but then forgot to torque any.
Breakaway preload was zero (FSM 9-15lb of pull). Snap ring gap was excessive and rings were 2.2mm factory size. I use 2.6mm DS, 2.4MM PS
Hub flange were shoot as were cone washers.
One thing I did like that I found. The axle bushing and needle bearing had be grease at some point. The used a tool like the Slee tool to grease from outside through the spindle. This is one area I really see grease. KUDOS to whomever did that.
So is this a cover up? Or did this rig take a hit possible un-report accident with no history of repair. Well, I see NO evidence of an accident.
Small crack in fender plastic skirt is typical.
Hub flange was damage from hit.
- Thread starter
- #26
This was my first Upper ball joint (UBJ).
Read and heard that upper control arm (UCA) must come off to press in and out the UBJ. That would mean additional expense and time for alignment. This would also mean additional time R&I the UCA. This whole job has been much more than we though it would be and I didn't want any addition time or cost needlessly. So I took a chance which may have added to time, if it didn't work. I went after UBJ R&R with UCA in place.
Love it when a plan comes together. I spend time trying every fitting I could find to press out the UBJ. But nothing was short enough to go within span of press clamp. After some trail and error, I just used a receiver cup at the top and nothing on the bottom. I then moved the clamp tool (end) from side to side and walked off the ball joint. Then found the correct fitting to press back on, after cleaning port and greasing. Bigboy made the job so much easier.
Look at what is missing, tells story of what was used for the UBJ pressing in.
Last edited:
- Thread starter
- #27
Brake fluid look old (dark) so I flushed. Some rubber bleeder caps were missing, which is a big deal for a small $2 part. It can lead to plugged bleeders, frozen in bleeders or even caliper damage. I soaked the rear bleeders for a few days, with penetrating oil. Since caps where missing. PS rear was plugged, which I reconditioned to allow flow.
- Thread starter
- #28
Leaving the front wheels off until done flushing brakes. Makes the front so much easier ") .
.
I torqued bleeders to 9IN.lbf. Then I spray cleaned brake bleeders orifice out and around the bleeder with cleaner. Any like cln: carb cleaner, MAF cleaner, brake cleaner that dries fast without leaving residue. This way I'll not attract moisture into bleeder, and can look to see if any weeping fluid when I'm done. If time test runs over 40 seconds, it is usually a weeping bleeder that needs just a little more snugging down. This test of booster run time was spot on at 36:79 seconds first time.
Reservoir now, Just a tad on the high side. The 1mm over should not be issue. As I did flowed the instruction embossed on reservoir for topping fluid and it will drop a little with brake pad wear.
Here's how it looked when I first inspected. This was topped without evacuating accumulator first, very common mistakes that has consequences.
WRONG: It was not flushed and overfilled after recent brake job.
- Thread starter
- #29
Lubing was a bit difficult with the rear two of the three Slee skids still in place, but doable.
Spiders were near dry as revealed by minimal old grease pushed out.

Engine ready to go.
Took on short drive up to 35MPH to reset steering VGRS, also to activate ABS which is part of brake flush procedure.
Seem to run fine, but I'll need to hook into tech stream and see how the data looks also.
Spiders were near dry as revealed by minimal old grease pushed out.
Engine ready to go.
Took on short drive up to 35MPH to reset steering VGRS, also to activate ABS which is part of brake flush procedure.
Seem to run fine, but I'll need to hook into tech stream and see how the data looks also.

- Thread starter
- #31
Roof rack leaks next.
I removed 9 bolt from one side to lift the rack one side at a time. Each bolt area were about a third filled with black poly. I cleaned each bolt area with a tooth bush soaked with a wax & grease paint cleaner, then blew out while wet with cleaner. Then I filled each cavity with seam sealer. Seam sealer is kind of runny. So it settled into crevices and down the hole as if self leveled. Once I had bolt back in, I refilled each bolt area with seam sealer. I'll need to let cure before water testing.
Next was leak in "A" pillar from missing rivets. I did not install rivets, since new windshield will be installed soon. I just plugged the open holes with butyl
- Thread starter
- #32
I'll check for leaks today, now that the 3m Seam Sealer has cured overnight. I'm also going to check the coolant level again, to make sure its to top of radiator under the cap. Also the AHC pressures and adjust the t-bars, as it has the Toyota lean (low DS rear).
Provided all goes well today, she road worthy. This assume the shops that flushed the fluids did at least that right!
Provided all goes well today, she road worthy. This assume the shops that flushed the fluids did at least that right!
Over the years, I've found so much stuff messed up. I try to understand why!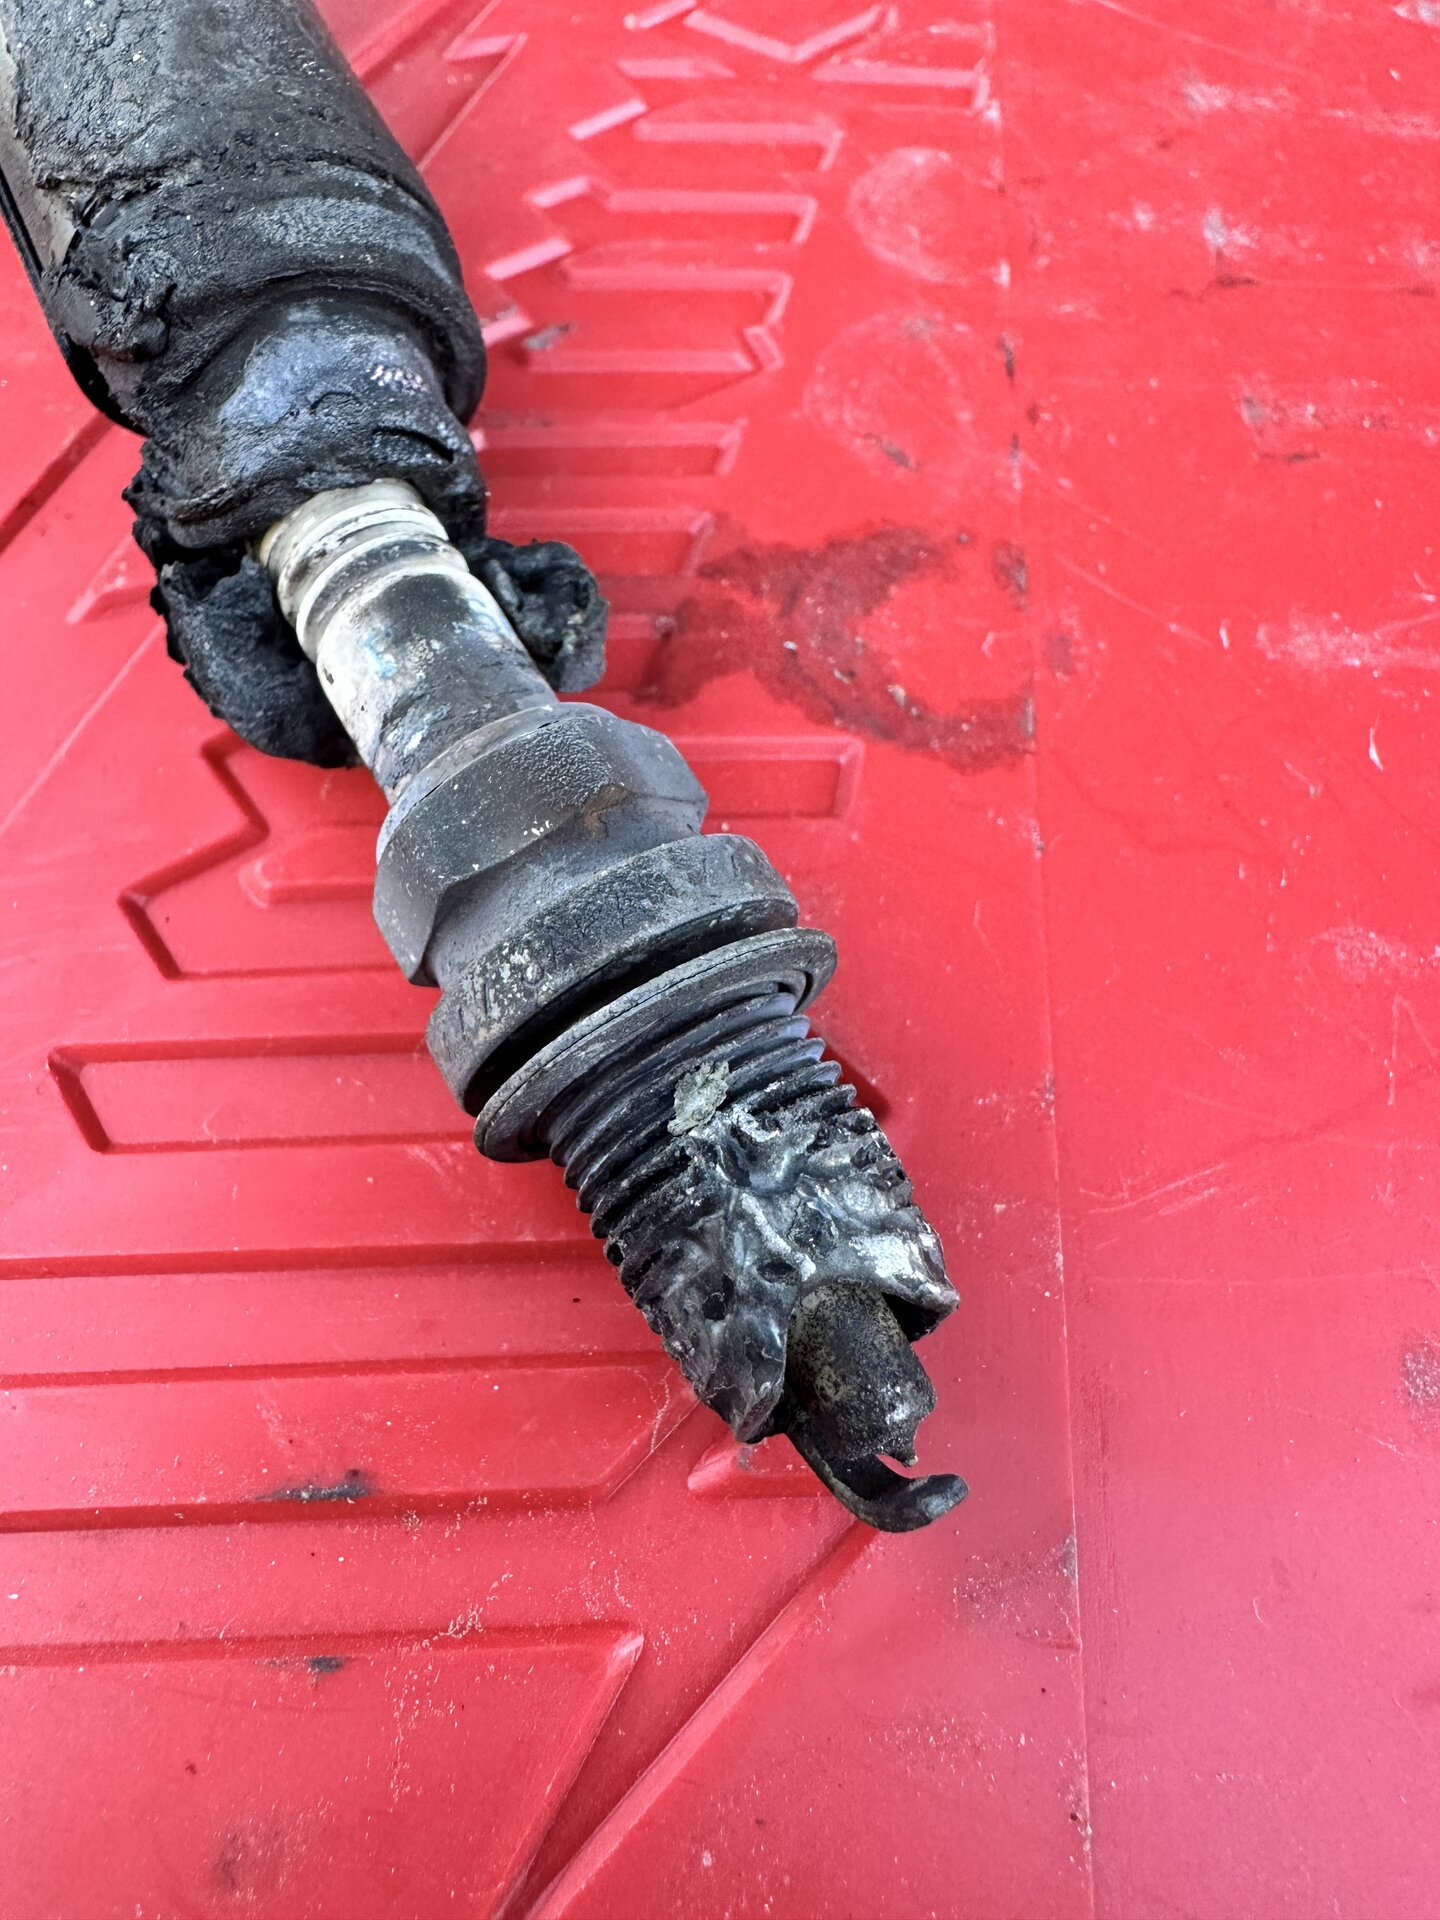
Ticking time bomb TICK TICK TICK: Spark plugs Alert Alert Alert!
TICK TICK TICK POP POP POP is a ticking time bomb, often mistaken as exhaust manifold crack or gasket leak leak. ALERT, ALERT, ALERT: Spark plugs are working themselves loose. "Walking Out" Then blowing out of head, taking their female threads of head with them! Very damaging! You think TICK...
IMHO, it's one or more of these:
General mechanic specializing in Toyota, not just 100 series.
Short cuts taken, as time allowed for job just not enough.
Error, from monetary distraction.
Not reading the FSM, for proper procedure.
Lack of experience.
Lack of mechanical shills.
Incompetency.
Sabotage, to insure future jobs of great cost for repair.
Just doesn't give a dam!
Drugs!
You've got me paranoid now! I'll check my plugs ASAP!
Wow
- Thread starter
- #35
You should be. This issue is appearing more and more with the aging fleet.You've got me paranoid now! I'll check my plugs ASAP!
Exactly. But this is so common, but a shame to see so many Dealerships, INDY and Toy specialty shop foreman aren't more on top of there mechanics.
Sure I'm more detailed oriented (OCD if you will, me I don't like labels of the tweet age) than most. But we all have access to Toyota FSM or TIS web portal.
So here is LT ft (long term fuel terms) now after removing K&N filter box and giving a minor turn up. If you recall, I was seeing TL FT or -20%. Which I'll bit will improve even more with a gas tank of 44K (fuel system and cylinder head cleaner) plus a long HWY drive to blow out.
After tune..plus

Before:
Tech Stream idling
Tech Stream under load (In "D" foot on brake, engine speed up to 1,325RPM) No misfires recorded. Good sign that coils aren't toast. Drive test 30 to 100MPH accelerate needs done as second test. Any missing and likely new Denso Coils will help smooth out.
- Thread starter
- #36
I also adjust t-bars. Had ~1" DS rear and ~1/2" DS front higher than PS. AHC pressures end up at front 8.2 and rear 4.8 with heavy after market rear coils, roof rack, Slee sliders and all three Slee skid plates installed by Slee. Ending rake (front lower) was<~3/4". Variances now less than ~1/8 side to side (from ~1" starting point).
If ride too bouncy, torsion bar bolt should be cranked CCW 1/2 turn at a time each. This will increase load/pressure equally on AHC.
If ride too stiff torsion bar bolt should cranked CW 1/2 turn at a time each. This will increase load on t-bar, reducing pressure in AHC.
If ride too bouncy, torsion bar bolt should be cranked CCW 1/2 turn at a time each. This will increase load/pressure equally on AHC.
If ride too stiff torsion bar bolt should cranked CW 1/2 turn at a time each. This will increase load on t-bar, reducing pressure in AHC.
- Thread starter
- #37
A note about roof rack bolt leaks. All bolts along with plastic spacers had a good amount of black poly under the mounts. At which point(s), these leaked, I could not tell. The 3M Seam Sealer seems to have done the trick, as no leaks detected. Time will tell.
I would suggest the the factory rain gutter molding be reinstalled. This improves look, and aids in keeping water/leaves/debris running off the roof.

 partsouq.com
I would suggest the the factory rain gutter molding be reinstalled. This improves look, and aids in keeping water/leaves/debris running off the roof.
| Lexus LEXUS LX470 UZJ100L-GNAGKA UZJ100 | Parts Catalogs | PartSouq
If you are looking for Parts for Lexus LEXUS LX470 UZJ100L-GNAGKA UZJ100 then we advise you to pay attention to the range of our spare parts catalog for Lexus!
Similar threads
Users who are viewing this thread
Total: 2 (members: 0, guests: 2)