HZJ75 Around the World... (1 Viewer)

This site may earn a commission from merchant affiliate
links, including eBay, Amazon, Skimlinks, and others.

Joined
Mar 16, 2011
Threads
3
Messages
21
Location
Started a round trip... Canada!
Hello everyone,

We are a French couple traveling around since 2007, we started from France, New Zealand, Australia, Samoa, Bali, Thaïlande, Cambodia and back to France! At this time we were mostly backpacking and buying cars on site when we had enough time/cash and selling them at the end of the visa.

We bought a Toyota Ace in NZ and a Nissan Patrol Y60 in Australia.
our blog from NZ: http://2008lodysseedeskiwis.blogspot.ca/
our blog from OZ: http://2009lodysseedeswallabies.blogspot.ca/

When we came back to France in 2010, we realized that our life was now to be on the road!
We decided to hit the road, so we saved some cash by working like crazy and building a 4WD to live in on the road, since that time we never stopped...

We started from France in September 2012 and made it, 13 month latter, to Vladivostok,
here is our blog France to Russia : http://2012lodysseedugobi.blogspot.ca/

We are actually in Canada on the East coast, traveling south and will be in the USA in a couple of month, here is our blog Alaska / Ushuaïa : http://2014iletaitunefoislesameriques.blogspot.ca/
So if ever you see us, don't hesitate to stop by!

Back to the car:

One morning we found an add for a Toyota HZJ75 near our place in Bretagne, you know the story, we just give a call and go to see, just to have a look... Well, we came back with the truck the same day!

We bought the car in 2010 and 1.5 years latter we started our trip around the world, here is the building of SPUTNIK...

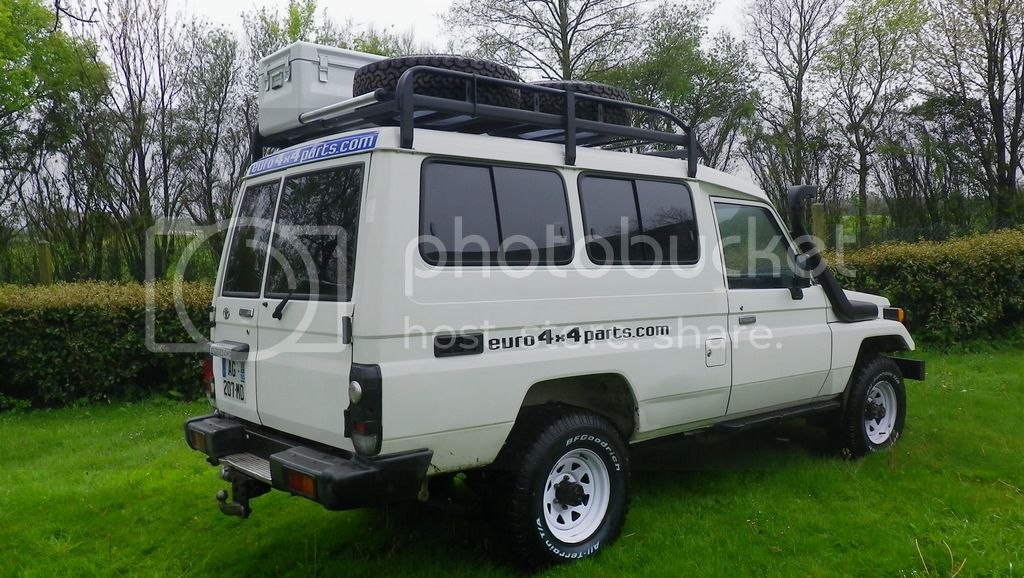
Here is the car when we found / bought it:

IMGP1416_116_zps152884cd.jpg


IMGP1408_89_zps24868e28.jpg


IMGP1432_105_zps86b41b77.jpg


IMGP1433_82_zps22cea755.jpg


About the truck:

It's a HZJ75 from 1995, 327000kms, had 3 different owners and the last one got the car since 3 years and never used it as he didn't have the time...
It's a left hand drive with documents for 5 persons, so it came with the rear bench.
Came with a Trans and Tcase in the trunk as they have been change with the last owner...
So on the Car, "new" (5000kms) clutch, rebuilt Tcase and Transmission.
Get all the bills and documents from the beginning so... why not!

The first thing was to clean it all and start listing our needs...

IKA_0382_zps5a491d00.jpg


IKA_0475_zps65699de0.jpg


To be continued...
Thx Ivan.
 
You two are inspiring to say the least. It was awesome to meet you here in Calgary last December. It was even more fun being a very small part of the work done to repair your transmission and get you on the road again. I already tell people I was a "big part" of an expedition around the world LOL

I'm going to take some time and go through those blogs.

Kevin
 
A bilingual blog! I will enjoy reading them as you travel along. Such a great adventure.
 
Well, I continue a little, (please forgive my english...)

We have our HZJ, cleaned and not too rusty, whatever ...
It remained to define the specifications. As we've already spent one and a half year in Australia living in a Nissan Patrol (see blog post cited 1) so this time, with the dimensions of HZJ, it'll be a palace!

Here is the list:

- Carring enough gas to go everywhere
- having the main power instaled, 220V, and be able to have it runing for enough time
- having enough room to carry all our gear, filming, diving, fishing...
- enough to cook and store some food
- having a setup nice enough to be able to spend some time inside when the weather is to crappy outside... Or when there is to many mosquitos!
- As we are going to spend some time traveling during winter time we'll need to get some device to keep us warm inside.

So we started buying stuff:

- 1 stationnary diesel heater, Webasto, 24v Air top,
- 1 fridge Vitrifrigo 42l with separate group 24V,
- 1 stove working with alchool as we found it easier to find on the road... (working with Etanol, Methyl Hydrate...)
- Found some LED system from Ikea for the inside...

With all that in stock we just had to start working!

First thing, just to gain in autonomy and power to run the auxiliary heater without taking the diesel from the main tank we decided to fit a second one.

as we are actually in a "squirel mode" for saving the money for the trip, we decided to build it ourself!

The target here is to replace the spare wheel (fixed under the vehicle) by an additional tank without limited the ground clearance of the car.

We have chosen not to connect the tanks, or use a 3 way connector. For us, it will be a diesel transfer pump. That will transfer the contents of the second tank in the original tank by a switch located on the dashboard.

After some time spend drawing, cuting cardboard for a making a template, we sarted working on the tank.

IMGP2181_zpsa6e46b90.jpg


It's made of 2.5mm aluminium with bulkhead to stop the "waving of the diesel" and hold 97L. So that will give us 91L + 97L = 188L of diesel. So far we are good for around 1600/1800kms, perfect for us!

The Tank will fit at the place of the spare wheel under the truck in a bracket made of steel,

IMGP2339_zps3c78356b.jpg


Here is the tank ready to go:

IMGP2330_zps00754465.jpg


There is a lid on top and on this plate are located the following: Diesel gauge, Webasto intake, Pump intake and overflow when refueling...
The tank is hold in the bracket with some spacer that I built out of PMMA on a milling machine as I'm a machinist... I also glued a sheet of rubber under the tank to prevent any damage from vibration...

Here is the tank in position:

IMGP2336_zps906c162d.jpg


IMGP2340_zps7d95cab4.jpg

I also add a plate fixed on the bracket to protect the tank, made of 3mm aluminium .

Now that the tank is fitted on the truck we just need to connect it to the main one and the filler,

Here is the filler pipe from the main tank where I had a pipe to connect the second tank:

IMGP2169_zps364c1ce2.jpg

Then connected:
IMGP2170_zpsf689b30a.jpg


The diesel pump fit perfectly over the tank, on the old sprae wheel holder bar:

IMGP2297_zps4c2a0f1a.jpg


IMGP2298_zpsf5071878.jpg
 
Great looking tank. When are you coming through the midwest of the US, if at all?
 
Great looking tank. When are you coming through the midwest of the US, if at all?
Hello Dubbinchris,

Well as we don't have any plan yet... all I can say for now is that we'll be folowing the East cost from the Maine to Florida the next months... Thinging being around New York early April, and by the way, we are actualy looking for a place to park/stay for a couple of night as we would love to spend some time in the town... knowing that you are not from there but maybe some one in the forum can help...

Thanks, Ivan.

(PS working on thread too...)
 
Yeah I'm definitely not along the coast but if you come through the state of Ohio you're welcome to park in our driveway for a night or two. Hopefully others along the coast will chime in.
 
Hello, Thanks for following and offering help or place to stop by on the road! That's why we are traveling!

Well I keep going with our HZJ, the tank is on just need to connect and fit everything...

here is the back right lights panel:

IMGP2261_zps96323159.jpg


IMGP2266_zpse041ed86.jpg


the 50mm filling pipe:

IMGP2275_zps13309940.jpg


IMGP2276_zpsae85ad48.jpg


IMGP2361_zps5398baca.jpg


In Red to the left the filling, in red to the right the overflow in blue, the vent when I'm transferring from the 2nd to the main.


IMGP2322_zpsc0384ead.jpg


for under the car I built a 90° angle in stainless, inside the side panel:

IMGP2277_zps44265c2c.jpg


under the car:

IMGP2278_zpsa23e4492.jpg


IMGP2321_zps06a9f393.jpg


The result:

IMGP2359_zps3d5a9da2.jpg


Then all the line or fixed like that:

IMGP2312_zps01cf3bf8.jpg


IMGP2316_zps3d03dc8c.jpg


IMGP2320_zps5529f5e4.jpg


with the gage on the dash:

IMGP2195_zps98d8a58a.jpg


Now it's time to start working on other stuff, changing the sits for some newer ones (Origin Citroen BX...) So for that i just machined an aluminum plate to match the fixation points.

IMGP1601_zpsf306f093.jpg


After that we start working on the insulation and deferents shelfs and storages ...

IMGP2173_zps89908db7.jpg


IMGP2172_zps8597595b.jpg


IMGP2175_zpseef9c5cf.jpg


We keep the back heater in plus of the webasto:

IMGP2474_zps21f4767f.jpg


IMGP2513_zpseab1b7a6.jpg


Thanks, Ivan.
 
Well, Sorry for the long silence as we are now in Nola I got a bit of time to update, here is the following...

We used 5mm plywood for the side and built-in some storage:
IMGP2510_zps740c4230.jpg


IMGP2540_zps7a5d5f87.jpg


IMGP2541_zpsb1ed53de.jpg


IMGP2543_zps65faad9e.jpg

Here is the webasto HL18D.

Then we started working on the inside setup:
IMGP2630_zpsabe3362a.jpg

IMGP2634_zps019172d0.jpg


We received our stove, an origo 4100 working with alchool:
IMGP2635_zps3fb971a9.jpg


And our fridge a Vitrifrigo C42:

IMGP2684_zps32dfa610.jpg


The webasto cover,

IMGP2685_zps87df6318.jpg


IMGP2688_zps40be0ee6.jpg


and inside:

IMGP2691_zpsff0d2147.jpg


We choosed a fridge with a "non include" conpressor (a danfoss DB35):

IMGP2687_zps46023502.jpg


As we save some room in the fridge!

All take shape:

IMGP2692_zps836e67ec.jpg

IMGP2701_zps62af154a.jpg


The rear heater vent:

IMGP2703_zpsbc737b75.jpg


And with bench and table:

IMGP2705_zps0c072e2f.jpg


IMGP2707_149_zpsc57e588e.jpg
 
So, as the inside is almost done, it's time to work on other things:

We choose a tint film for the windows, that is special for anti breaking it's 0,2mm and fit with a special glue:

First removing the frames:

IMGP2710_zps77e3d432.jpg


IMGP2727_zps86481778.jpg


Then painting the frames and film the glass and but everything together...

IMGP2762_zps31da4423.jpg


IMGP2763_zps9f1f8dd0.jpg


Same for the rear doors:

IMGP2787_zpse3f8aaa2.jpg


IMGP2795_zpsc0631100.jpg


IMGP2815_zps2537836c.jpg


During this time I worked on a new cabinet above the stove:

IMGP2768_zpsffabd531.jpg


IKA_3896_zpsdcaaaf7d.jpg


IKA_3899_zpsbb96820b.jpg
 
Last edited:
As we wanted to protect the engine we decided to built a bull-bar that will do the job!

start from a beam that I had,

IMGP2557_145_zps1945c408.jpg


then cut, weld, grind, paint...

IMGP2558_105_zpsa1ea09a2.jpg


IMGP2561_85_zpsed981e3a.jpg


IMGP2564_zps8bf46c2e.jpg

IMGP2565_zps79a6f7af.jpg


A friend of us had this from a KZJ so why not using it?!

IMGP2612_zpse92e2966.jpg


I cut it and changed angle to make it fit, then weld the bracket to the beam:
IMGP2615_zps5557504d.jpg


IMGP2621_zpsdad13215.jpg


then painting:
IMGP2759_zpseffea80f.jpg


IMGP2786_zps71b8f810.jpg


That's it for the front, let"s work on the top now...

As we well need to carry extra stuff we decided to built a roof rack. We had a roof rack left from a Renault Trafic new generation that will be perfect after few modifications...

IMGP2211_zps6661809d.jpg


IMGP2220_zpsbfe04224.jpg


IMGP2222_zps394ea56c.jpg

To wide and to long we decided to make it fit!

IMGP2217_zpsc21eccb4.jpg


Stainless feet :

IMGP2287_zps3a1b025f.jpg


then a bit of painting:
IKA_2336_zps8e97b34d.jpg


IKA_2342_zps1b67d786.jpg


IMGP2446_zps106c46f9.jpg


IMGP2448_zps02446f91.jpg


Then on the car:

IMGP2535_zpsb7d3821f.jpg
 
Here is the location of the auxiliary batteries
IMGP2753_zps6a83563a.jpg


As the car is in 24v, we decided to keep the fridge and the webasto working in 24V,
We choose 2x AMG 850A - 90Ah

IMGP3046_zps05302ec2.jpg


It's time to test the led:

IMGP2775_zps5c42ace1.jpg


IMGP2782_zpsff079d1a.jpg


Thank and don't hesitate if you do have some questions...
Ivan.
 
WOW! You've been busy. It's all coming together. What are you doing for water? Drinking, washing cooking, etc.
 
Hi Scrapdaddy,

Actually the car is finish since 2012 as we are on the road since... actually in Nola.

About the water, we choose to use normal water jerrican, as it's easy to refill anywhere, easy to remove from the car when needed and also no risk or less risk of spilling in the car and create more damage, the last reason is the risk of contamination of a unique big tank...
We do carry one of 13l and one of 20l plus an other of 3l so 36l (around 9 galons) so far never add trouble even in Iran or Mongolia.

Thanks.
 
The Auxiliary batteries get charge from the alternator so we connect them using a Cyrix-i 12/24 V 100 A et 225 A from Victron.

To keep an eye on what's going on with the power we add a panel on the side of the fridge cabinet:
IMGP3044_zpsc425642c.jpg


IMGP3045_zps5ec1a635.jpg


To operate, Fridge, heater and common 12V from a converter (24v / 12V 10A).
We also fit an inverter (24V/220V).
We can also control the Tension of the batteries engine and Auxiliary .

during the process we also received some parts from one of our sponsors Euro4x4parts, so it was time to work on the suspensions...

IMGP2643_80_zps13fad8f4.jpg


IMGP2641_75_zps79f70cae.jpg


IMGP2659_zps2d959bc1.jpg


IMGP2663_zps25eede9b.jpg


IMGP2661_zpsd03d92b7.jpg


IKA_3908_zps36fa27b3.jpg


So we fit New leaf springs Maxitrac +300kgs and also add a leaf at the rear to make it a + 700kgs news chocks absorber Tough Dog, steering chocks absorber OME and a new radiator.
 
Last edited:
Almost finish, just needed a Snorkel, a pre filter fg500 and of course some boxes on the roof rack.

IMGP2802_zpspeakjxry.jpg


IMGP2896_zpsx9l6actt.jpg


I found some fiberglass boxes from the army but they were to high for the roof so we had to cut them and removed about 8cm then re fiber them.

IMGP2828_zpskc9agndn.jpg


Just needed a good painting so let's do it!

IMGP2827_zpscmyr96xa.jpg


IMGP2831_zpskerg5e8n.jpg


IMGP2824_zpsfonyhrmf.jpg


The last thing was to get some cushion for the inside. We found a foam mattress from the boat industry that was perfect.

so here is the result in table configuration:

IMGP3024_zps7g8ncaq8.jpg


IMGP3027_zps5efwvzvq.jpg


IMGP3030_zpskhh4nlbd.jpg


here are the storage behind the sits:

IMGP3029_zpsl0ks0jey.jpg


Here on bed setup:

IMGP3032_zpssbw3vv27.jpg


IMGP3035_zpswrg4do5k.jpg


So in about a year we went from that:

IMGP1416_116_zps152884cd.jpg


to that:

IMGP3005_zpsogpd7uzn.jpg


IMGP3015_zpsdxkic2lm.jpg


IMGP3018_zpsw0hevouf.jpg


IMGP3019_zpscezufk6i.jpg


IMGP3021_zpsdeflfv1e.jpg


IMGP3039_zpsph5ch2lg.jpg


So we started traveling in September 2012 from France to Mongolia, then shipped the car to Vancouver Canada, from there we drove North to Alaska them Quebec, enter the USA in Maine, all the way down to the Keys and are on the road to Wyoming... done about 100.000 kms with Sputnik so far and impatient to do more!

Thx for having a look. Ivan and Katia.
 
Last edited:

Users who are viewing this thread

Back
Top Bottom