How to change your rear shocks without cutting a hole in the floor (1 Viewer)

This site may earn a commission from merchant affiliate
links, including eBay, Amazon, Skimlinks, and others.

Joined
Aug 3, 2011
Threads
9
Messages
78
Reading all the threads on the rear shocks kind of scared me to do this since I'm not much of a mechanic. I found a couple tips though that I thought might help someone on the fence about doing it themselves.

When I took it upon myself to replace the rear shocks, I had every intension of cutting a hole in the floor to get the top nuts. I figured with my MN car I'd need to.
I thought I'd try doing it without cutting a hole just to see if I could do it.

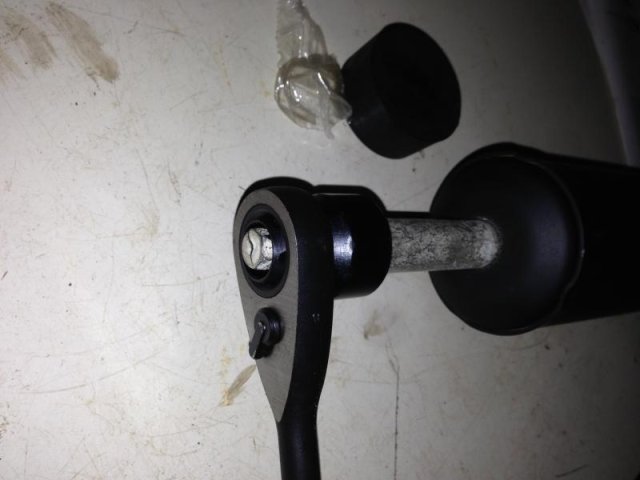
Turns out this tool from sears made it so I could do it without that.

Here's what you need to get:

http://www.sears.com/craftsman-19pc...p-00931088000P?prdNo=3&blockNo=3&blockType=G3

This is key because it's low profile on the nut, but you can still slide a pipe over the handle. A regular wrench or even the ratcheting wrench has the crow foot on the opposite side that you can't slide a pipe over
IMG_0850.jpg


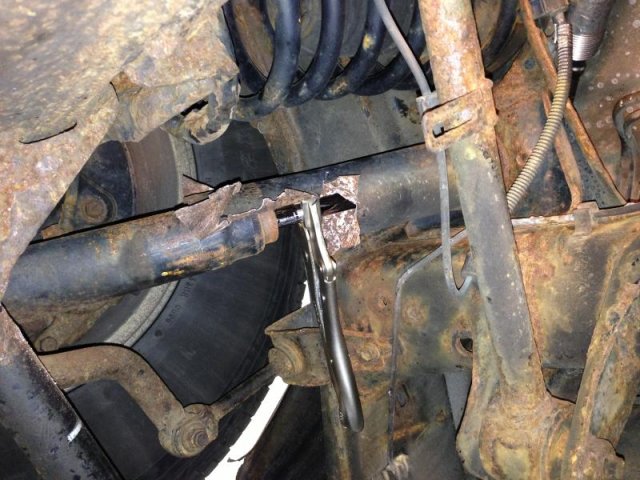
Cutaway the shock to get a vice grips on the piston. I used a tin snips to cut it away:
IMG_0856.jpg

I had to get that unbelievably tight to keep it from spining.

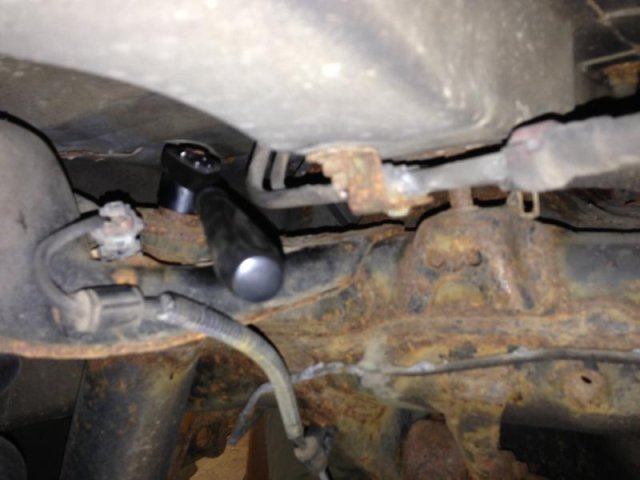
Get the tool on the top nut like this:
IMG_0844.jpg

and watch out for the fuel lines:

IMG_0848.jpg

I bought a 12" and 8" piece of 1" pipe and put those over the end of the wrench and was able to break the nut free on the drivers side. Only was able to loosen the nut about 4 clicks of the ratchet at a time, but I got it off.


Caveat:
I must admit now that passenger side was not that easy, the nut was so rusted it didn't fit inside my 19MM socket and I stripped it with my 13/16 socket. I ended up cutting the shock piston right through the bottom rubber cushion wit a regular saws all. This was actually VERY easy, just keep the rubber and blade wet with a squirt bottle.

IMG_0850.jpg


IMG_0856.jpg


IMG_0844.jpg


IMG_0848.jpg
 
Brilliant! Someone finally solved the enigma. I'd pay $36.00 to keep from cutting holes in the floor.
 
Brilliant! Someone finally solved the enigma. I'd pay $36.00 to keep from cutting holes in the floor.

Fwiw, we've pulled hundreds of rear 100 Series shocks and never cut a hole. Started with a standard box end wrench, twist the dust housing when it cooperates. If it breaks loose, use the vice grip method and lock the top nut with the wrench. For the AHC rigs we took a socket and welded it directly to a piece of flat strap. I've posted pictures of the tool in the past, works like a charm.

Now, if the nut strips, the sawzall or cut-off are your only options. As noted by the OP it isn't too bad on a standard rig. It sucks on the AHC as your cutting through the hollow shaft full of oil. Do yourself a favor and bleed the oil out of the shock before you cut. Saves a big mess ;)
 
I replaced my rear shocks a couple of weeks ago. It took about 20 minutes per side. I used a standard box-end wrench on the top nut and a pipe wrench to turn the shock body. Once the nut was broken free I just turned the shock bodies by hand. When installing, I used a strap wrench on the new shocks to protect the finish. It wasn't nearly as bad as I was anticipating based on what I'd read here on 'Mud.
 
I replaced my rear shocks a couple of weeks ago. It took about 20 minutes per side. I used a standard box-end wrench on the top nut and a pipe wrench to turn the shock body. Once the nut was broken free I just turned the shock bodies by hand. When installing, I used a strap wrench on the new shocks to protect the finish. It wasn't nearly as bad as I was anticipating based on what I'd read here on 'Mud.

Must be nice having a rust free car!


Also I should add, removing the spare tire gives you a lot more room to sit underneath.
 
It sounds brutal, but the sawsall is quick, easy, and painless. Cut through the lower bushing and done. Be sure to use lots of water to keep the blade cool and lubed unless you really like rubber smoke.
 
Seeing pics like these always make me grateful to live in the desert where cars never rust out.
 
This thread delivers! Finally mustered up the courage to tackle the rear shocks. Started with the passenger side first.
Working alone I had to make do with leverage, so I hacked away at the metal shield around the piston & was able to wedge a pipe wrench in there to sit hands-free so I could work on loosening the top nut. Luckily the truck is rust free & I soaked the nuts in PB Blaster a while back.

Figured I would take a picture to show it can be done.


Nut is loose, so the hardest part is out of the way.
 
Here is the tool that made it easy for me, 22mm flex head gear wrench, no need to cut the shocks either, just get a big pair or channel locks or a pipe wrench to hold the shock in place. WHAM BAM!!!

gear wrench.jpg
 
Here is the tool that made it easy for me, 22mm flex head gear wrench, no need to cut the shocks either, just get a big pair or channel locks or a pipe wrench to hold the shock in place. WHAM BAM!!!

Yep, that's how I did it as well. Makes it a piece of cake.
 
Cursing liberally seemed to be the key to mine.
 
I went with the sawzall method as well and it worked without any issues. It is a little messy and the burnt rubber smell isn't very pleasant but it did the job without fail.
 
Cut them off, don't make unnecessary holes in the floor pan!
 
Has anyone tried cutting off the nut using a dremel?
No rubber burning and no oil spills from the fluid on AHC cards as when you cut the shaft off.
 
It sounds brutal, but the sawsall is quick, easy, and painless. Cut through the lower bushing and done. Be sure to use lots of water to keep the blade cool and lubed unless you really like rubber smoke.

Just went through this on my 05 midwest car and this did the job. The only sad part is that I thought I was the first guy to think of this method but that's OK. Takes a 12" metal cutting blade and some acrobatics and yoga under the car to position the saw but some smoke, burning rubber bits, and hot metal flakes later and both sides are out. Probably 4 batteries worth of sawing on the 18V Dewalt. Knowing about water for the burning rubber would have been nice. That's a brutal material. The passenger side was particularly tricky with the parking brake cable, diff, and rear brake flex line all battling for space with the saw. I know from doing the shocks on my 4 Runner last year that the nut was not going to move no matter what so any wrench turning plan would fail. The access on the LC is basically insanely bad but in the end, I won.
 

Users who are viewing this thread

Back
Top Bottom