
Hi everyone, after having received lots of great advice on the forum, I decided to do a write up of my own.
There's lots of threads on this already, but every member focuses on different things, so here's another one.
What does this write up cover:
-Free wheeling hub removal and disassembly.
-Hub removal.
-Brake caliper removal.
-Spindle removal.
-Axle seal removal.
This is a 1985 HJ60, front left side, disc brake model, with free wheeling hubs.
Remember, safety first.
This simply recounts my experiences, always defer to the FSM.
This is just a pictorial guide.
Here's a picture of the whole thing still assembled.

Free wheeling hub cover off, simply remove the 6 bolts + washers.
Now for the free wheeling hub itself. Remove another 6 bolts + washers, which will reveal
the cone washers. Here's what you need to make them pop out:
WD40 or other penetrant, brass drift and big hammer.
After spraying some penetrant on each of the 6 cone washers, hammer on the studs
like so:
Give each stud a firm but gentle tap, and keep going round in circles. Eventually,
one will come loose. Give them some more penetrant if they won't budge.
And keep going round in circles giving each stud a tap. They will budge eventually.
(Note: they may pop out sometimes, so be mindful of that, or keep a bolt on the end of it)
Cone washers are out, time to remove the snap ring. Use snap ring pliers.
The free wheeling hub is now off. As you can see, all is not well in hub land.
There shouldn't be any dark grey stuff oozing out.
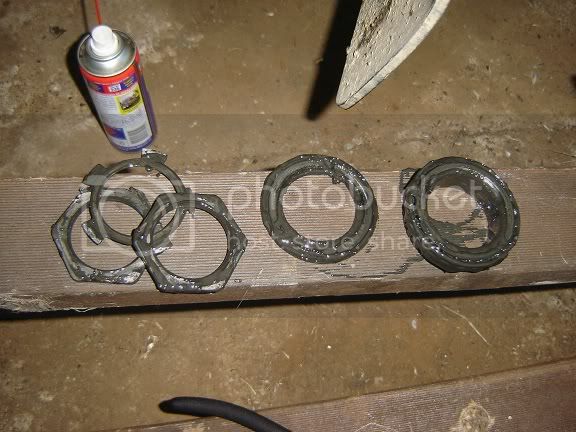
Remove the locking nut, locking tab, adjusting nut, thrust washer and outer bearing.
For the nuts, use a 54mm socket.
Be careful not to accidentally drop the bearing, or you may need to replace it.
To remove the hub + disc assembly, you first have to detach the brake lines and remove the caliper.
Detach the brake line at the start of the flexible hose section by removing a c clip and then plug the line.
Also detach the line where it enters the caliper.
The caliper is secured by 3 bolts, 2 large ones and a smaller one, and the dust cover reinforcement (metal strip with 3 holes).
Now the hub and disc are off. Apparently the hub grease was once green.
This will reveal the spindle. The spindle is held on by 8 bolts, and also secures the oil seal and dust cover (backing plate).
Bolts are off, oil seal is off, and backing plate is dangling from the spindle in this picture.
Here's a axle shaft, the longer left side one. It comes out quite easily.
Just rotate till the flat side is on top, and pull it out.
And here the spindle is off, axle shaft is out, to reveal the knuckle cavity and axle oil seal.
In my case, the grease is slowly oozing out. The axle seal seems to have failed causing
diff oil to enter the knuckle and a moly grease/diff oil mix to enter the wheel bearings causing
premature wear and wear on the spindles as well.
The axle seal can be pulled out using a seal puller, or some other device that allows you to grip behind it.
Note: before removing the seal, mark (I scratched the metal surface) the top of the seal.
Once removed, check if the seal is uniformly worn, or if it has a 'dent' in the top or bottom indicating the
shims may need adjusting to have the kunckle at the correct height compared to the cv joint.
Final picture. The free wheeling hub, cleaned and disassembled.
It comes apart quite easily with some snap ring pliers and screw drivers.
Note the tiny parts as well, a tiny ball and a tiny spring.
There's an excellent description on the forum on how to reassemble.
(https://forum.ih8mud.com/79-95-toyo...ng-aisin-locking-hub-locking-hub-rebuild.html)
Install a new o-ring while you're at it.
* I did not rebuild the knuckle, but fellow members will probably recommend you do, as you're in there anyway.
Reassembly is the reverse of the above, noting the following.
-Use the FSM or other manual at all times.
-If your axle shaft (cv joint) does not slide in smoothly, have a look at the online manual,
to get a clearer picture of what is going on inside the diff. It'll help visualise what you're
supposed to do. Gently push the cv joint down to slightly raise the other end to lift it into the
first opening. Now you need to repeat the same procedure to lift it into the next (smaller) opening.
Rotate the propellar shaft to aid it's entry into the diff. This worked for me.
-Apply grease to all new oil seals so they do not run dry initially.
-Torque all bolts to the correct torque.
-You will need to bleed the brake on that corner. (When did you last replace the brake fluid?)
-Don't forget the snap ring for the axle shaft towards the end of the procedure. Pull the shaft out by inserting a bolt into
the hole provided. (bolt is the same size as the rear axle shaft holes on full floaters)
-Make sure you get the wheel bearings 'right'. There's plenty of threads on that too. Make sure there's no
bearing free play. Use the correct grease.
-Bend the locking washer tabs over both the adjusting and locking nuts.
If there's anything incorrect or missing in the write up, let me know.
There's lots of threads on this already, but every member focuses on different things, so here's another one.
What does this write up cover:
-Free wheeling hub removal and disassembly.
-Hub removal.
-Brake caliper removal.
-Spindle removal.
-Axle seal removal.
This is a 1985 HJ60, front left side, disc brake model, with free wheeling hubs.
Remember, safety first.
This simply recounts my experiences, always defer to the FSM.
This is just a pictorial guide.
Here's a picture of the whole thing still assembled.

Free wheeling hub cover off, simply remove the 6 bolts + washers.

Now for the free wheeling hub itself. Remove another 6 bolts + washers, which will reveal
the cone washers. Here's what you need to make them pop out:
WD40 or other penetrant, brass drift and big hammer.

After spraying some penetrant on each of the 6 cone washers, hammer on the studs
like so:

Give each stud a firm but gentle tap, and keep going round in circles. Eventually,
one will come loose. Give them some more penetrant if they won't budge.
And keep going round in circles giving each stud a tap. They will budge eventually.
(Note: they may pop out sometimes, so be mindful of that, or keep a bolt on the end of it)
Cone washers are out, time to remove the snap ring. Use snap ring pliers.

The free wheeling hub is now off. As you can see, all is not well in hub land.
There shouldn't be any dark grey stuff oozing out.

Remove the locking nut, locking tab, adjusting nut, thrust washer and outer bearing.
For the nuts, use a 54mm socket.
Be careful not to accidentally drop the bearing, or you may need to replace it.
To remove the hub + disc assembly, you first have to detach the brake lines and remove the caliper.
Detach the brake line at the start of the flexible hose section by removing a c clip and then plug the line.
Also detach the line where it enters the caliper.
The caliper is secured by 3 bolts, 2 large ones and a smaller one, and the dust cover reinforcement (metal strip with 3 holes).

Now the hub and disc are off. Apparently the hub grease was once green.

This will reveal the spindle. The spindle is held on by 8 bolts, and also secures the oil seal and dust cover (backing plate).

Bolts are off, oil seal is off, and backing plate is dangling from the spindle in this picture.

Here's a axle shaft, the longer left side one. It comes out quite easily.
Just rotate till the flat side is on top, and pull it out.

And here the spindle is off, axle shaft is out, to reveal the knuckle cavity and axle oil seal.
In my case, the grease is slowly oozing out. The axle seal seems to have failed causing
diff oil to enter the knuckle and a moly grease/diff oil mix to enter the wheel bearings causing
premature wear and wear on the spindles as well.
The axle seal can be pulled out using a seal puller, or some other device that allows you to grip behind it.
Note: before removing the seal, mark (I scratched the metal surface) the top of the seal.
Once removed, check if the seal is uniformly worn, or if it has a 'dent' in the top or bottom indicating the
shims may need adjusting to have the kunckle at the correct height compared to the cv joint.

Final picture. The free wheeling hub, cleaned and disassembled.
It comes apart quite easily with some snap ring pliers and screw drivers.
Note the tiny parts as well, a tiny ball and a tiny spring.
There's an excellent description on the forum on how to reassemble.
(https://forum.ih8mud.com/79-95-toyo...ng-aisin-locking-hub-locking-hub-rebuild.html)
Install a new o-ring while you're at it.

* I did not rebuild the knuckle, but fellow members will probably recommend you do, as you're in there anyway.
Reassembly is the reverse of the above, noting the following.
-Use the FSM or other manual at all times.
-If your axle shaft (cv joint) does not slide in smoothly, have a look at the online manual,
to get a clearer picture of what is going on inside the diff. It'll help visualise what you're
supposed to do. Gently push the cv joint down to slightly raise the other end to lift it into the
first opening. Now you need to repeat the same procedure to lift it into the next (smaller) opening.
Rotate the propellar shaft to aid it's entry into the diff. This worked for me.
-Apply grease to all new oil seals so they do not run dry initially.
-Torque all bolts to the correct torque.
-You will need to bleed the brake on that corner. (When did you last replace the brake fluid?)
-Don't forget the snap ring for the axle shaft towards the end of the procedure. Pull the shaft out by inserting a bolt into
the hole provided. (bolt is the same size as the rear axle shaft holes on full floaters)
-Make sure you get the wheel bearings 'right'. There's plenty of threads on that too. Make sure there's no
bearing free play. Use the correct grease.
-Bend the locking washer tabs over both the adjusting and locking nuts.
If there's anything incorrect or missing in the write up, let me know.