
Budget 86 2F rebuild for my 1980 FJ40 *UPDATE W/ PICS*
9/25/10 Its been together for almost 5 months and 1200 miles and zero issues. It hasn't used a drop of oil and there are zero leaks!!Imagine that, A bone dry undercarrige! I don't think I've ever owned a totaly dry underside LandCruiser, it almost seems wrong.LOL
Before I get into my rebuild, a little history lesson first. My 1980 FJ40
is my 5th landcruiser that I’ve owned. About 5 years ago I did a body on restoration. I pretty much rebuilt or replaced all of the steering brakes, suspension, trans, transfer case, paint, body, interior…… and added a CCOT a/c system. At that time, I did a compression test and found 130 to 140 PSI across the board, but when I pulled the pan and inspected several of the bearings, they were scored pretty good. This explained why my cruiser has low oil pressure, more so when hot. I didn’t have the $ to rebuild it at the time and it was still running fine with no noises or problems.
Fast forward to last month. 55,000 miles later and my 365,000 mile original 2F still runs good, but still has low oil pressure. While cruising a local craigslist ad, I found a guy who had a 1987 2F that was removed for a V8 conversion. In the ads picture, I saw the stock 2F a/c mounting bracket and 3 groove balancer I had been looking for.
NOTE* The compressor bracket supplied with the CCOT mounts the compressor where the alternator is mounted. The CCOT kit comes with a small V-belt drive clutch on the compressor that runs in the 2F’s large V-belt pulleys. I hate this part because the belt always slips and squeals when you first turn the a/c on. Its totally embarrassing and a big design flaw on CCOT’s part.
The only problem was the guy selling the motor wouldn’t just sell me the bracket and 3 groove balancer, he wanted the whole thing out of his back yard. I offered him $100 for the whole thing and he accepted. Once I got the greasy dirty thing home, I ran a quick compression test. 3 holes had zero compression and the other 3 had about 60 psi. Disappointed of the outcome but curious to see what was wrong, I pulled the motor apart. A blown head gasket, one burnt valve and one scuffed piston was the obvious bad news. The rings were beyond spec, the cam lobes and all 12 of the Toyota lifters showed severe pitting. The good news was it had been rebuilt in the past, and a lot of the parts looked like they could be reused. So off to the machine shop they went.
The machine shop said the head only had one burnt valve. All the rest of the valves, all the guides and seats were within spec and the head had no cracks. The block measured fine. All bores were good with no wear and no taper. The 5 good pistons were good quality slugs that are set at .001” to .0015” of clearance. The main, rod and cam bearings were in excellent shape and are set right at .0015” of oil clearance. All of the other clearances like the crank thrust, rod trust clearance, cam thrust clearance, oil pump clearances ………………. were all found to be right in the middle of their respective specifications.
WOW!! How lucky can a guy get? I also discovered that the head was the later model 2F head that has the extra bolt holes necessary for the next generation 3F engine.
Below is the cylinder head as I got it back from the machine shop getting ready for a coat of paint. The head only needed one valve and surfacing. All guides and 11 valves were within spec.

The head getting ready for paint. Someone has already did some sort of repair to the oil galley plug. This will come back to bite me later. You can also see the old cam at the top of the picture.
A nice new coat of paint.
Here is a shot of the heads casting numbers. The 61040 show it to be a late model close chamber head. The date code I’m not sure of. The date code is 0731. Anyone know what that means?
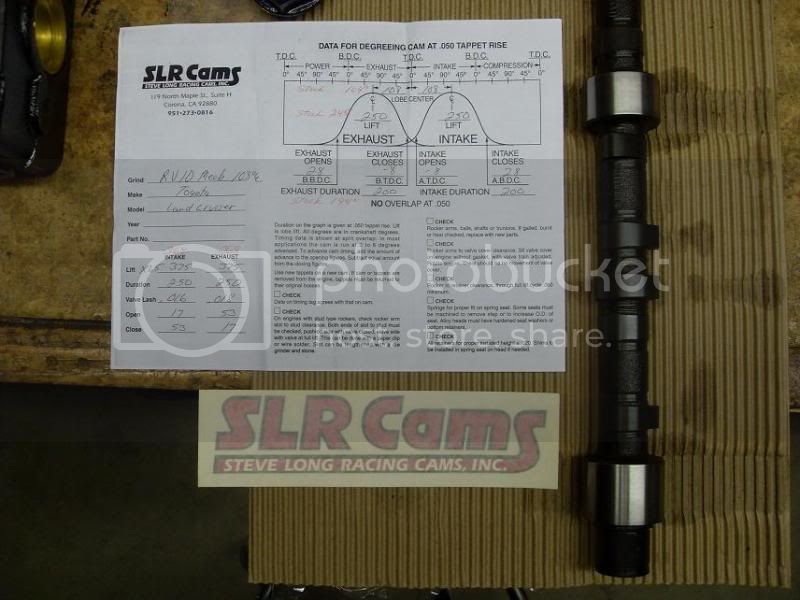
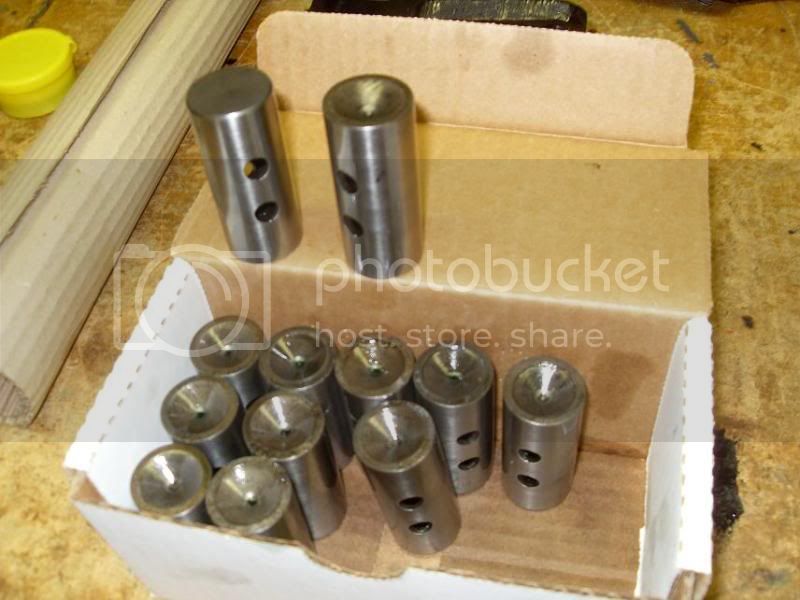
Below is a shot of the cam and the cams data sheet. Steve Long Racing Cams is the place I used, they came highly recommended by several different competent machine shops. The cam specs are close to stock, .375” of lift and 250 deg of duration and 108 degree lobe centers. Just a tad more lift and duration than stock. Not sure about how I feel about the lash specs he wrote down, seems a bit to much lash (.018” E and .016” I) to me. The cam cost $80 for him to grind the lobes and polish the bearing journals. At home I looked at all of the lobes and lifters with a magnifying glass, all of the pitting was gone and the lobes and lifters look nice.
They also refaced, coated and polished all 12 of my lifters for $2.50 each or $30 for all 12. The guy’s been in business of almost 30 years and he knows what he’s doing. He will grind your cam to any spec you want, I highly recommend him.
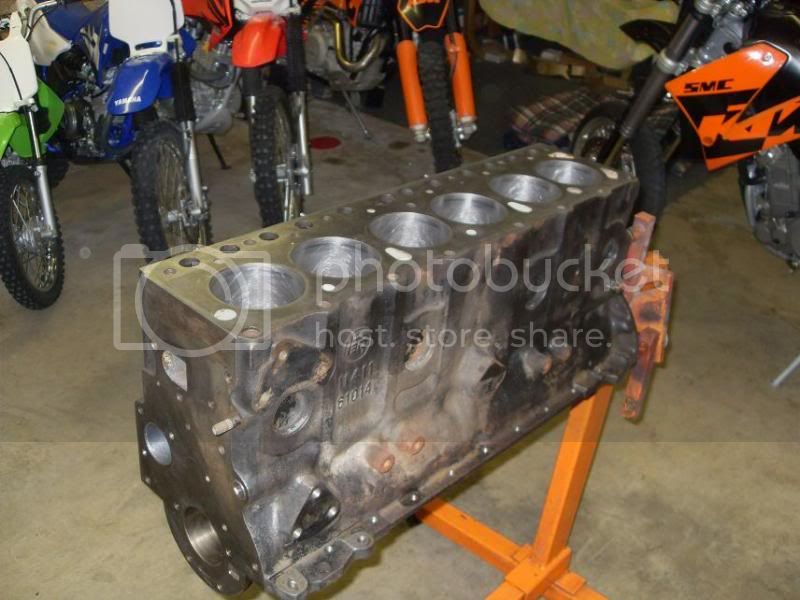
Here’s the block all honed, cleaned and getting ready for paint.
The casting numbers on the block are 61014. Which makes it a 81+ casting. You can see that the 79 and newer blocks are machined (the three bolt holes and the stud above the freeze plug) for the factory power steering mounting bracket that I have on my cruiser.
And the date code is 50917, whatever that means.
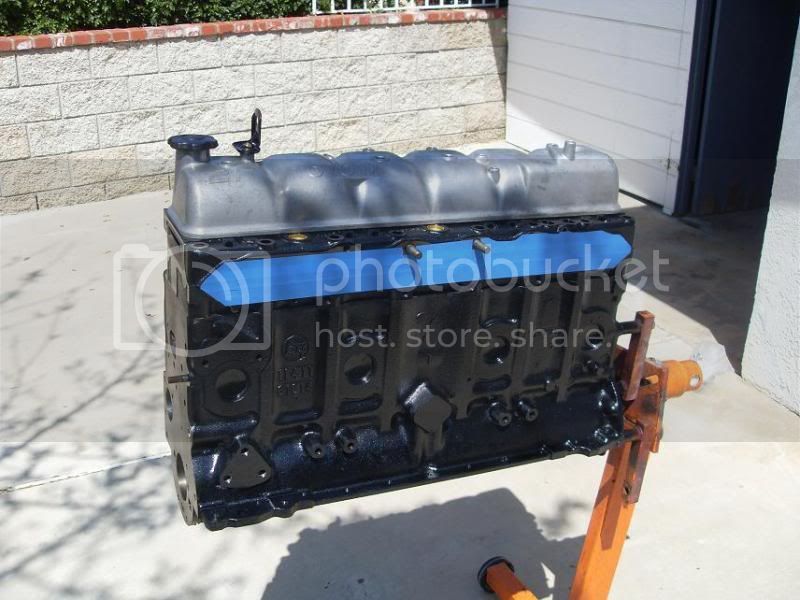
The block is now cleaned and painted and letting the paint bake in the sun. Its nice to have all the parts clean and painted. A little mock up picture for motivation.
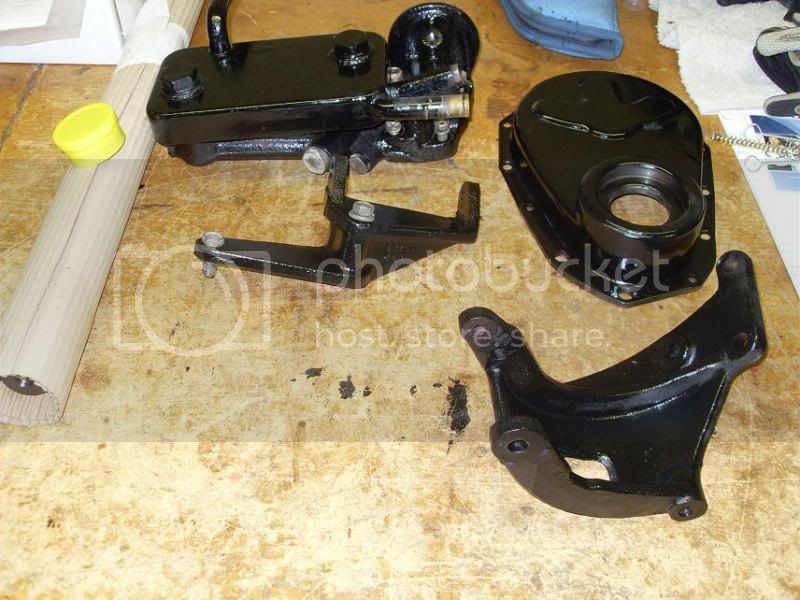
Spent several hours in the solvent tank cleaning all the other parts and all of the nuts and bolts. I forgot how much I hate solvent tank duty. Here are some of the parts that are clean and painted.
More parts
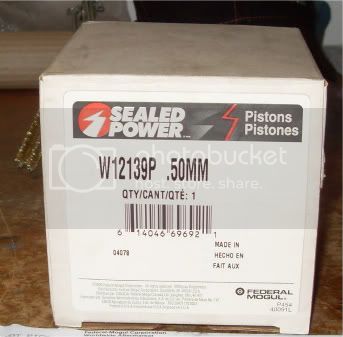
My replacement piston came in from Northern Auto parts yesterday. $38 for a high quality Sealed Power slug with a .5mm oversize to match the bore. I was a little worried about it matching the weight of the other 5 pistons. This piston is only 2 grams heavier (from 575 grams to 577 grams) than the “ART” piston it replaces. The new wrist pin was 8 grams heavier than the one it replaces. 10 grams total isn’t to bad I guess.
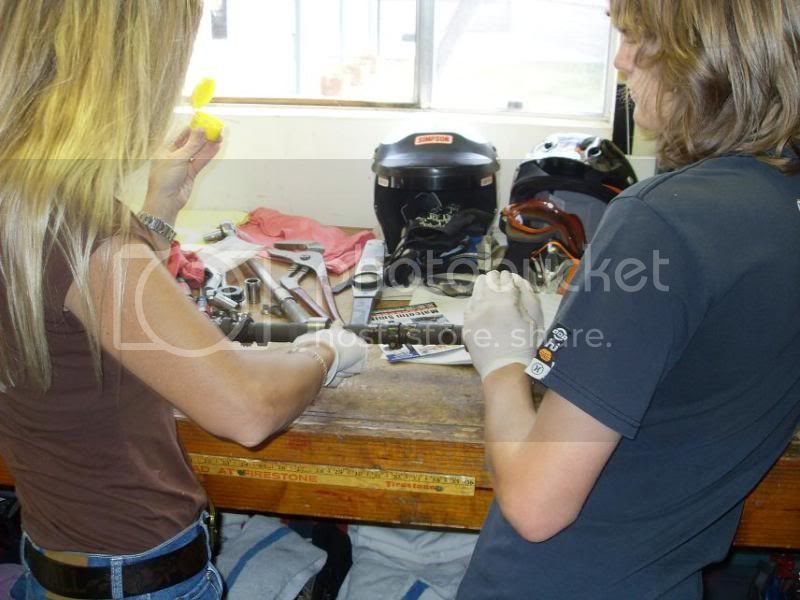
The wife and kids are going to build this one with me. Its time for them to learn about what’s inside one of these things. Here they are getting ready to stuff the pistons after installing the crank and torqueing the mains.
The assembled short block waiting for the oil pan.
The wife and son getting the cam ready to go in while the daugter was taking these pics and barking out clearance and torque specs.
I made sure the one piece Melling timing gear was timed correctly, backlash was a tight .003"
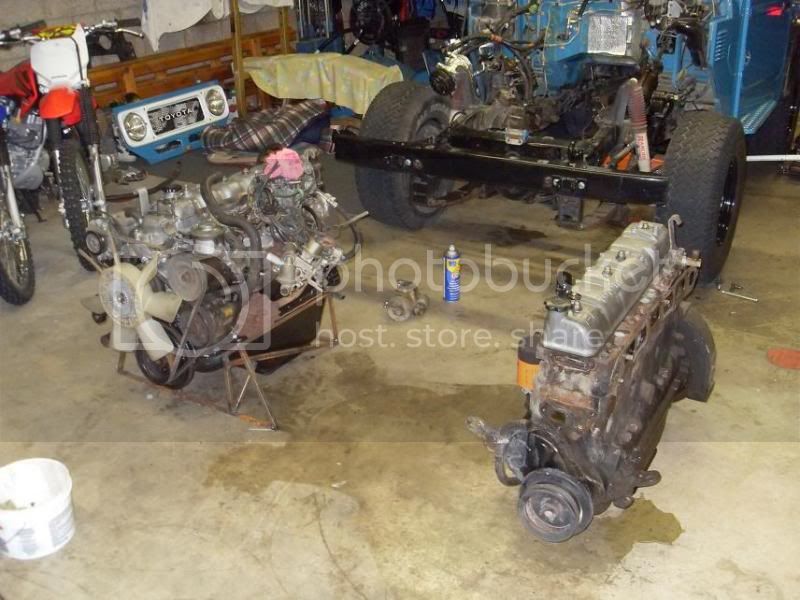
After the head, rocker cover and oil pan were on, I yanked the old mill. New and old sitting side by side. Old motor just hit the floor. Transformation complete, The new motor is almost ready to install.
Made a heat shield for the rear exhaust manifold in hopes of cutting down on the heat coming in through the firewall.
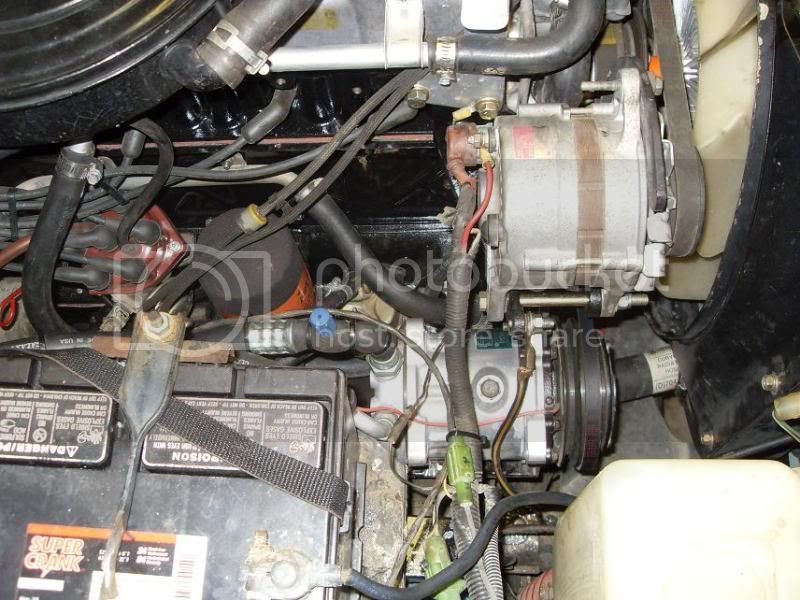
The new motor in. Relocated the a/c compressor from the CCOT location to the stock Toyota location. The CCOT system works great, but they put the compressor in a pully groove that's the wrong size and causes the belt to slip when you use the a/c. It was a poor design on CCOT's part, problem solved.
I also had to relocate the battery up and back a bit since the a/c compressor now rides where the battery was. 30 min. with the chop saw and my mig welder and the problem was solved.
Other than putting the fenders and the bib back on I was done in two weekends. The cam break in went fine. The motor ran strong on the test drive with a bit more grunt than the tired motor and a lot better engine braking during decel. I then noticed I had an oil leak. Upon closer inspection I found the oil plug in the head was almost completely out of the head. I reached down with a pair of [liars and it came out! HOLY COW, I just dodged a bullet. I tapped the hole and installed a 8mm plug, problem solved. That could have ended really bad, I don't know how that plug didn't just pop out.
After a 50 mile test drive I changed the oil and filter. 200 miles thus far and not one drop of oil leaked or lost. A valve adjust at 1,000 miles and It should be good to go for another 365,000 miles. I will keep you posted as the miles mount. I will have to see how the oil level stays and if the fuel consumption is still at 13 mpg.
The end dollar figure was $673 for the whole thing. Not to bad for a completely within spec 2F out the door. Let me know what you guys think.
9/25/10 Its been together for almost 5 months and 1200 miles and zero issues. It hasn't used a drop of oil and there are zero leaks!!Imagine that, A bone dry undercarrige! I don't think I've ever owned a totaly dry underside LandCruiser, it almost seems wrong.LOL
Before I get into my rebuild, a little history lesson first. My 1980 FJ40
is my 5th landcruiser that I’ve owned. About 5 years ago I did a body on restoration. I pretty much rebuilt or replaced all of the steering brakes, suspension, trans, transfer case, paint, body, interior…… and added a CCOT a/c system. At that time, I did a compression test and found 130 to 140 PSI across the board, but when I pulled the pan and inspected several of the bearings, they were scored pretty good. This explained why my cruiser has low oil pressure, more so when hot. I didn’t have the $ to rebuild it at the time and it was still running fine with no noises or problems.
Fast forward to last month. 55,000 miles later and my 365,000 mile original 2F still runs good, but still has low oil pressure. While cruising a local craigslist ad, I found a guy who had a 1987 2F that was removed for a V8 conversion. In the ads picture, I saw the stock 2F a/c mounting bracket and 3 groove balancer I had been looking for.
NOTE* The compressor bracket supplied with the CCOT mounts the compressor where the alternator is mounted. The CCOT kit comes with a small V-belt drive clutch on the compressor that runs in the 2F’s large V-belt pulleys. I hate this part because the belt always slips and squeals when you first turn the a/c on. Its totally embarrassing and a big design flaw on CCOT’s part.
The only problem was the guy selling the motor wouldn’t just sell me the bracket and 3 groove balancer, he wanted the whole thing out of his back yard. I offered him $100 for the whole thing and he accepted. Once I got the greasy dirty thing home, I ran a quick compression test. 3 holes had zero compression and the other 3 had about 60 psi. Disappointed of the outcome but curious to see what was wrong, I pulled the motor apart. A blown head gasket, one burnt valve and one scuffed piston was the obvious bad news. The rings were beyond spec, the cam lobes and all 12 of the Toyota lifters showed severe pitting. The good news was it had been rebuilt in the past, and a lot of the parts looked like they could be reused. So off to the machine shop they went.
The machine shop said the head only had one burnt valve. All the rest of the valves, all the guides and seats were within spec and the head had no cracks. The block measured fine. All bores were good with no wear and no taper. The 5 good pistons were good quality slugs that are set at .001” to .0015” of clearance. The main, rod and cam bearings were in excellent shape and are set right at .0015” of oil clearance. All of the other clearances like the crank thrust, rod trust clearance, cam thrust clearance, oil pump clearances ………………. were all found to be right in the middle of their respective specifications.
WOW!! How lucky can a guy get? I also discovered that the head was the later model 2F head that has the extra bolt holes necessary for the next generation 3F engine.
Below is the cylinder head as I got it back from the machine shop getting ready for a coat of paint. The head only needed one valve and surfacing. All guides and 11 valves were within spec.

The head getting ready for paint. Someone has already did some sort of repair to the oil galley plug. This will come back to bite me later. You can also see the old cam at the top of the picture.

A nice new coat of paint.

Here is a shot of the heads casting numbers. The 61040 show it to be a late model close chamber head. The date code I’m not sure of. The date code is 0731. Anyone know what that means?

Below is a shot of the cam and the cams data sheet. Steve Long Racing Cams is the place I used, they came highly recommended by several different competent machine shops. The cam specs are close to stock, .375” of lift and 250 deg of duration and 108 degree lobe centers. Just a tad more lift and duration than stock. Not sure about how I feel about the lash specs he wrote down, seems a bit to much lash (.018” E and .016” I) to me. The cam cost $80 for him to grind the lobes and polish the bearing journals. At home I looked at all of the lobes and lifters with a magnifying glass, all of the pitting was gone and the lobes and lifters look nice.
They also refaced, coated and polished all 12 of my lifters for $2.50 each or $30 for all 12. The guy’s been in business of almost 30 years and he knows what he’s doing. He will grind your cam to any spec you want, I highly recommend him.
Here’s the block all honed, cleaned and getting ready for paint.
The casting numbers on the block are 61014. Which makes it a 81+ casting. You can see that the 79 and newer blocks are machined (the three bolt holes and the stud above the freeze plug) for the factory power steering mounting bracket that I have on my cruiser.

And the date code is 50917, whatever that means.

The block is now cleaned and painted and letting the paint bake in the sun. Its nice to have all the parts clean and painted. A little mock up picture for motivation.
Spent several hours in the solvent tank cleaning all the other parts and all of the nuts and bolts. I forgot how much I hate solvent tank duty. Here are some of the parts that are clean and painted.
More parts
My replacement piston came in from Northern Auto parts yesterday. $38 for a high quality Sealed Power slug with a .5mm oversize to match the bore. I was a little worried about it matching the weight of the other 5 pistons. This piston is only 2 grams heavier (from 575 grams to 577 grams) than the “ART” piston it replaces. The new wrist pin was 8 grams heavier than the one it replaces. 10 grams total isn’t to bad I guess.
The wife and kids are going to build this one with me. Its time for them to learn about what’s inside one of these things. Here they are getting ready to stuff the pistons after installing the crank and torqueing the mains.

The assembled short block waiting for the oil pan.

The wife and son getting the cam ready to go in while the daugter was taking these pics and barking out clearance and torque specs.
I made sure the one piece Melling timing gear was timed correctly, backlash was a tight .003"

After the head, rocker cover and oil pan were on, I yanked the old mill. New and old sitting side by side. Old motor just hit the floor. Transformation complete, The new motor is almost ready to install.
Made a heat shield for the rear exhaust manifold in hopes of cutting down on the heat coming in through the firewall.

The new motor in. Relocated the a/c compressor from the CCOT location to the stock Toyota location. The CCOT system works great, but they put the compressor in a pully groove that's the wrong size and causes the belt to slip when you use the a/c. It was a poor design on CCOT's part, problem solved.

I also had to relocate the battery up and back a bit since the a/c compressor now rides where the battery was. 30 min. with the chop saw and my mig welder and the problem was solved.
Other than putting the fenders and the bib back on I was done in two weekends. The cam break in went fine. The motor ran strong on the test drive with a bit more grunt than the tired motor and a lot better engine braking during decel. I then noticed I had an oil leak. Upon closer inspection I found the oil plug in the head was almost completely out of the head. I reached down with a pair of [liars and it came out! HOLY COW, I just dodged a bullet. I tapped the hole and installed a 8mm plug, problem solved. That could have ended really bad, I don't know how that plug didn't just pop out.
After a 50 mile test drive I changed the oil and filter. 200 miles thus far and not one drop of oil leaked or lost. A valve adjust at 1,000 miles and It should be good to go for another 365,000 miles. I will keep you posted as the miles mount. I will have to see how the oil level stays and if the fuel consumption is still at 13 mpg.
The end dollar figure was $673 for the whole thing. Not to bad for a completely within spec 2F out the door. Let me know what you guys think.
Last edited:
