
I don't know if this will apply or interest more than 1 or two of you on here. A couple of years ago I swapped out my seat leather with some L seat leather and put in seat heat switches that I got on ebay. My center console had been modified to be a sub box by the previous owner, so I was stuck running vertical switches in my radio bezel. They worked fine, but it was just one of those things that bugged me every time I drove it so I started looking into getting some horizontal switches from a Lexus RX300.
You can find the rx300 seat switches on ebay along with the console for around $20-50. The sellers never included a pigtail, so I decided to use the pins from my existing extended harness that I made when I plugged the JDM switches in under the seat and ran the wires up, under the console and into the radio bezel.
The vertical (jdm) switches come with a pigtail harness with a male side and square female side that plugs into the back of the switch. I had already made my coolguy extened harness and plugged it into the body harness, so I ordered a couple of 6 pin female connectors from corsa technic (6-Way Kit - https://www.corsa-technic.com/item.php?item_id=1360&category_id=129 ) and modified them to fit the RX300 switches. You have to trim a part on the inside of the switch and then also rotary tool / file off a small part of the top of the new corsa connector for everything to jive but the lock tab clicks and its secure. I used some flush cutters and a small file and was done in a few minutes.


You should know that the JDM and RX switches have a different pinout.
The JDM/ Vertical ones are as follows with the square connector
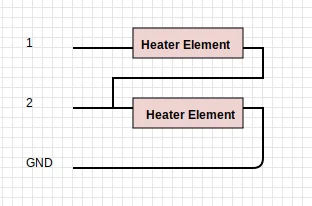
And the RX is pinned like this and with wire colors from the JDM harness
Once you get your wires all swip swapped around, you'll want to file down the locating tab on the top of the connector. Once thats done the switches will set in place and you can find something else to obsess over.
You can find the rx300 seat switches on ebay along with the console for around $20-50. The sellers never included a pigtail, so I decided to use the pins from my existing extended harness that I made when I plugged the JDM switches in under the seat and ran the wires up, under the console and into the radio bezel.
The vertical (jdm) switches come with a pigtail harness with a male side and square female side that plugs into the back of the switch. I had already made my coolguy extened harness and plugged it into the body harness, so I ordered a couple of 6 pin female connectors from corsa technic (6-Way Kit - https://www.corsa-technic.com/item.php?item_id=1360&category_id=129 ) and modified them to fit the RX300 switches. You have to trim a part on the inside of the switch and then also rotary tool / file off a small part of the top of the new corsa connector for everything to jive but the lock tab clicks and its secure. I used some flush cutters and a small file and was done in a few minutes.
You should know that the JDM and RX switches have a different pinout.
The JDM/ Vertical ones are as follows with the square connector
- Low heat
- ignition
- illumination/ bulb positive
- ground
- High heat
- Illumination/ bulb negative
And the RX is pinned like this and with wire colors from the JDM harness
- Green- Bulb positive
- blue/ orange stripe - high seat heat
- blue/ black stripe- low seat heat
- blue/ white stripe- ignition +
- black/ white stripe - bulb negative
- white/ black - ground
Once you get your wires all swip swapped around, you'll want to file down the locating tab on the top of the connector. Once thats done the switches will set in place and you can find something else to obsess over.

")

