
Looking forward to seeing what it looks like with the bumper style push pins. I think I probably would powdercoat with a semi-matt light color that works with the interior, if it were me.
Navigation
Install the app
How to install the app on iOS
Follow along with the video below to see how to install our site as a web app on your home screen.
Note: This feature may not be available in some browsers.
More options
You are using an out of date browser. It may not display this or other websites correctly.
You should upgrade or use an alternative browser.
You should upgrade or use an alternative browser.
Builds 1997 HZJ77HV-PEU Build (Grey Poupon) (1 Viewer)
- Thread starter sleepydad69
- Start date
-
- Tags
- build thread
This site may earn a commission from merchant affiliate
links, including eBay, Amazon, Skimlinks, and others.
More options
Who Replied?Not sure if you have one of these or not. They work pretty well getting OEM door panels off. Nice work on the door cards.
Amazon product ASIN B000NP2SBG
Amazon product ASIN B000NP2SBG
- Thread starter
- #123
Not sure if you have one of these or not. They work pretty well getting OEM door panels off. Nice work on the door cards.
Amazon product ASIN B000NP2SBG
Yes I already have a version of the clip destroying tool
") it also works well for vac hoses who are being stubborn.
it also works well for vac hoses who are being stubborn.- Thread starter
- #124
I have become a member of the golden hub club.
I picked up
 radd-cruisers.shoplightspeed.com
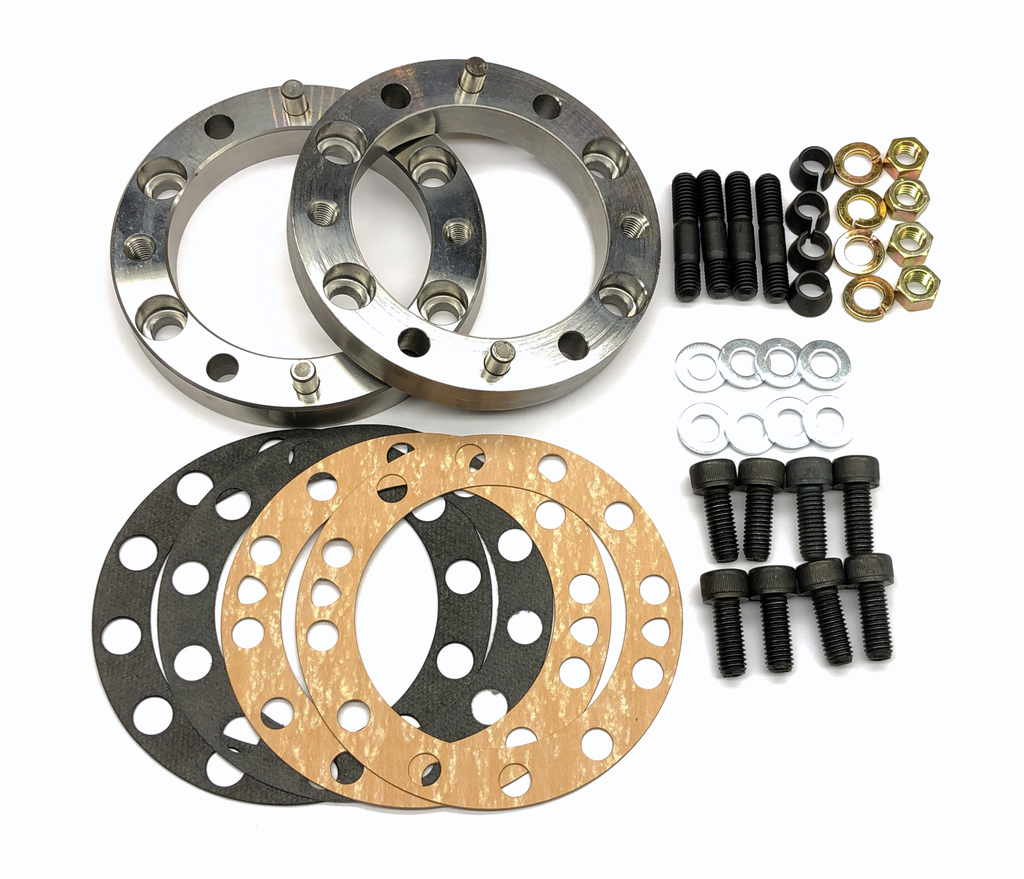
nice kit, very well done.
Everything came off nice and smooth and the plate went on just as the instructions laid it out. I did add a dab of blue locktight to the allen head bolts just because I'm a bit paranoid.

I did run into some trouble. When doing 25 year old truck archeology things might be as they should? so, who knows if these original studs have been replaced with longer ones. I had a lot of extra stud body to contend with. ending preposition nice!
I ended up stacking 3 washers and using ARP 12-point nuts, sorry I love my 12-point ARP nuts. The kit provides 2 shorter studs and the kit works fine with just one washer and that stud. But for whatever reason I have slightly longer stud bodies on my electronic hub studs? not a big deal.
all done and it clicks back and forth with a nice solid snap. I will also make a note that I needed the provided snap ring because my late model truck has slighly thicker snap rings. So it was good those were provided. I could have taken a diamond stone and shaved mine down but who wants to do that?
@Radd Cruisers
I picked up
Manual Locking Hub Adapter Kit to replace Toyota Power Locking Hubs
Manual Locking Hub Adapter Kit to replace Aisin electric hubs with manual locking hubs.
nice kit, very well done.

I did run into some trouble. When doing 25 year old truck archeology things might be as they should? so, who knows if these original studs have been replaced with longer ones. I had a lot of extra stud body to contend with. ending preposition nice!
I ended up stacking 3 washers and using ARP 12-point nuts, sorry I love my 12-point ARP nuts. The kit provides 2 shorter studs and the kit works fine with just one washer and that stud. But for whatever reason I have slightly longer stud bodies on my electronic hub studs? not a big deal.
all done and it clicks back and forth with a nice solid snap. I will also make a note that I needed the provided snap ring because my late model truck has slighly thicker snap rings. So it was good those were provided. I could have taken a diamond stone and shaved mine down but who wants to do that?
@Radd Cruisers
- Thread starter
- #125
Ok full stop on the golden hub club.... I should have done a test drive before I posted... I'm guessing I maybe missed a detail someplace? and it does not appear as though these were intended for 77 series electric locking hub replacement?
first problem that I did not notice? you can't remove a standard size hub bore Toyota wheel without removing the ring. The ring itself is larger than the bore so.... I think this is a deal breaker. having to disassemble the entire hub to remove a wheel is not a great design.
the other part is totally my fault I should have maybe considered looking a little more closely? at how the wheel bearings nut locks in place. the inner most ring of the electric locking ring has those 3x little torx bit screws. they engage with the wheel bearing lock nut to hold it in place. I'm familiar with the solid axle pickup truck hubs where you have those tabs you bend down so... I kind of figured the wheel bearings were actually locked into place by the same deal. I figured the inner electric locking ring on the setup was just to clearance those screws to hold that ring. I was wrong.
that is the wheel bearing lock nut and it locks via the next picture, that ring.
those torx screws line up with the holes in the lock nut and the tabs slide into the groves on the spindle. so this is the locking mechanism.
But what happened during my very short test drive of course is the wheel bearing nut unscrewed. It was really subtle however but I quickly returned at snail’s pace the couple of blocks and started to cry as I realized how stupid I had been.
I don't think it messed up the axle, but it for sure made a small mess out of the end of the spindle. so, I will have to pull the entire chunk now and see what is what.... not sure how the kit will work for this setup. I'm guessing the kit will not work what so ever with the 77 series electric locking hubs and you have to source a totally new knuckles/hubs/spindles? I don't know I will have to talk to Rad Cruisers?
JDM Journeys
Moderator
Dude, so sorry. This bites hard. Hopefully damage is minimal.
- Thread starter
- #127
Dude, so sorry. This bites hard. Hopefully damage is minimal.
yea I feel pretty stupid but I guess it could have been way worse.
However now I'm out on limb. I guess I could drag it out into the yard this sping, open the windows and plant flowers in it?
- Thread starter
- #128
Ok so nothing got inside the chunk (hub bearings) and the axle is fine. shined it up a bit but the splines look fine. it really just bent the end of spindle and took the threads right off the lock nut. so... now the questions is? I guess do I have to replace the knuckle and everything out from there and get a new axle for this side? obviously this kit is not going to work for a 77.
Awwwe man! I hate it when stuff like this goes wrong/sideways... especially when there are so many other things vying for your time and money.
It's odd as in the earlier pictures, that spacer appears to be the same size as the hub and the rim seems to sit further back on the hub itself
I have never worked with the manual hub kits, so I have little to offer you as far as guidance. Perhaps John from Radd's can give you some definitive solutions. I realize this probably sounds like a pat answer, and would likely earn me a solid punch were I to say something like this in the moment, but after I calm down and get past the initial disappointment and kicking of my own @$$, I try to look at it as a learning experience, something to add to my repertoire of know how to either help someone else or for the next time I have some work to do in the same place down the road. You just always hope that the 'lessons' are not tooo expensive.
Sorry for the troubles my friend, hopefully John can steer you in the right direction... no need to start talking planter boxes just yet.... hang in there.... from your previous posts, I can see you have the talent to make it right.
- Thread starter
- #130
Awwwe man! I hate it when stuff like this goes wrong/sideways... especially when there are so many other things vying for your time and money.
It's odd as in the earlier pictures, that spacer appears to be the same size as the hub and the rim seems to sit further back on the hub itself
I have never worked with the manual hub kits, so I have little to offer you as far as guidance. Perhaps John from Radd's can give you some definitive solutions. I realize this probably sounds like a pat answer, and would likely earn me a solid punch were I to say something like this in the moment, but after I calm down and get past the initial disappointment and kicking of my own @$$, I try to look at it as a learning experience, something to add to my repertoire of know how to either help someone else or for the next time I have some work to do in the same place down the road. You just always hope that the 'lessons' are not tooo expensive.
Sorry for the troubles my friend, hopefully John can steer you in the right direction... no need to start talking planter boxes just yet.... hang in there.... from your previous posts, I can see you have the talent to make it right.
oh no yea I'm fine, just self deprecating. I have made some epic blunders in my time, I'm 100% confident this will not be the last one.
what I'm wondering is.... I was comparing the mini-truck solid axle spindles to 77 electric locking ones and they are exactly the same except a slightly different bearing race taper setup. although where the bears sit it's exactly the same OD. so... I have this spare axle assembly, yep everybody needs a spare axle assembly. it has full built out chunks for a solid axle pickups. I could use them and the spindles. so I know that would probably work. There is a notch in the 77 electric hub setups in the knuckles for the wire. not hard to plug that up. But I still need the plate adapter to make up the difference in space for these axles. so... not being able to take the wheels off the truck without taking the entire locking hub/plate off is not something I want long term.
If it was me, since it looks like you have a full mini truck axle, Id just swap the whole knuckle over from the mini truck and be done with it all. That axle is built for manual hubs so it will all be ready to roll with no adjustments. If you don't have a full axle, then some good sealent/plug for that wire hole (re use the wire plug?) and get the mini truck spindles on. No more spacer needed and ready for manual hubs.oh no yea I'm fine, just self deprecating. I have made some epic blunders in my time, I'm 100% confident this will not be the last one.
what I'm wondering is.... I was comparing the mini-truck solid axle spindles to 77 electric locking ones and they are exactly the same except a slightly different bearing race taper setup. although where the bears sit it's exactly the same OD. so... I have this spare axle assembly, yep everybody needs a spare axle assembly. it has full built out chunks for a solid axle pickups. I could use them and the spindles. so I know that would probably work. There is a notch in the 77 electric hub setups in the knuckles for the wire. not hard to plug that up. But I still need the plate adapter to make up the difference in space for these axles. so... not being able to take the wheels off the truck without taking the entire locking hub/plate off is not something I want long term.
View attachment 3239384
View attachment 3239386
View attachment 3239388
I like the electric hubs just for the uniqueness of them, but I definitely understand the concern for reliabalilty. So I am collecting parts slowly for a swap in the future lol.
- Thread starter
- #132
If it was me, since it looks like you have a full mini truck axle, Id just swap the whole knuckle over from the mini truck and be done with it all. That axle is built for manual hubs so it will all be ready to roll with no adjustments. If you don't have a full axle, then some good sealent/plug for that wire hole (re use the wire plug?) and get the mini truck spindles on. No more spacer needed and ready for manual hubs.
I like the electric hubs just for the uniqueness of them, but I definitely understand the concern for reliabalilty. So I am collecting parts slowly for a swap in the future lol.
yea and I compared everything side by side. slight variations due to rust and wear I would guess but I think it's exaclty the same.
the pickup have
rotor to wheel mounting surface 48.88 mm
wheel mounting surface to hub face 60.32 mm
the 77 electric hub
rotor to wheel mounting surface 48.45 mm
wheel mounting surface to hub face 60.68 mm
obvious to me now the spindles are different because of how the bearing lock nut works. DOH!
77 hub left, pickup right
what is even better is the 77 shares calipers with the Toyota IFS pickups. nice! I tested the fit and yes the pickup solid axle chunks are perfect fits without the need for the adapter ring. so, this is how I will roll it seems.
I do need to source a couple of brass bushings and some new gaskets but that is it for now I think. fire parts cannon sir! yes fire away.
It’s also nice that you have I believe FJ60 rotors already in the mini truck hub. Factory they were all solid rotor rather than vented so you are ready to roll! Although you might be able to have just swapped rotors as well. But those bolts tend to be a huge pain so if you don’t have to, just get them turned on the vehicle (better anyways) later and call it a day!yea and I compared everything side by side. slight variations due to rust and wear I would guess but I think it's exaclty the same.
the pickup have
rotor to wheel mounting surface 48.88 mm
wheel mounting surface to hub face 60.32 mm
the 77 electric hub
rotor to wheel mounting surface 48.45 mm
wheel mounting surface to hub face 60.68 mm
obvious to me now the spindles are different because of how the bearing lock nut works. DOH!
77 hub left, pickup right
View attachment 3239762
what is even better is the 77 shares calipers with the Toyota IFS pickups. nice! I tested the fit and yes the pickup solid axle chunks are perfect fits without the need for the adapter ring. so, this is how I will roll it seems.
View attachment 3239765
I do need to source a couple of brass bushings and some new gaskets but that is it for now I think. fire parts cannon sir! yes fire away.
- Joined
- Sep 28, 2002
- Threads
- 559
- Messages
- 8,112
- Location
- Kamloops, BC Canada
- Website
- www.shopraddcruisers.ca
Ok full stop on the golden hub club.... I should have done a test drive before I posted... I'm guessing I maybe missed a detail someplace? and it does not appear as though these were intended for 77 series electric locking hub replacement?
first problem that I did not notice? you can't remove a standard size hub bore Toyota wheel without removing the ring. The ring itself is larger than the bore so.... I think this is a deal breaker. having to disassemble the entire hub to remove a wheel is not a great design.
View attachment 3239163
the other part is totally my fault I should have maybe considered looking a little more closely? at how the wheel bearings nut locks in place. the inner most ring of the electric locking ring has those 3x little torx bit screws. they engage with the wheel bearing lock nut to hold it in place. I'm familiar with the solid axle pickup truck hubs where you have those tabs you bend down so... I kind of figured the wheel bearings were actually locked into place by the same deal. I figured the inner electric locking ring on the setup was just to clearance those screws to hold that ring. I was wrong.
that is the wheel bearing lock nut and it locks via the next picture, that ring.
View attachment 3239164
those torx screws line up with the holes in the lock nut and the tabs slide into the groves on the spindle. so this is the locking mechanism.
View attachment 3239165
But what happened during my very short test drive of course is the wheel bearing nut unscrewed. It was really subtle however but I quickly returned at snail’s pace the couple of blocks and started to cry as I realized how stupid I had been.
I don't think it messed up the axle, but it for sure made a small mess out of the end of the spindle. so, I will have to pull the entire chunk now and see what is what.... not sure how the kit will work for this setup. I'm guessing the kit will not work what so ever with the 77 series electric locking hubs and you have to source a totally new knuckles/hubs/spindles? I don't know I will have to talk to Rad Cruisers?
View attachment 3239166
You're trying to second guess a kit that's been around a very long time and the dimensions are very exacting - this kit was designed specifically for these vehicles - the 77s, and 78s etc.
Your wheels are the oddball part here. They little bit that protrudes in is oddball, and they are either not factory, or are and add-on item that your 77 did not come with.
And, you removed the bearing adjusting nut locking ring - which is the slip ring in these vehicles - which is not something the instructions say to do. You have to really understand the system before you remove the parts.... It NEEDs to stay there.
I will add a note to the instructions explaining this as it's important to know how to adjust these bearings and to understand how they are retained.
Thank you for bringing this to my attention.
~john
- Thread starter
- #135
You're trying to second guess a kit that's been around a very long time and the dimensions are very exacting - this kit was designed specifically for these vehicles - the 77s, and 78s etc.
Your wheels are the oddball part here. They little bit that protrudes in is oddball, and they are either not factory, or are and add-on item that your 77 did not come with.
And, you removed the bearing adjusting nut locking ring - which is the slip ring in these vehicles - which is not something the instructions say to do. You have to really understand the system before you remove the parts.... It NEEDs to stay there.
I will add a note to the instructions explaining this as it's important to know how to adjust these bearings and to understand how they are retained.
Thank you for bringing this to my attention.
~john
Yes I fully understand how it works now with the lock ring. This has nothing to do with the kit. agreed.
the stock hub OD as I measured with a calipers is 105.35 mm. the adapter ring OD is 106.35 so the ring is larger than the standard hub OD. if the OD of the ring matched the stock hub it would be fine for me.
The wheels are Toyota part 42601-35751. These wheels are for a 5th gen 4runner. The wheels fit on the 77 hub just fine without the ring. so to me it's the rings that are oddball.
Now that I understand it's really just a standard toyota pickup knuckle, spindle, hub I see no reason to continue to run the old spindle, hub. Had I known this I would have never gone the kit direction. But now I know.
for me being able to run a hub or lug centric wheels is a requirement.
for people who do not want to swap out the old spindle/hubs and run lug centric wheels it's a great choice. It just might be important to mention this so future confusion is avoided.
Same wheel and same issue for me. The ring was slightly larger than the hub. Ended up taking the ring down carefully with a Dremel. Not ideal but plan to convert over the manual locking knuckle/spindle eventually.Yes I fully understand how it works now with the lock ring. This has nothing to do with the kit. agreed.
the stock hub OD as I measured with a calipers is 105.35 mm. the adapter ring OD is 106.35 so the ring is larger than the standard hub OD. if the OD of the ring matched the stock hub it would be fine for me.
The wheels are Toyota part 42601-35751. These wheels are for a 5th gen 4runner. The wheels fit on the 77 hub just fine without the ring. so to me it's the rings that are oddball.
Now that I understand it's really just a standard toyota pickup knuckle, spindle, hub I see no reason to continue to run the old spindle, hub. Had I known this I would have never gone the kit direction. But now I know.
for me being able to run a hub or lug centric wheels is a requirement.
for people who do not want to swap out the old spindle/hubs and run lug centric wheels it's a great choice. It just might be important to mention this so future confusion is avoided.
- Thread starter
- #137
while waiting for parts...
the 77 electric knuckles have that spot for the wire so... now that I'm ditching those spindles... I could just gob FIP into that spot... but a much harder more expensive path. exists. perfect! To answer the first question no it does interfere with the inside. The stock spindles have a huge electrical box in that spot.
3d printed a plug to fill the void. will still have to FIP into that spot but this should be a lot < FIP.
used fusion 360 to create a mold from that plug object. works pretty good, have done this a couple of times now to create custom polyurethane bushing for suspension and body mounts. I think the hardness of the material I use is 90 nits? it's good stuff. has made it thru multiple MN salt filled winters and it's still looking good.
Heck yes, now we are cookin with gas! Great work!while waiting for parts...
the 77 electric knuckles have that spot for the wire so... now that I'm ditching those spindles... I could just gob FIP into that spot... but a much harder more expensive path. exists. perfect! To answer the first question no it does interfere with the inside. The stock spindles have a huge electrical box in that spot.
View attachment 3243891
3d printed a plug to fill the void. will still have to FIP into that spot but this should be a lot < FIP.
used fusion 360 to create a mold from that plug object. works pretty good, have done this a couple of times now to create custom polyurethane bushing for suspension and body mounts. I think the hardness of the material I use is 90 nits? it's good stuff. has made it thru multiple MN salt filled winters and it's still looking good.
View attachment 3243895View attachment 3243896
View attachment 3243892
- Thread starter
- #140
Destroying the upholstery business in the privacy of my own home!
I have been messing around and improving... still have a long way to go. I'm very much a perfectionist. It hurts a little to put this out but I do love the constructive advise you’ll provide. The design has just enough of that Grey Poupon pretensive vibe? Now I need to move up to the rear passenger doors and work up that design.
I have been messing around and improving... still have a long way to go. I'm very much a perfectionist. It hurts a little to put this out but I do love the constructive advise you’ll provide. The design has just enough of that Grey Poupon pretensive vibe? Now I need to move up to the rear passenger doors and work up that design.
Similar threads
Users who are viewing this thread
Total: 2 (members: 0, guests: 2)