
Navigation
Install the app
How to install the app on iOS
Follow along with the video below to see how to install our site as a web app on your home screen.
Note: This feature may not be available in some browsers.
More options
You are using an out of date browser. It may not display this or other websites correctly.
You should upgrade or use an alternative browser.
You should upgrade or use an alternative browser.
Builds 1978 FJ-40 R2.8 Cummins Build - "Mater" (1 Viewer)
This site may earn a commission from merchant affiliate
links, including eBay, Amazon, Skimlinks, and others.
More options
Who Replied?rossl
SILVER Star
- Thread starter
- #23
Received the frame back from media blasting this week:
.jpg")
Overall it looks really good, but there are a few spots which were missed. The inside of the frame rail is pretty hard to clear 40+ years of junk.
I got to work removing the rear bumper. Both cross braces are pretty well rotted, the bumper is pretty badly tweaked, and both spring perch plates are pretty well rusted/gone. So I pretty much cut the entire thing off.
Started by grinding down the old rivets, drilling them slightly, then using an air hammer to punch them out the rest of the way.
Got all the old parts removed and starting to test fit the new braces.
.jpg")
I cleaned up the exposed metal and gave areas I wouldn't have access to again a quick blast with a weld through primer. My plan is to try to hot rivet to make it look original, but for now I'm bolting the new components into place to validate fitment.
Ended up fitting pretty well - some of the aftermarket parts aren't the exact dimensions as stock, but it makes up for it by having solid metal and being straight. Also pictured is the new receiver mount - more on that later as I move onto the tire carrier.
Overall it looks really good, but there are a few spots which were missed. The inside of the frame rail is pretty hard to clear 40+ years of junk.
I got to work removing the rear bumper. Both cross braces are pretty well rotted, the bumper is pretty badly tweaked, and both spring perch plates are pretty well rusted/gone. So I pretty much cut the entire thing off.
Started by grinding down the old rivets, drilling them slightly, then using an air hammer to punch them out the rest of the way.
Got all the old parts removed and starting to test fit the new braces.
I cleaned up the exposed metal and gave areas I wouldn't have access to again a quick blast with a weld through primer. My plan is to try to hot rivet to make it look original, but for now I'm bolting the new components into place to validate fitment.
Ended up fitting pretty well - some of the aftermarket parts aren't the exact dimensions as stock, but it makes up for it by having solid metal and being straight. Also pictured is the new receiver mount - more on that later as I move onto the tire carrier.
rossl
SILVER Star
- Thread starter
- #25
My next task was to stitch weld the frame members together. Overall consensus seems mixed here - plenty of people warning against welds cracking as the frame flexes vs others who have done it. Eventually I think I'm going to end up with a full cage for safety's sake anyway, which means the frame shouldn't flex that much anyway. Given the frame was clean and accessible I decided to go ahead and stitch weld both rails.
Up next is getting the rear bumper riveted on and getting the frame painted and prepped for suspension.
Up next is getting the rear bumper riveted on and getting the frame painted and prepped for suspension.
rossl
SILVER Star
- Thread starter
- #26
Decided to pull apart the parking brake from the old transfer case and move it to the split case (with the conversion output shaft on it). For the record, the parking brake has never worked and has always been near the top of my list to repair. I got a new cable and rebuild kit, and waiting on other supplies to finish the frame, so I transferred focus yesterday to brake repair.
Pulling the old brake off it became pretty clear that no small amount of oil/grease has leaked into the mechanism and soaked for many years, rendering any holding power useless.
So it got pulled apart and run through the parts washer. I ended up blasting the backing plate and repainting before putting back together with new pads/springs:
That's way better looking.
Next I'm going to put it onto the split t-case.
reddog90
SILVER Star
Where did you get the rebuild kit and was it pretty straight forward? I really need to do this.
rossl
SILVER Star
- Thread starter
- #28
Where did you get the rebuild kit and was it pretty straight forward? I really need to do this.
For the parking brake? SOR has them, part 076-100A. It was fairly straight forward. Remember to drain your t-case oil first. I took a before picture as reference, but just putting all the parts out on the counter helps. I was a little confused at first by the replacement rubber boot which came in the kit since mine had long since disappeared from the adjuster knob.
rossl
SILVER Star
- Thread starter
- #30
This weekend I worked on attaching the rear crossmember to the frame using hot rivets. I've seen it a couple of times on the forum and thought it didn't look impossible. I like the unique look of the rivets on the rear crossmember, and decided to give it a go over button head bolts.
Mostly I followed the instructions here, thanks to @Efjayforty:
 forum.ih8mud.com
I didn't go to the extent of creating a specific tool to match the factory rivets - round head rivets are close enough for the look I wanted.
The end result was not as good. Structural, but not pretty. I think I've identified a couple of initial problems - first feels like not heating the rivet evenly. In those cases the rivet wanted to buck to one side. I tried to do this single handed, I think for sure this would be easier with one or two helpers.
Bottom of the rear crossmember with a couple rivets put in and vice grips holding the next one until I get a bucking bolt installed underneath:
Note the closest rivet isn't the prettiest looking, but it will hold.
For the exposed rivets on the rear crossmember I decided to reverse the rivet direction, with the pre-finished side out. This produced much better looking rivets which will be exposed:
I think once I get a little paint on it this will end up looking great.
About halfway done, I still have to flip the frame and do a bunch in the top.
Mostly I followed the instructions here, thanks to @Efjayforty:
Builds - 1974 Reassembly
Greetings. I purchased a 1974 FJ40 as a project for my oldest son and I to work on. The truck is red and virtually rust free. The truck had a V8 conversion where the front motor mounts were removed and a Saginaw PS conversion. Whomever did the conversion did a pretty crude job that included...
forum.ih8mud.com
I didn't go to the extent of creating a specific tool to match the factory rivets - round head rivets are close enough for the look I wanted.
The end result was not as good. Structural, but not pretty. I think I've identified a couple of initial problems - first feels like not heating the rivet evenly. In those cases the rivet wanted to buck to one side. I tried to do this single handed, I think for sure this would be easier with one or two helpers.
Bottom of the rear crossmember with a couple rivets put in and vice grips holding the next one until I get a bucking bolt installed underneath:
Note the closest rivet isn't the prettiest looking, but it will hold.
For the exposed rivets on the rear crossmember I decided to reverse the rivet direction, with the pre-finished side out. This produced much better looking rivets which will be exposed:
I think once I get a little paint on it this will end up looking great.
About halfway done, I still have to flip the frame and do a bunch in the top.
rossl
SILVER Star
- Thread starter
- #31
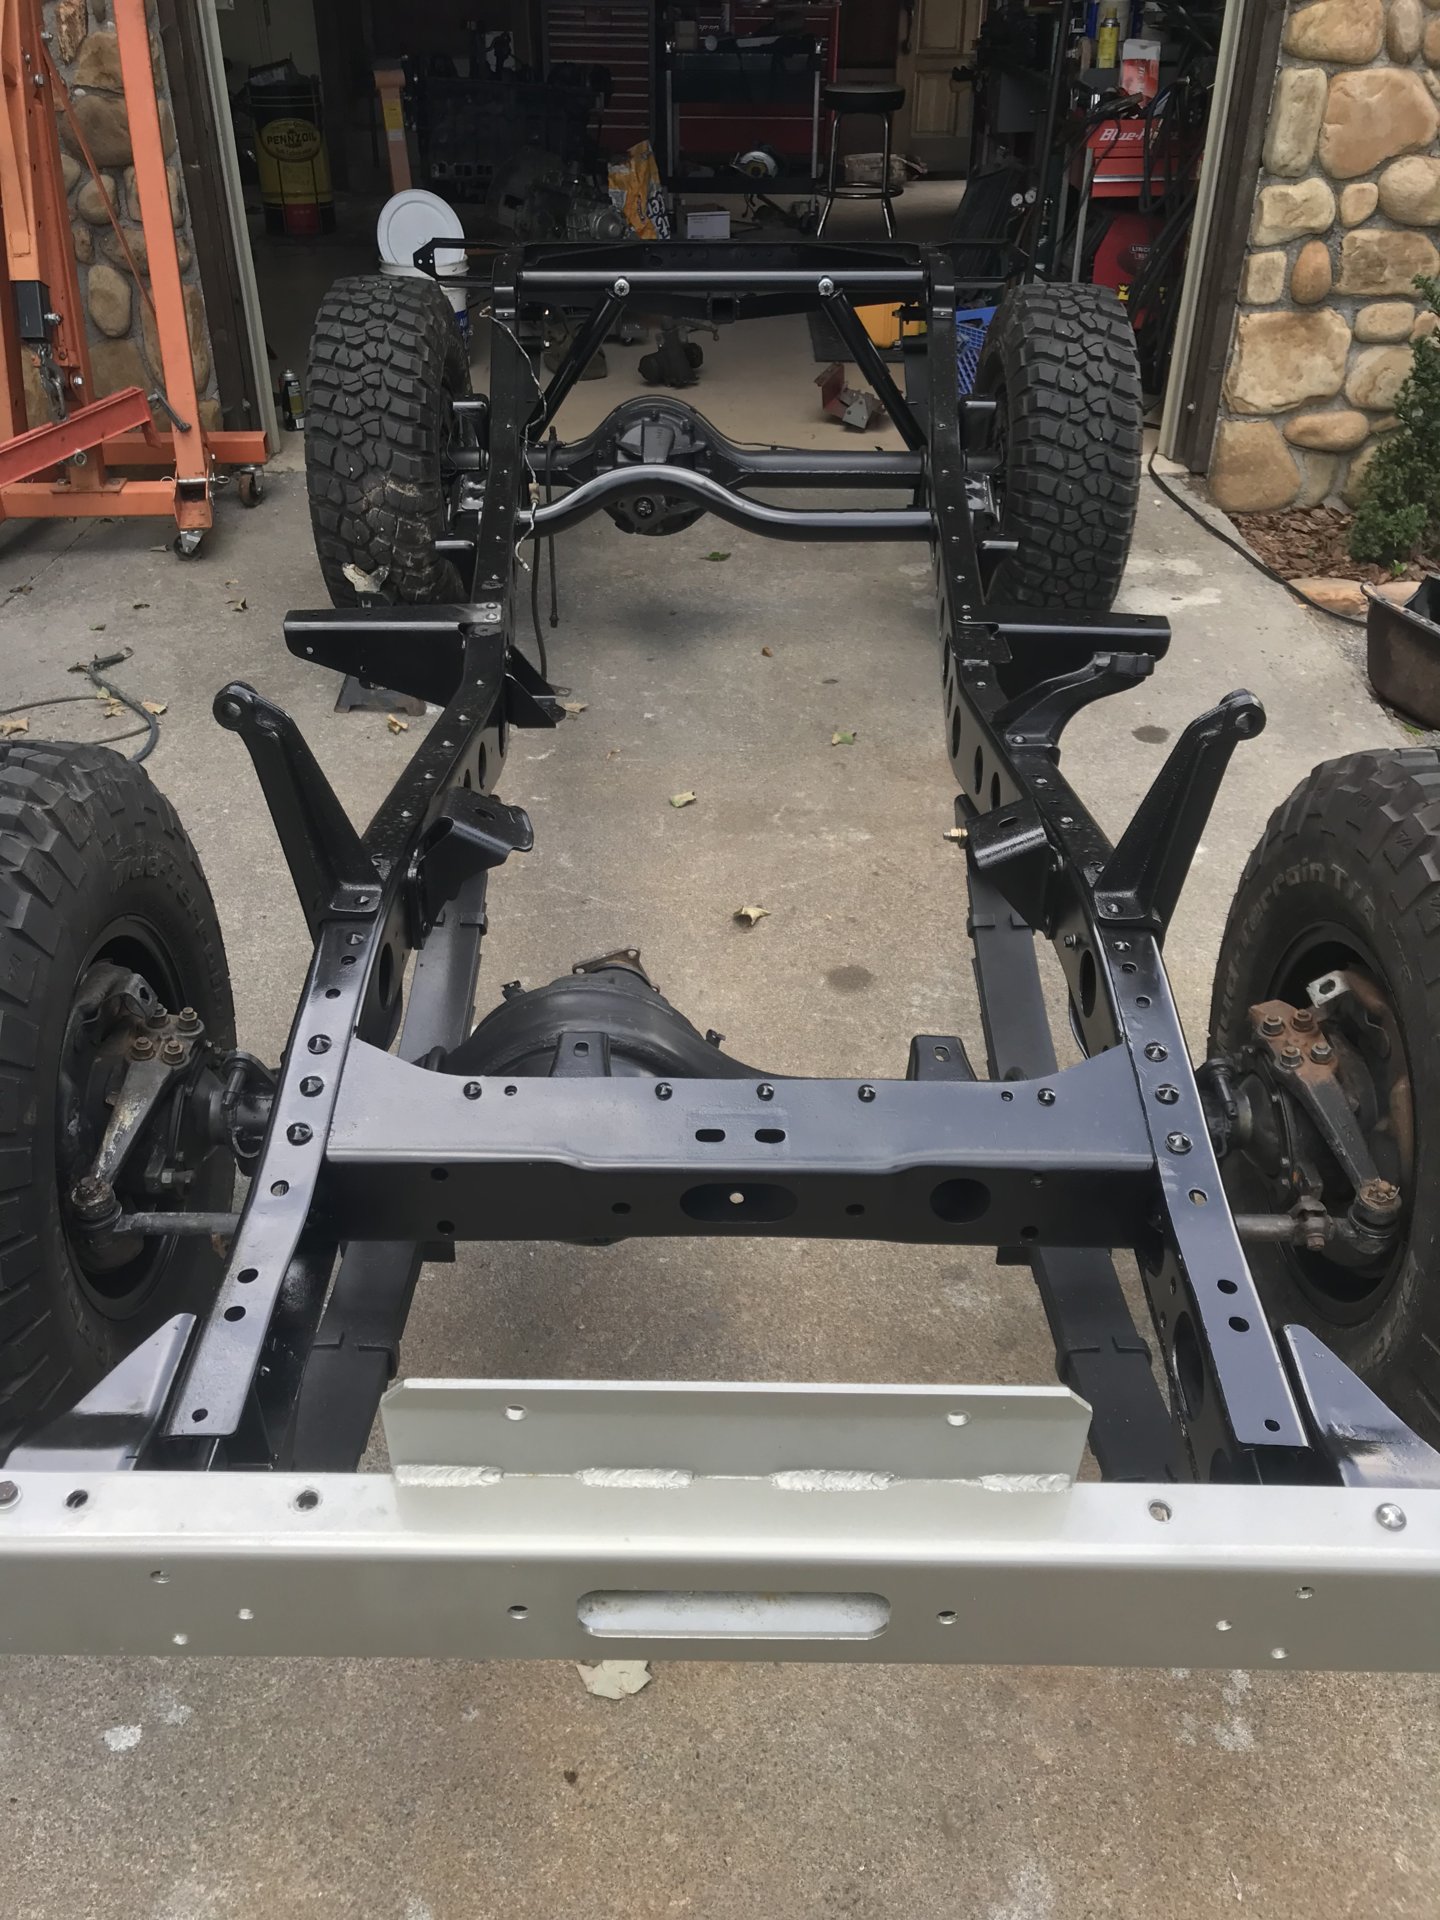
Starting to realize it has been a while since I've updated. I've had a couple delays, but managed to get back into the shop last weekend to lay down a little paint on the frame and start putting things back together.
Given a clean frame and the replacement of the rear crossmember I decided to proceed to box the rear portion of the frame as well. Again, there seems to be mixed feelings on if the frame should flex with the suspension and ultimately what boxing the frame adds, but I ultimately decided that the 40 year old frame could use a little reinforcement. The downside was time - this took way longer than I expected. The Ruff Stuff boxing kit may have worked well with stock components, but the replaced rear braces were not an exact fit so I needed to replace those with new metal.
Rear fully boxed:

And flipped the frame the right side up (and hopefully it stays this way), painted, and started to get some rear suspension under it:
It's starting to be nice to be re-assembling things. Can't wait until I get the front end back under it and get it rolling again.
Given a clean frame and the replacement of the rear crossmember I decided to proceed to box the rear portion of the frame as well. Again, there seems to be mixed feelings on if the frame should flex with the suspension and ultimately what boxing the frame adds, but I ultimately decided that the 40 year old frame could use a little reinforcement. The downside was time - this took way longer than I expected. The Ruff Stuff boxing kit may have worked well with stock components, but the replaced rear braces were not an exact fit so I needed to replace those with new metal.
Rear fully boxed:
And flipped the frame the right side up (and hopefully it stays this way), painted, and started to get some rear suspension under it:
It's starting to be nice to be re-assembling things. Can't wait until I get the front end back under it and get it rolling again.
rossl
SILVER Star
- Thread starter
- #32
The rear axle is getting close to being complete, so I thought I would document a few things. First, I my goal was to have lockers front and rear. My options basically came down to ARB, which is the general agreement for locker choice - strong, reliable, etc. I didn't go that route.
Instead I had a spare rear axle from another '78 FJ-40 which was a semi-float, and went deep into the forums telling tales of swapping a 9.5" Toyota e-locker from the rear of an FJ-80. I was immediately intrigued. Down sides are not to use large tires (not planning on going over 35", and if the locker fails it tends to trap everything inside the axle). I probably shouldn't have been so interested, but the idea of staying Toyota was intriguing. For some reason I've always felt the need to do things a little different.
First step was the rear axle is a semi-float design, and the FJ-80 is a full float. So either an axle swap was required, or conversion to a full float design. Then I found a kit which converts the semi-float FJ-40 to a full float design from Front Range Off Road, utilizing the same spindle and outer components as the front axle. In one swap I could go to a FF design, add disc brakes and a locker. I was hooked.
So, I tore the axle down to the housing, cleaned, painted, and added a brace. Then bought the right length studs for the FJ-80 locker - it requires 2 long studs and 4 longer studs, with 4 regular length studs. Also used the gasket from an FJ-80 locking differential as a template to grind the necessary clearance for the locking mechanism (left hand side):
The two major components to the kit are adapter for the axle flange to spindle and new axle shafts, complete with the long spline inner axle for the e-locker.
Flange mocked up:
Next, the outer portion of the axle needs to be trimmed flush with the inner lip of the flange to allow the spindle to bolt on. This essentially removes the bearing and seal mating surface. No going back now:
The new axle seal is held in place by an aluminum insert which is installed in place of the bronze bushing in the spindle:
And axle cut with the adapter mounted:
rossl
SILVER Star
- Thread starter
- #33
Next I installed the seal into the spindle:
And studs mounted:
Next install the spindle and assorted gaskets, same as the front:
And install the new to me locking differential:
Complete with a new back up lamp switch to replace the old used one, new OEM actuator cover, and locking actuator. Electronics temporarily tested to lock/unlock on the bench, and seems to have worked fine.
Next, prep the spindle for the hub housing:
rossl
SILVER Star
- Thread starter
- #35
And the next project is the rear bumper tire carrier. I was inspired a little by the 4-Plus products, which seem beefy and nice. I wanted to add a 2" receiver, but wanted to retain both stock bumperettes to keep the original look. I also didn't want to add additional bolt holes in the rear bumper after removing the old one and replacing with a new replacement, so I came up with a way to mount the tire carrier/spindle from the bumperette mounts and hitch which is hopefully sturdy enough.
Next I've got to figure out the latching mechanism and upper swing arm/tire carrier.
Next I've got to figure out the latching mechanism and upper swing arm/tire carrier.
rossl
SILVER Star
- Thread starter
- #37
Also a little bit of sun today, so I pulled the OEM replacement fenders out of the box from @dieselbj42. They experienced some primer scuffs in their journey but otherwise are ready to prep for paint.
rossl
SILVER Star
- Thread starter
- #39
I used Eastwood Chassis Black primer + top coat. I've heard that this can chip easily from some people, so we'll see how well this goes.What kind of paint did you use on your frame? I'm have my crusier pulled apart and am going to paint the frame in the coming weeks.
I used Eastwood Chassis Black primer + top coat. I've heard that this can chip easily from some people, so we'll see how well this goes.
Yeah, look hard enough and I feel like you can find cases of that with pretty much every product out there. Not easy to choose. I've got a can of Chassis Saver that I plan to use and going to do some test pieces this weekend
Similar threads
Users who are viewing this thread
Total: 2 (members: 0, guests: 2)