Stock Rear Bumper Receiver (1 Viewer)

This site may earn a commission from merchant affiliate
links, including eBay, Amazon, Skimlinks, and others.

Nay

Joined
Aug 17, 2004
Threads
132
Messages
4,993
Location
Colorado
Stock Rear Bumper Receiver - Made It Stronger

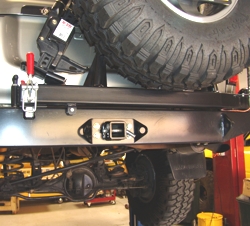
In a bid for increased clearance, I removed my clearance robbing tow hitch and am installing this Slee receiver:

sof_receiver.jpg


I had some misgivings about using this with the stock bumper until I started cutting the hole in the bumper and crossmember, which together are approaching 1/4" thick. The hitch extends behind the crossmember and is then triangulated to the frame, bolting up to where the tire carrier plate would normally bolt.

Given the bracing and triangulation that exists in the stock crossmember, plus the additional triangulation of this receiver, this is looking like more than enough for recovery and moderate towing without compromising clearance. I had been looking at this as an interim solution, but seeing what it would take to increase clearance for a custom bumper, i.e. cutting the frame and relocating the crossmember...I'm gonna leave it alone. There is a lot more strength back there than I had been assuming.

I'll post pics tomorrow when it is fully bolted up.

Nay
 
Last edited:
So you're keeping the existing stock bumper, but installing the slee? Hmm...may have to watch this one closely.
 
When time allows, please give more info on this mod, as well as your spare tire carrier.
 
davegonz said:
So you're keeping the existing stock bumper, but installing the slee? Hmm...may have to watch this one closely.

That's right. Spare is mounted on the roof rack...I hate swing out carriers, both for weight/position and inconvenience. Once it is all bolted up, I may just have it welded to the bumper for extra strength...plenty of material for that.

I'll post pics of the frame mounts and bumper view tomorrow...assuming I can keep the drill bit sharp for the four holes in the bumper/crossmember :beer:

Nay
 
Hmm. The picture shows 4 bolts through the very thick and very stout Slee bumper that was designed for the hitch. But you're putting those 4 bolts through two 1/8 inch pieces of sheetmetal that don't touch each other?? Did you check with Slee on that?

With the forward end attached to a mount point that Toyota intended only to hold the spare tire up, I really have to question the integrity of this unless I'm missing something.

DougM
 
Eager to see more as I have been considering something like this although I don't relish a roof top tire because I would wimper and sniffle if I had to get the spare off the roof and put the flat up there. HAving said that I do indeed not enjoy the stock hand crank orientation....
 
IdahoDoug said:
Hmm. The picture shows 4 bolts through the very thick and very stout Slee bumper that was designed for the hitch. But you're putting those 4 bolts through two 1/8 inch pieces of sheetmetal that don't touch each other?? Did you check with Slee on that?

With the forward end attached to a mount point that Toyota intended only to hold the spare tire up, I really have to question the integrity of this unless I'm missing something.

DougM

To me it seems like maybe he just cut a 2" hole for the tube itself to go through and then used the factory 4 bolt holes? Sort of like what I did without the tube. If so it should be plenty sturdy, but Ill await pictures to clarify.
 
The stock rear crossmember is not as thick as you think it is. In the very center there is an additional plate welded to the back of it but it IS NOT full width. It is only about 7 inches wide. just outboard of that plate (about where YOUR bolts will go through) it is only single thickness. I would not recommend any thing more than a bike rack unless the Slee bumper is also installed.
 
IdahoDoug said:
Hmm. The picture shows 4 bolts through the very thick and very stout Slee bumper that was designed for the hitch. But you're putting those 4 bolts through two 1/8 inch pieces of sheetmetal that don't touch each other?? Did you check with Slee on that?

With the forward end attached to a mount point that Toyota intended only to hold the spare tire up, I really have to question the integrity of this unless I'm missing something.

DougM


Christo does not rate the receiver for towing and does not endorse it for towing regardless of the presence of his bumper in the mix.
 
Honestly I really question anything that doesn't closely resemble the mounting points of the stock reciever. If you look at how the stock reciever is mounted, there is a significant friction area between the reciever brackets and the frame rail. The bolts of course act in shear, but more importantly act in tension to create a frictional force between the two pieces. This frictional force is what carrys the load, moreso than the 8 or so bolts in shear. Looking at the aftermarket options, I'm seeing much smaller contact areas, although the # of bolts may or may not be the same. This is what concerns me. I'd love to hear thoughts from some knowledgeable people such as Christo on this matter.

Ary
 
skyshark186 said:
To me it seems like maybe he just cut a 2" hole for the tube itself to go through and then used the factory 4 bolt holes? Sort of like what I did without the tube. If so it should be plenty sturdy, but Ill await pictures to clarify.

Here is how it works. You cut a hole where the factory four bolt mounts are located and insert the hitch. Here are the two pieces I cut out - these are back to back for a 1/4" thickness, so the bolts are going through 1/4" of material (and this is not sheetmetal - it took a lot of work with the cutting wheel...I was thinking I could just use a hole saw...forget it). You can see the nutserts that replace the crossmember piece beside the stock pieces

Nutserts.jpg

Then you drill four holes and bolt the face plate up to the crossmember (these four holes are outside of the factory holes) - it is retained by a nutplate with two nuts on each side (see pic above). Here I don't have the holes drilled yet. Ignore the fact that it looks like the hitch sits low...that is because it is not bolted on yet and the angle of the picture.

Hitch Close.jpg

The back of the hitch then bolts up with two arms that triangulate to the frame.

Hitch Triangulation.jpg

I don't see any reason why this would be weaker than with the Slee bumper. The weak point is the nut threads having to hold the pulling force no matter how much bumper material you have. This is not like a tow hitch where the bolts go up into the frame and the strength is in the shear load rating of the bolts. This is why I say I may weld, although the triangulation mounts are a shear mount, with should add a lot of extra strength.

Now for recovery usage, we could question if 1/4" of material is enough to handle pulls from the side. Given that this is a lot more than many aftermarket bumpers, and I now have additional triangulation over even a tow hitch, I am not concerned.

Slee did recommend this setup. I was inquiring about using the receiver that bolts to the factory holes for basic recovery, and they didn't think it would handle side loads very well. Since I don't want a tire carrier, this is a perfect solution unless I wanted to go nuts and trim the frame for a prerunner and the extra potential clearance.

Nay
Hitch Close.jpg
Hitch Triangulation.jpg
Nutserts.jpg
 
That inner plate with the captive nuts welded to it IS NOT full width. It ends just past your cuts.
 
cruiserdan said:
That inner plate with the captive nuts welded to it IS NOT full width. It ends just past your cuts.

That's correct. The Slee receiver holes go to the edge of the stock "nutsert" plate, but they do have the full 1/4" of material (just barely).

What is most interesting to me, and I hadn't realized this until I relocated the tire and removed the Reese hitch, is that the 80 doesn't truly have a rear bumper. It has a step cap that is bolted on to the crossmember, plus plastic end caps - you can't just "unbolt" the bumper and bolt something else on.

In order to damage this setup, you would either need to a) exert so much force that you rip the bolts out of the nuts and overcome the additional triangulation, or b) bend the crossmember and the frame.

What I wish I had done was try to cut the hole inside of the factory mounts to preserve more material and perhaps create a snug fit (I did this on the inside cut), but some welding top and bottom (where there is 1/4" of material) would take care of that if I think it's an issue down the road.

I think it is more than enough when I compare it to the unibody mounts on my old Jeep bumper, which saw 5,000 lb+ towing and some pretty good extractions, but aren't we always sure our new mods are the best thing? :grinpimp:

BTW, I am not installing this for heavy towing. The point for me is to have a rear tow point for light extractions offroad. I figure that if I damage the crossmember it will be time to cut the whole thing off and do a prerunner setup. The bolt holes where the tire carrier mounts would work well for a relocated crossmember that is triangulated to the third bolt...but what a PITA to achieve some much needed extra clearance.

Nay
 
Last edited:
Wen I cut mine I made a hole just large enough to get the tube through. Mine is not exaclty the same as yours but it was a forebearer for Christo's design.
 
cruiserdan said:
Christo does not rate the receiver for towing and does not endorse it for towing regardless of the presence of his bumper in the mix.

That's the legal (and smart) position...but when you look at it you'll see the wings with holes for the towing safety chains...so it is in fact designed for towing, even though all disclaimers apply...

I think it is easy for 80 owners to overlook how much beef is in the basic design compared to some other vehicles with similar tow ratings. The stock crossmember/bumper combination is triangulated to the frame and has an additional brace bar across the middle. 1/8" stock is also used in many of the non-structural parts of aftermarket bumpers for weight reasons, and those bumpers are unlikely to have the structural weld connections to the frame.

When I compare this setup to the aftermarket bumper with integrated Class III hitch on my old Cherokee, I think this comes out ahead. The Cherokee had 8 bolts to the unibody sheetmetal to hold the entire weight of the bumper, which was additionally attached to the unibody "frame rails" like a standard tow hitch with two 1/4" thick tabs bolted to a couple of nuts in a nutsert residing inside the frame rails. There was no "beef" anywhere in this setup, and no triangulation at all - the main bumper was 1/8" stock. I towed a 5,000 lb trailer from Virginia to Colorado with that thing and used it extensively offroad, and for a time it carried a jerry can, hi-lift, and spare.

Anyway, if I manage to damage it, I'll report back. For now, I have gained as much clearance over the Reese tow hitch as if I had lifted an extra 3-4 inches while still having a rear tow point and keeping a grand in my pocket.

Nay
 
If you did this for recovery purposes, I feel from an engineering perspective that this setup is a big step down in strength from the factory rear tow hooks that came on every 80. It's a nice way to have a way to tow a gardening trailer to the hardware store and back, but without the strength of a Slee bumper back there that is not a very strong setup. I suspect when you put a bike rack and 3 bikes on that hitch you'll be able to flex it with ease. Let us know.

DougM
 
Nay, great job. I think that will be plenty sturdy for towing of just about anything the 1fzfe will want to handle.
 
I've been thinking about doing something similar, only I plan to cut-up and rework the Valley Class III hitch on my LX. With the spare gone, I'll reuse the Valley angles that bolt to the frame but run two crossmembers up and behind the LX frame member. I'll have to make a new much-longer 2" receiver tubing section, which will probably have to bolt to all three crossmembers (the factory section and the two fab'd sections) for maximum strength and rigidity. This way the factory crossmember serves merely as "extra" support and isn't the main load bearing piece.
 
I finished the install today. As I was bolting it up after drilling the holes, I hit a little problem. As is often the case, little problems often open the door to major opportunities. The bolts on the lower holes were too long and would hit the back of the crossmember that is inside of the main bumper piece (it curves out to provide enough room for the top bolts).

Not wanting to take a trip to the hardware store, I pulled out the cutting wheel to trim them down, only to find out I don't have another cutting disc. So I figure I'll just drill all the way through and the bolt can just poke through the other side, so I drill it through and start bolting it up.

Now getting those nutserts to stay in place is a real task because you have no room to work, so I used some adhesive caulk and then stuck a finger through the space in the back to make the micro adjustments. As I am doing this, I can feel that the nutserts have almost entirely filled the space between the bumper and the crossmember (remember, this is all one piece, it is just hollow)...a couple of washers to fill the space and I could run a longer bolt through about 1" of total material...kind of like a sleeve, but there is a lot more material than a sleeve and the two bolts on each side are connected by the nutsert. I suddenly have an opportunity to make the whole thing a lot stronger.

So I go digging through my old parts stash, which is full of grade 8 hardware from various old Jeep projects. This happens to be in a tool kit where a quart of oil leaked on everything, and also corroded an emergency flare...everything in there is covered with glowing neon yellow Mobil 1. (Note to self: don't store a previously opened quart of oil with tools and parts and then leave it alone for 2 years). So I manage to find two perfect (glowing) 1/2" bolts and decide this is a good time to wash my hands, which are also glowing, before continuing.

Now I just need to slide in the washers, which was easier said than done in a very tight space, and bolt it up. Here is a pic of the bolts back through the crossmember - you can see the washers on the inside as well.

Hitch Through CM.jpg

The final assembly ties the front end of the bumper into the rest of the crossmember. It order to rip this out, you'd basically have to rip off the entire crossmember and bend in the frame rails, which should be awfully hard to do.

I am extremely pleased at how this project turned out. $185 and about 3 hours of cutting, drilling, and bleeding and you've got a hitch mounted up to your stock bumper/crossmember. It's a two beer job, and is a nice way to get yourself comfortable with taking a cutting wheel to your rig :bounce2: . Just get some longer 3" bolts and washers for the bottom holes and take it all the way through the crossmember.

Nay
Hitch Through CM.jpg
 

Users who are viewing this thread

Back
Top Bottom