
Fantastic work! I just read through the entire thread, it's given me a ton of ideas and tips for my restoration. Forgive me if you already mentioned it, what kind of paint and color did you use for the Exterior items? The grille, rear vents, mirrors etc.
Navigation
Install the app
How to install the app on iOS
Follow along with the video below to see how to install our site as a web app on your home screen.
Note: This feature may not be available in some browsers.
More options
You are using an out of date browser. It may not display this or other websites correctly.
You should upgrade or use an alternative browser.
You should upgrade or use an alternative browser.
This site may earn a commission from merchant affiliate
links, including eBay, Amazon, Skimlinks, and others.
More options
Who Replied?- Thread starter
- #262
Thank you!Fantastic work! I just read through the entire thread, it's given me a ton of ideas and tips for my restoration. Forgive me if you already mentioned it, what kind of paint and color did you use for the Exterior items? The grille, rear vents, mirrors etc.
I used SEM Bumper coat charcoal metallic. It is not a 100% match but close. And it is meant for painting plastic so it is easy.
- Thread starter
- #263
Radio had problems. It came on when turning key to "acc" position. It also turned of with the key but the lights for buttons stayed on. I asked around and someone suggested to change the relay to a version with a resistor to kill all the possible small currents that may cause this. It did not work. Then someone suggested that the radio itself discharges capasitors to the lightning. And this one was it. I had split the wires after relay for the radio lightning an turn on. Current went throug the split point from pin to pin. So I added a diode first in the wrong wire of course but finally it worked. Now it behaved as it should. When I was messing with the wires I lost the ground. Had some bad joints so I redid all. Now everything was fine.
After this I noticed that left rear speaker did not work. I removed front seats and dug out the wires under carpet to inspect the joint. It was fine. I found reason for this in the speaker wire connector. It had one pin bent.
After this I started with front speakers. First traced the silhouettes to a paper.

Then cut adapters from plastic sheet.
Some chamfering and a foam rubber as a seal.
Figuring out the position with a scrap door card.
New plastic clips for screws.
Test fit. I found out here that speaker wires was wrong way. Swapped them around to get the left and right channels to right sides.
New hole to door cards. These cards had the same speakers before but in 4" size. So did not have to sacrifice the cards without speaker holes.
New plastic. I moved the small "pouch" from old plastics.
Did not get the "pouch" to stick and the lever bar went through the plastic in wrong place so had to redo the plastic.
New door handles.
Washed the inside handles.
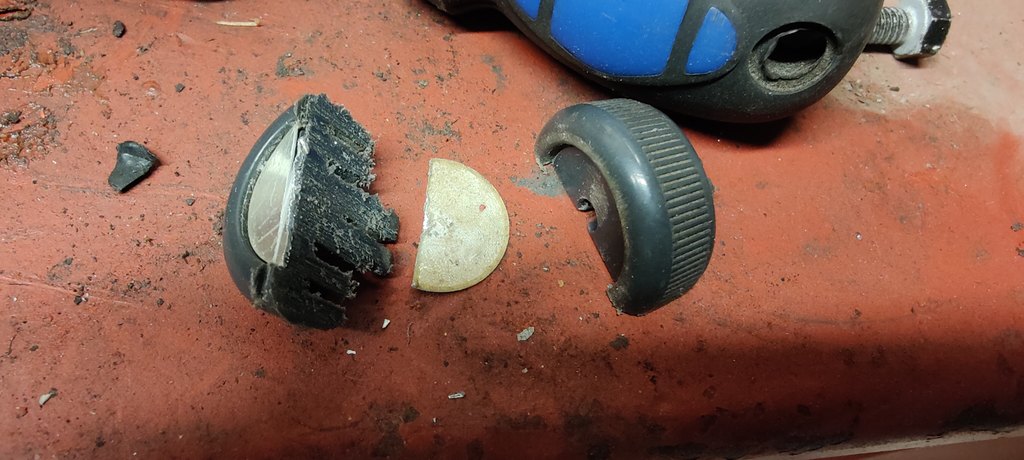
Then on to the window cranks. These all look worn and tired.
Tried to pull the knob out to see how the aluminium in the center is attatched and maybe remove it.
Did not see so I cut one knob in half.
The aluminium is just glued on. So I ordered some new cranks to some Corolla or other Toyota. I removed some material to get better under the aluminium. Then soaked them with brake cleaner to soften the glue and get the aluminium insert off.
Two came out perfect and two got same small marks when prying off the insert.
After this I noticed that left rear speaker did not work. I removed front seats and dug out the wires under carpet to inspect the joint. It was fine. I found reason for this in the speaker wire connector. It had one pin bent.
After this I started with front speakers. First traced the silhouettes to a paper.

Then cut adapters from plastic sheet.

Some chamfering and a foam rubber as a seal.


Figuring out the position with a scrap door card.

New plastic clips for screws.

Test fit. I found out here that speaker wires was wrong way. Swapped them around to get the left and right channels to right sides.

New hole to door cards. These cards had the same speakers before but in 4" size. So did not have to sacrifice the cards without speaker holes.

New plastic. I moved the small "pouch" from old plastics.

Did not get the "pouch" to stick and the lever bar went through the plastic in wrong place so had to redo the plastic.
New door handles.

Washed the inside handles.

Then on to the window cranks. These all look worn and tired.

Tried to pull the knob out to see how the aluminium in the center is attatched and maybe remove it.

Did not see so I cut one knob in half.
The aluminium is just glued on. So I ordered some new cranks to some Corolla or other Toyota. I removed some material to get better under the aluminium. Then soaked them with brake cleaner to soften the glue and get the aluminium insert off.

Two came out perfect and two got same small marks when prying off the insert.

- Thread starter
- #264
Rear door cards got new metal parts.
Stopper clip got powder coat.
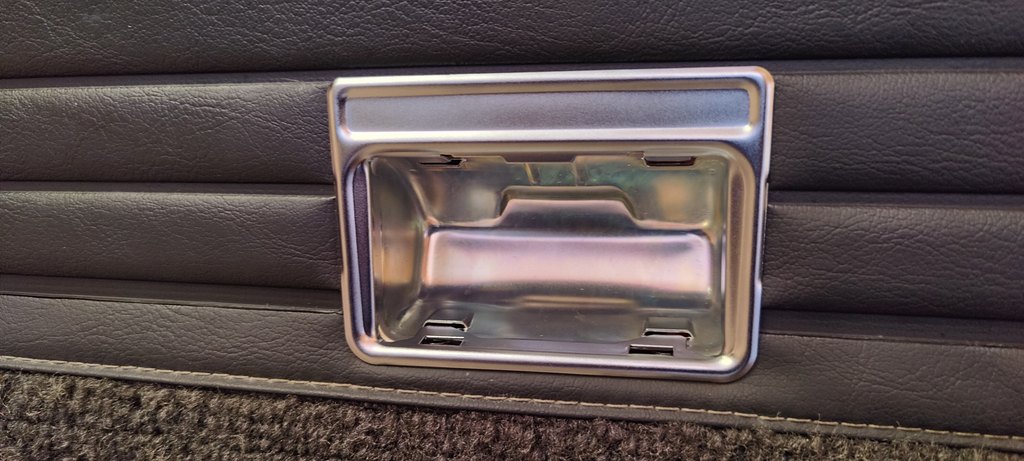
Ash tray cleaned and treated. Before and after.
And finished product.
Then door cards on.
Plastic under the handle is new.
Speaker sits just at the top of fabric. Just like I wanted it.
Then door opening trims. They looked also very worn.
Some sanding.
Painted with SEM structure paint and bumper coater.
Mounted.

Stopper clip got powder coat.


Ash tray cleaned and treated. Before and after.

And finished product.


Then door cards on.


Plastic under the handle is new.

Speaker sits just at the top of fabric. Just like I wanted it.

Then door opening trims. They looked also very worn.


Some sanding.

Painted with SEM structure paint and bumper coater.

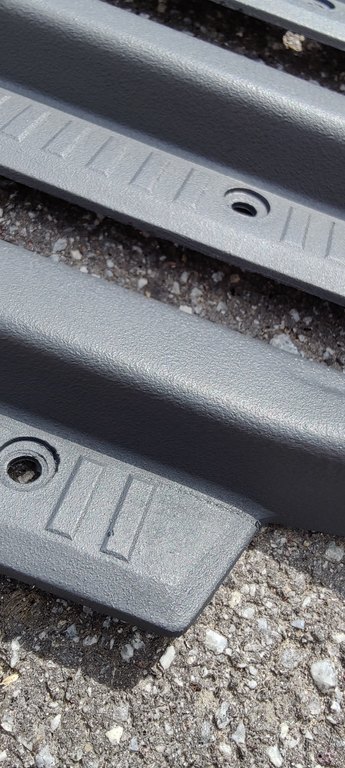
Mounted.


- Thread starter
- #265
After this I mounted the radio finally on its place. Got to peel of the protective film.
Injection pump looked so rusty and ugly that I had to sort it out before I can call the car finished. Also removed the injectors for a refurbish. Pump make up and injector overhaul was done by About Us | My Site - https://www.ftworkshop.com/?lang=fi
Waiting on the pump I made some decals. Numbers I got with Google and size and positions from another engine.
Then I got the pump and injectors back.
Put them back in the car.
After this I had some problems. Engine was really hard to get started and it did not run right. Idle was rough, stalled, did not run without pumping on the manual hand pump, etc. After all the air was out from the system it ran like it should. The start was difficult still. I measured that current came to the glow plugs so I started thinking maybe the new not oem glow plugs were bad. I swapped them to old original Denso ones. That did nothing. After this I measured the current on glows again and now there was no voltage on plugs when glowing. I had one power supply rail wrong installed for glows. But that was not the reason either for not glowing. Then I started tho think if the problem was this one rail piece with some wires on it. And that was it.
Connector was badly corroded.
Cleaned the connector and now it glows and starts as it should.


Injection pump looked so rusty and ugly that I had to sort it out before I can call the car finished. Also removed the injectors for a refurbish. Pump make up and injector overhaul was done by About Us | My Site - https://www.ftworkshop.com/?lang=fi


Waiting on the pump I made some decals. Numbers I got with Google and size and positions from another engine.


Then I got the pump and injectors back.


Put them back in the car.


After this I had some problems. Engine was really hard to get started and it did not run right. Idle was rough, stalled, did not run without pumping on the manual hand pump, etc. After all the air was out from the system it ran like it should. The start was difficult still. I measured that current came to the glow plugs so I started thinking maybe the new not oem glow plugs were bad. I swapped them to old original Denso ones. That did nothing. After this I measured the current on glows again and now there was no voltage on plugs when glowing. I had one power supply rail wrong installed for glows. But that was not the reason either for not glowing. Then I started tho think if the problem was this one rail piece with some wires on it. And that was it.

Connector was badly corroded.

Cleaned the connector and now it glows and starts as it should.
- Thread starter
- #266
Then the mud flaps. I bought these from ebay some years ago. Also later one rear flap where I got the missing mounting bracket from.
Front ones were in really bad shape.
Rear ones was fine.
Made some new metal pieces.
Tried to straighten out one front flap. Did not work.
Glued the metal pieces on.
Paint.
Looked on new nos flap how the brackets was fastened. I turned new rivets from aluminium bar.
After some Flex seal I assembled the flaps.
Then some last parts.

Front ones were in really bad shape.

Rear ones was fine.

Made some new metal pieces.


Tried to straighten out one front flap. Did not work.


Glued the metal pieces on.


Paint.

Looked on new nos flap how the brackets was fastened. I turned new rivets from aluminium bar.

After some Flex seal I assembled the flaps.


Then some last parts.


- Thread starter
- #267
Then it was time to take it out and drive home.
Power steering was yelling like crazy and did not stop no matter what I tried. Then some fellow Cruiser head told me that his reservoir had clogged in the new zink plating process. I opened my reservoir and yes. This was the reason. It wass full of rust inside and the mesh had two small spots that was not clogged. So I removed all the rust and the mesh cleaned it well and put back on. Now it worked.
I bought a bottle of bubbly in 2019 (when the first deadline was) that I would open when the car is in my home garage. So now it was time to open that bottle.
Some pictures outside after a wash and new wheels.
Then some details to inside. Old period correct maps, stuff in the original dealer folder, etc. My father had same kind of air freshener in his LC back in the day. That air freshener is from same year that my car.


Power steering was yelling like crazy and did not stop no matter what I tried. Then some fellow Cruiser head told me that his reservoir had clogged in the new zink plating process. I opened my reservoir and yes. This was the reason. It wass full of rust inside and the mesh had two small spots that was not clogged. So I removed all the rust and the mesh cleaned it well and put back on. Now it worked.
I bought a bottle of bubbly in 2019 (when the first deadline was) that I would open when the car is in my home garage. So now it was time to open that bottle.

Some pictures outside after a wash and new wheels.


Then some details to inside. Old period correct maps, stuff in the original dealer folder, etc. My father had same kind of air freshener in his LC back in the day. That air freshener is from same year that my car.


- Thread starter
- #268
Next day couple of guys from SLCK (Finnish Land Cruiser Club) to make the museum car inspection. In Finland we have this museum car thing. If the car is over 30 years old, original and in good shape it can be registered as museum car. Taxes and insurance is very cheap. Normally this one with back seat would cost about 1200€/year in taxes. Now it has no taxes. Also insurance is 48€/year but it is limited to 30 days of use per year, but no one follows you how much you drive. Or maybe neighbours but no one else. I got good grades from the inspection. 13 "Good" and 23 "Excellent". Grades are "To be corrected", "Fair", "Good" and "Excellent". It was also a bit more serious inspection when a make and modell specific car club does it instead of a generic inspector. I am in the middle.
Next day I had to tackle some oil leak. Made a new gasket for the cover for push rod opening. No leaks from there now.
Then temporary "plates" and waiting for the registration inspection on next day.
Waiting in line. I got it registered. The guys there were quite blown away. Nothing to complain on the road worthy side. I also got back the original register number on plates.
Noticet when driving to the inspection that the turn signal did not return. For got this brown plastic thing.
Then some test drive. Drove fast and got even numbers.
Then started the problems. Rear brakes came hot when driving. I loosened them couple times to get that sorted. After first longer drive it dropped some fluid. Three of the injectors were leaking. New zink coating did harm the sealing surfaces.
New set. First some paint.
While test drive after the change the power steering had some noise again. Steering box had leaked almost all oil out. For some reason the adjusting screw and locking nut was loose. After tightening the leak stopped. After couple drives something dripped again. This time it was gear box oil. Fill and drain plugs were not tight enough. I was afraid to tighten them after I got threads ruined on one plug earlier. But now it seems like no drops from anywhere.
Then to the main event. Previous owner had 60y birthday this saturday. I have waited for the final reveal to this party and it was worth it. It was a surprise for her that i drove with her old car to the party. She was so surprised, happy and moved. Many of the relatives had fun stories from the history, road trips and all other stuff. It was fun to listen and discuss with peolpe and show off the car.
Next steps are to get the car back to painter. There are some dings etc. that needs to be taken care of. After that the original style side decals on. Melber alloy wheels will also come under the car when I gaet those refurbished. Also winch has no wire and drive shaft need bolts. Now I have to drive the car and try to start rely on it on longer trips. All those leakages had taken me down ond the reliability thinking. But I am sure it will build up. Also it is autumn now so it can be that all that driving is done next summer. It is almost ime for winter storage.
Now I want to thank you all who has followed my project, commented and supported me on this journey. It has been fun to share it with this community and maybe give others some hints and motivation to work on their own car.
Thank you! Kiitos!


Next day I had to tackle some oil leak. Made a new gasket for the cover for push rod opening. No leaks from there now.

Then temporary "plates" and waiting for the registration inspection on next day.

Waiting in line. I got it registered. The guys there were quite blown away. Nothing to complain on the road worthy side. I also got back the original register number on plates.

Noticet when driving to the inspection that the turn signal did not return. For got this brown plastic thing.

Then some test drive. Drove fast and got even numbers.


Then started the problems. Rear brakes came hot when driving. I loosened them couple times to get that sorted. After first longer drive it dropped some fluid. Three of the injectors were leaking. New zink coating did harm the sealing surfaces.
New set. First some paint.


While test drive after the change the power steering had some noise again. Steering box had leaked almost all oil out. For some reason the adjusting screw and locking nut was loose. After tightening the leak stopped. After couple drives something dripped again. This time it was gear box oil. Fill and drain plugs were not tight enough. I was afraid to tighten them after I got threads ruined on one plug earlier. But now it seems like no drops from anywhere.
Then to the main event. Previous owner had 60y birthday this saturday. I have waited for the final reveal to this party and it was worth it. It was a surprise for her that i drove with her old car to the party. She was so surprised, happy and moved. Many of the relatives had fun stories from the history, road trips and all other stuff. It was fun to listen and discuss with peolpe and show off the car.

Next steps are to get the car back to painter. There are some dings etc. that needs to be taken care of. After that the original style side decals on. Melber alloy wheels will also come under the car when I gaet those refurbished. Also winch has no wire and drive shaft need bolts. Now I have to drive the car and try to start rely on it on longer trips. All those leakages had taken me down ond the reliability thinking. But I am sure it will build up. Also it is autumn now so it can be that all that driving is done next summer. It is almost ime for winter storage.
Now I want to thank you all who has followed my project, commented and supported me on this journey. It has been fun to share it with this community and maybe give others some hints and motivation to work on their own car.
Thank you! Kiitos!
Last edited:
Cruiser Cult
Supporting Vendor
Seriously awe inspiring attention to detail and skill.  Congratulations on a fine rig and a job very well done.
Congratulations on a fine rig and a job very well done. @Samppahj , voi perkelle, mies on tehnyt tyota. kunnia auton katsomusta merkista  joo, se oli pitka ajo kotin tallilta, mita, puoli kilometri?
yeah guys, like i said last fall when i got home from the motherland, pictures do not do this beast justice. it was a pleasure to see it in person
sami, sie olet viela ugly
joo, se oli pitka ajo kotin tallilta, mita, puoli kilometri?yeah guys, like i said last fall when i got home from the motherland, pictures do not do this beast justice. it was a pleasure to see it in person
sami, sie olet viela ugly
- Thread starter
- #271
Yes I am not getting prettier as time goes by. Also my barber has been on vacation@Samppahj , voi perkelle, mies on tehnyt tyota. kunnia auton katsomusta merkista
yeah guys, like i said last fall when i got home from the motherland, pictures do not do this beast justice. it was a pleasure to see it in person
sami, sie olet viela ugly
Out of curiosity, do you have the OEM part number you used from the 70 series diff sensor/switches?Then new sensors/switches for diff locks. New ones came from J7 series, because HJ ones are no longer available. They seem to be same ones and the connector is right type. Only cables are too long.

I read the whole build. Very well done.
- Thread starter
- #273
They were these: Genuine LandCruiser 70 Series HZJ KZJ PZJ BJ Transfer Case Hi-Lo Sender Switch | eBay - https://www.ebay.co.uk/itm/Genuine-LandCruiser-70-Series-HZJ-KZJ-PZJ-BJ-Transfer-Case-Hi-Lo-Sender-Switch-/192480199160?_trksid=p2349526.m4383.l4275.c1Out of curiosity, do you have the OEM part number you used from the 70 series diff sensor/switches?
I read the whole build. Very well done.
Excellent work, my friend!
- Thread starter
- #275
This season has ended. Did drive a bit, only 461km. But after all leakage etc. problems the car has worked fine. It has been very rainy autumn so sunny driving days has not been many. But I took some photos on good days.
I am surprised of that I am not afraid to drive it. I have driven in rain, gravel roads, fields and it is just fun and a fun car to drive. Not fast or comfortable but fun. That is the best part of the whole build to be able to drive and enjoy the result. Not to just have it sitting in a garage and be afraid if it gets rock chip.
But now it rests over winter in warm garage and enjoys the company of couple Mercedes, Mustang and some bikes.
Yesterday was a special day. Eight years from this picture. I can still remember the smell when I opened the door and sat in for the firs time. But it has been fun eight years, not all the time but mostly fun.


I am surprised of that I am not afraid to drive it. I have driven in rain, gravel roads, fields and it is just fun and a fun car to drive. Not fast or comfortable but fun. That is the best part of the whole build to be able to drive and enjoy the result. Not to just have it sitting in a garage and be afraid if it gets rock chip.
But now it rests over winter in warm garage and enjoys the company of couple Mercedes, Mustang and some bikes.

Yesterday was a special day. Eight years from this picture. I can still remember the smell when I opened the door and sat in for the firs time. But it has been fun eight years, not all the time but mostly fun.

mongoose2231
Supporting Vendor


georgebj60
SILVER Star
Really well done. And nice to see it out in the wild.
@Samppahj , on mukava nähdä snow white tallista ulos ja erämassa  se on tullut pitkän matka 8 vuodesa ja hyvin tehtö kaveri. juu, minun dragonship rakennus on hitasti menosa kun työ hommat ovat rangkat. mutta sen on tulosa. tää vanha f¤%ker on aijatelemasa tulla kotimahan kevättalvella, olis ko ovi auki?
se on tullut pitkän matka 8 vuodesa ja hyvin tehtö kaveri. juu, minun dragonship rakennus on hitasti menosa kun työ hommat ovat rangkat. mutta sen on tulosa. tää vanha f¤%ker on aijatelemasa tulla kotimahan kevättalvella, olis ko ovi auki?tmxmotorsports
SILVER Star
Say whu lol@Samppahj , on mukava nähdä snow white tallista ulos ja erämassa
some translation app should get you the general gist.Say whu lol
just trying to retain my mother tongueSimilar threads
Users who are viewing this thread
Total: 3 (members: 0, guests: 3)