
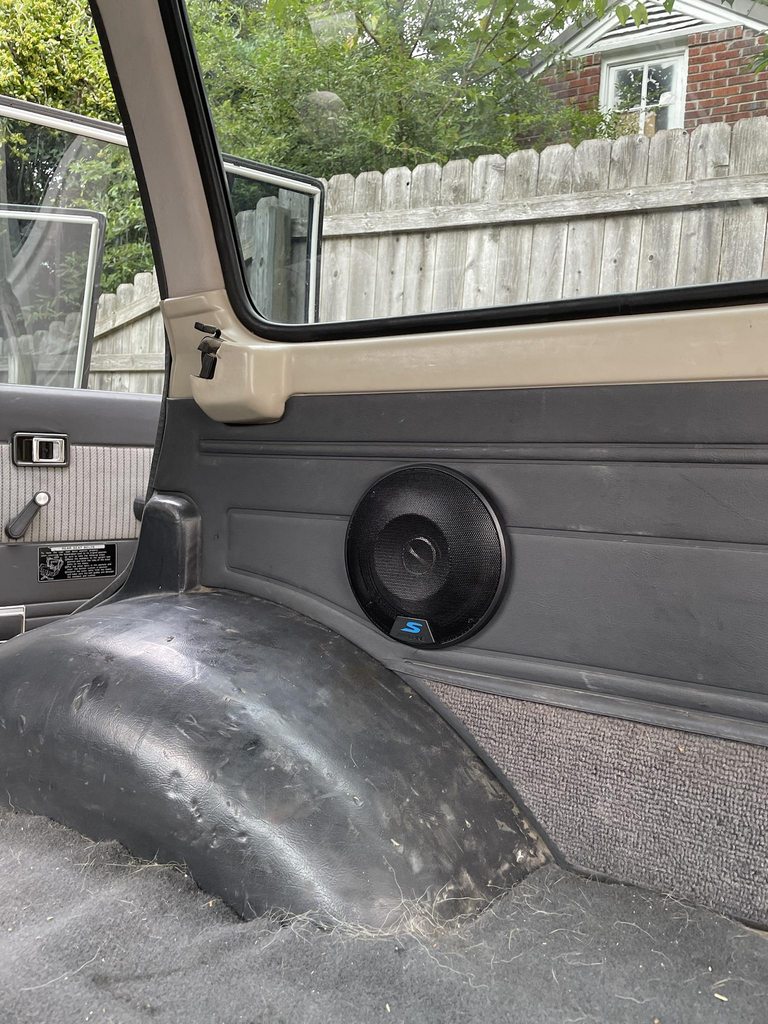
The little tab on the bottom of the brackets had to be added because the bodywork on the 60 differs from the 62? In other words, on a 62 the brackets mount directly on the top and bottom, no bracket required?The easiest way would be to get the cargo panels from the 62 and speaker brackets and covers. I just used the fj62 speaker brackets and cut my own holes and used alpine speaker grilles. Tbh you could pretty easily make your own speaker brackets too, the fj62 ones were kind of a pain to get to work. I routed the wires under my carpet along the doorsills then crossed behind the hump that the front 2 brackets that the front seats rest on to my amp under the driver seat. Since its all under the carpet, you cant see anything and it looks pretty clean besides the dog hair.

Navigation
Install the app
How to install the app on iOS
Follow along with the video below to see how to install our site as a web app on your home screen.
Note: This feature may not be available in some browsers.
More options
You are using an out of date browser. It may not display this or other websites correctly.
You should upgrade or use an alternative browser.
You should upgrade or use an alternative browser.
What did you do with your 60 this weekend? (21 Viewers)
- Thread starter MrMoMo
- Start date
This site may earn a commission from merchant affiliate
links, including eBay, Amazon, Skimlinks, and others.
More options
Who Replied?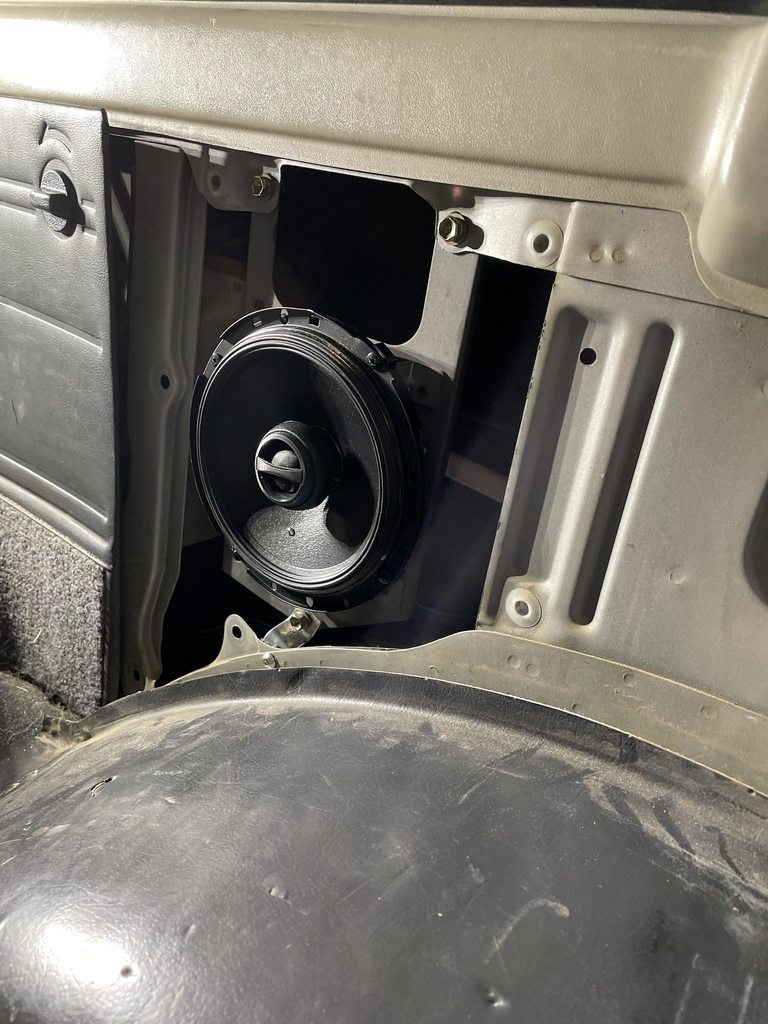
WoodnotRust
SILVER Star
Working on my brakes: Rebuilt my LSPV spring arm and dolled up the brackets ready for the new LSPV valve. I got a 2" spacer ready to accommodate the OME 2" lift, but just in case it isn't really a full 2" I have a 1" spacer as a back-up. In the meantime Meineke is installing the new Booster/Master Cylinder and all new OEM components for the rear brakes. Should all be done Monday and I hope to see a nice improvement to the way the brakes feel and stop.

Moving doors and overheating 2F engines! Ran an errand to pick up a vintage door for my new pottery studio and all was well. Drove to a Halloween party later in the day and about a mile from home at the end of the night, noticed some engine knocking and then smelled burning fluids. Pulled over and shut the engine down immediately. Popped the hood amid all the steam rising from the engine bay to find a burst coolant line. Then proceeded to help DH redneck tow it the mile home. DH sure is glad he wasn't driving, but then again, he is the mechanic
Hopefully we don't have a warped head or cracked block on our hands. TBD later today.

Hopefully we don't have a warped head or cracked block on our hands. TBD later today.
Someone wanted to see what I was inspecting
offending bugger
At least she started up and sounded fine for the minute it took to get her back in her parking spot. Guess putting on a new radiator cap was too much for the older hoses. I knew they should be replaced, just figured I had a Little time.
Also picked up the 70 visors from a few pages back, not a direct replacement for my '82, the plastic mounting piece puts the visor at the WAY wrong angle. Thankfully, it's easy enough to pull the mount and arm to swap the old saggy visor the fresh, new and clean one:

offending bugger

At least she started up and sounded fine for the minute it took to get her back in her parking spot. Guess putting on a new radiator cap was too much for the older hoses. I knew they should be replaced, just figured I had a Little time.
Also picked up the 70 visors from a few pages back, not a direct replacement for my '82, the plastic mounting piece puts the visor at the WAY wrong angle. Thankfully, it's easy enough to pull the mount and arm to swap the old saggy visor the fresh, new and clean one:


It’s the plastic piece that’s at the wrong angle right? Or did you use the 60 arms in the 70 plastic piece?Someone wanted to see what I was inspecting
offending bugger
At least she started up and sounded fine for the minute it took to get her back in her parking spot. Guess putting on a new radiator cap was too much for the older hoses. I knew they should be replaced, just figured I had a Little time.
Also picked up the 70 visors from a few pages back, not a direct replacement for my '82, the plastic mounting piece puts the visor at the WAY wrong angle. Thankfully, it's easy enough to pull the mount and arm to swap the old saggy visor the fresh, new and clean one:
Finished up these axles in June 2017 installed them in Sept 2019. Installed the levers today. Things move slow when you have little ones.

It’s the plastic piece that’s at the wrong angle right? Or did you use the 60 arms in the 70 plastic piece?
It's the plastic piece, and Only the plastic piece, that's wrong/incompatible. You could put the 60 plastic on the 70 metal arm if you want. I'll post a picture of the difference that piece of plastic makes when the other side comes in. In text description, it changes the angle of the whole visor, so when you swing it over to do the door window, it's drooping at about 45deg, as you try to swing it back to normal rest it tilts up into the headliner well short of the retaining clip.
Still, it's one of those things that's not a problem if you know. I was Hoping for new plastic as well, as my drivers side was cracked in half... for now super glue and baking soda will do. Also means that if I try to customize the original visor, I can easily just swap back and forth.
perrobravo
SILVER Star
Installed a Cruiser Head plug and play USB outlet making use of the switch blank to the right of the ashtray. Super easy and quick installation. While I was in there, removed the rear heater switch since I recently deleted the rear heater itself.
Much cleaner look than whatever Amazon cigarette lighter adapter mess I was using before...Thanks @ChaserFJ60 !
Much cleaner look than whatever Amazon cigarette lighter adapter mess I was using before...Thanks @ChaserFJ60 !


Checked my carb to see why all of a sudden it started acting awful. It's been idling at 650 and acting great for years. This happened last week and I think I got debris in the carb.
I found the air filter and it looks like a Rollercoaster. This I believe was a federated air filter. Bought a wix and has reinforced wire on the outside.

I found the air filter and it looks like a Rollercoaster. This I believe was a federated air filter. Bought a wix and has reinforced wire on the outside.
CenTXFJ60
SILVER Star

John McVicker
SILVER Star
^^^
Nice, very nice.

Nice, very nice.
Nice to see I’m not the only one with three gauges mounted in the same spot! What’s the one on the left halfway in the photo?Installed a Cruiser Head plug and play USB outlet making use of the switch blank to the right of the ashtray. Super easy and quick installation. While I was in there, removed the rear heater switch since I recently deleted the rear heater itself.
Much cleaner look than whatever Amazon cigarette lighter adapter mess I was using before...Thanks @ChaserFJ60 !
I’m running A:F, temp, vacuum.
jesus888
SILVER Star
Think it was ~$300 total…@Silveredition hugely envious of the armrests and your vent windows— I can imagine shipping them to the states is wildly expensive but how pleasant they must be to use
I think you need the tab on the 62 also. They are really easy to make out of some scrap metal thoughThe little tab on the bottom of the brackets had to be added because the bodywork on the 60 differs from the 62? In other words, on a 62 the brackets mount directly on the top and bottom, no bracket required?
Sure thing man, just a little scrap metal bent like a S. I think the fj62s had them from the factory in thereThat little extension you made for the speaker mounts is exactly what I needed to see. I recently installed some of those and wondered how to not have them dangle. Drove to NH w/ them like that and thankfully there was no irritating vibration but I need to make a couple of them. Thanks!
perrobravo
SILVER Star
That’s an AFR gauge on the left. Truck runs on the rich side pretty much all the time. It runs very well though (unless ~10 MPG is considered), so I haven’t bothered to adjust it. Fully desmogged, no cat, the carb was rebuilt, vacuum is good…so will probably just leave it alone and ignore that gauge.Nice to see I’m not the only one with three gauges mounted in the same spot! What’s the one on the left halfway in the photo?
I’m running A:F, temp, vacuum.
I’m fully smogged, idle at 14.5 and typically run lean. I have most parts assembled for a desmog though - removing EGR and air pump systems. Hopefully I’ll get around to that before spring.That’s an AFR gauge on the left. Truck runs on the rich side pretty much all the time. It runs very well though (unless ~10 MPG is considered), so I haven’t bothered to adjust it. Fully desmogged, no cat, the carb was rebuilt, vacuum is good…so will probably just leave it alone and ignore that gauge.
I’ve given half a thought to reproducing those speaker brackets but haven’t been able to get my hands on them. They’d be great for installing cargo area speakers in a 60, using the 62 grill cover (or a @red66toy repro speaker cover) for a stock/OE look. I should probably go up to Poncha Springs and dig around, I bet Classic Cruisers has one.I think you need the tab on the 62 also. They are really easy to make out of some scrap metal though
if you message brooke carr on facebook hes got like 20 of them. I got mine from himI’ve given half a thought to reproducing those speaker brackets but haven’t been able to get my hands on them. They’d be great for installing cargo area speakers in a 60, using the 62 grill cover (or a @red66toy repro speaker cover) for a stock/OE look. I should probably go up to Poncha Springs and dig around, I bet Classic Cruisers has one.
Similar threads
Users who are viewing this thread
Total: 22 (members: 0, guests: 22)