
Inspirational.. Did you use special paint for the carpet?
Navigation
Install the app
How to install the app on iOS
Follow along with the video below to see how to install our site as a web app on your home screen.
Note: This feature may not be available in some browsers.
More options
You are using an out of date browser. It may not display this or other websites correctly.
You should upgrade or use an alternative browser.
You should upgrade or use an alternative browser.
This site may earn a commission from merchant affiliate
links, including eBay, Amazon, Skimlinks, and others.
More options
Who Replied?- Thread starter
- #202
I used SEM Color Coat.Inspirational.. Did you use special paint for the carpet?
I'm impressed with SEM color coat. I haven't tried it on carpetI used SEM Color Coat.
- Thread starter
- #204
Long time since the last update so here it is.
I continued with the doors. Passenger door gets another chrome strip when I have done small fixes on it.

After that I refurbished D-pillar vents. One of the hardened rubber flaps was in one piece.
Made new ones from soft rubber.
Gasket to the edge.
Got some right length staples. Marked the holes to the rubbers and punctured holes with a needle. Then folded the staples manually. Did not want to buy a stapler for this small job. Plastic parts are washed and treated.
Gaskets for mirrors and vents got washing and treatment.
Vents got some new paint and refurbished gaskets on.
Mounted.
I continued with the doors. Passenger door gets another chrome strip when I have done small fixes on it.


After that I refurbished D-pillar vents. One of the hardened rubber flaps was in one piece.

Made new ones from soft rubber.

Gasket to the edge.

Got some right length staples. Marked the holes to the rubbers and punctured holes with a needle. Then folded the staples manually. Did not want to buy a stapler for this small job. Plastic parts are washed and treated.


Gaskets for mirrors and vents got washing and treatment.

Vents got some new paint and refurbished gaskets on.

Mounted.

- Thread starter
- #205
Mirror got also a refurbishment. They were quite rusted inside.
Dismantling, washing and painting.
Metal parts yellow zincked. I replaced the rusted out pin with a screw and washer.
Mounted.
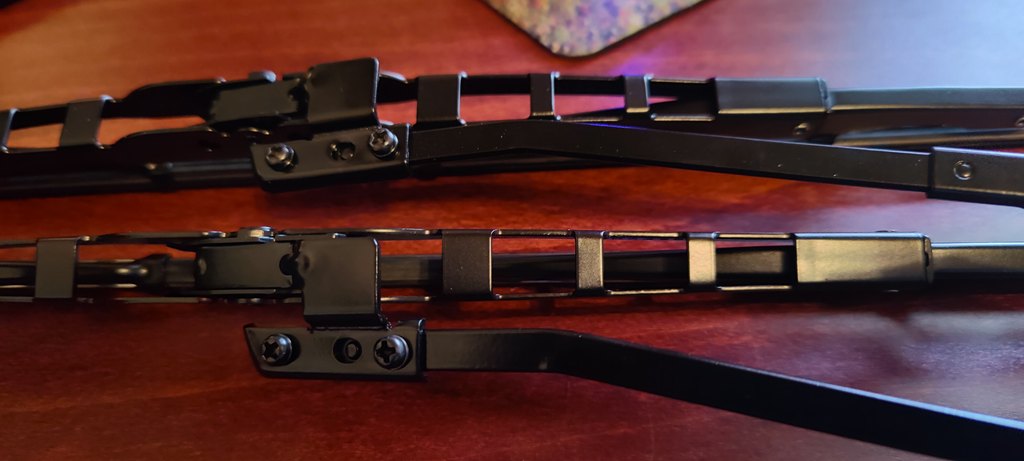
At the same time with mirror screws I powder coated the wipers.
Screwed on some adapters for normal wiper blades.
And mounted. Found out that I have ordered plastic caps for a RHD version. I ordered new ones but not in place yet.


Dismantling, washing and painting.


Metal parts yellow zincked. I replaced the rusted out pin with a screw and washer.


Mounted.


At the same time with mirror screws I powder coated the wipers.


Screwed on some adapters for normal wiper blades.

And mounted. Found out that I have ordered plastic caps for a RHD version. I ordered new ones but not in place yet.

- Thread starter
- #206
I gathered also some door stoppers in same batch for zinc with mirror pieces. I meant to do it earlier but somehow I did not do it. I had some problems with disassembling if I remember correct. They were so ugly that I had to try it again.
I managed to gather together all four needed rubbers that were not broken. Also cut new foam pads on them.
Mounted.
I went though my pile of good door panels. It was easy to figure out which ones to use in front doors. I have only two pairs. One without speaker holes and another ones with them. They both are mint, only one small cut on both passenger side panels. Rear ones I had more pain finding good ones. Some had cuts, some carpets were too "fluffy" some had rust in ash tray frames....
I made the choice a bit easier by taking rust free parts from scrap panels. Also had to swap the locking knob frames from black plastic to metal shiny ones on some panels.
Wash.
Finally I have mint or near mint panels for all doors and cargo area. Also got to glue on again one self made sticker. Finnish version of instructions how to use diff locks on drivers door panel.
Then came the summer when the car would be finished. But I did actually close to zero work on it. Only thing I did was that I tried two versions of showroom plates. Maybe the red/white would be better?


I managed to gather together all four needed rubbers that were not broken. Also cut new foam pads on them.

Mounted.

I went though my pile of good door panels. It was easy to figure out which ones to use in front doors. I have only two pairs. One without speaker holes and another ones with them. They both are mint, only one small cut on both passenger side panels. Rear ones I had more pain finding good ones. Some had cuts, some carpets were too "fluffy" some had rust in ash tray frames....


I made the choice a bit easier by taking rust free parts from scrap panels. Also had to swap the locking knob frames from black plastic to metal shiny ones on some panels.

Wash.

Finally I have mint or near mint panels for all doors and cargo area. Also got to glue on again one self made sticker. Finnish version of instructions how to use diff locks on drivers door panel.


Then came the summer when the car would be finished. But I did actually close to zero work on it. Only thing I did was that I tried two versions of showroom plates. Maybe the red/white would be better?


- Thread starter
- #207
At the end of the Finnish mid summer holiday weekend I got some motivation to get it started. Filled power steering fluid and coolant. While filling up the radiator I took a look at the floor to see if it had some leaks somewhere. Well it had some leaks.
Al the PS fluids were on the floor and also some coolant. PS had one fitting at the pump loose and without gaskets. That one got sorted quickly. Coolant in other hand was leaking from the oil cooler cover.
This one took my motivation away for some months. I did not have the lust for taking off the pump and starter to get the cover away. So I waited. Also when laying on the floor and draining the radiator I calculated in my head what I would get from parting it out. But I got my self together and got rid of that thought. Then came the vacation. Did couple of trips, got corona for the second time, started to build a smoker and a green house. Still no motivation for the car. But then I found a thing on ebay from US that got my motivation back a little.
Empty box for the radio that will be on the car and started this whole project. Box had some mounting parts so it was not totally empty.
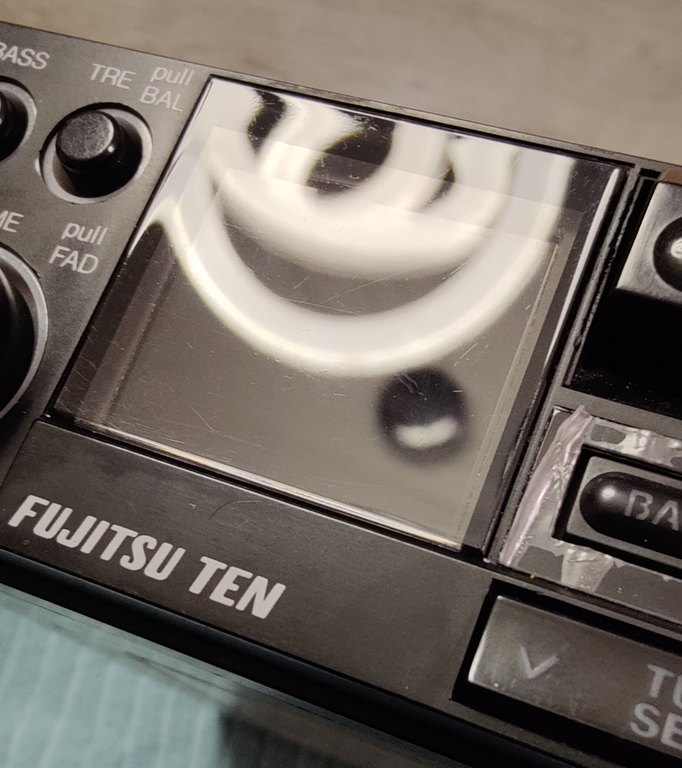
My radio has still protective film around the buttons so I will get a near genuine unboxing feeling when the time comes to mount the entertainment system to the car.
Had some scratches on the display.
So did some polishing.
In to the box.
Now the whole system waits for the right time in boxes. Speakers are genuine NOS parts in boxes.
The box was not cheap. I got it for $30 but after shipping and customs and taxes the sum was not so reasonable but it got my motivation back.
Then I got a period correct protection for fender. Finnoil was a oil company in Finland between 1964-1992. According to the seller this is from the 90´s so it fits the car right. Now I was ready to take care of the coolant leaks.
The cover got tight just with tightening the screws. But then I found a major leak between the head and thermostat housing. Last time I thought that was just some overflow from filling up. It got sorted with cleaning of surfaces and a new gasket.
Everything back together and just enjoying of a good feeling. It was a bit annoying that it was so close that I could get it started earlier in the summer. But you newer know.
Then I got a thought. What about putting some diesel in the tank and try to start it. I had no gasket int the filler cap so I took it from another cap and cleaned it.
Then switces to the steering column and ignition lock on their places. Connected the earth cable. Some strange buzzing sound started under the dash. I turned the key and...NOTHING! The whole car is totally dead. Not even a weak light from anywhere inside or outside the car. Just the buzzing sound that changes a bit when turning the key or light on. Batteries were a bit weak (20,5V). Put on a charger and went home. Again the parting out thoughts came in my head. Well it was not so close to get it started earlier after all. But now I have a long and depressing winter ahead of me to get it sorted. Let´s see when I find the solution for this setback.

Al the PS fluids were on the floor and also some coolant. PS had one fitting at the pump loose and without gaskets. That one got sorted quickly. Coolant in other hand was leaking from the oil cooler cover.

This one took my motivation away for some months. I did not have the lust for taking off the pump and starter to get the cover away. So I waited. Also when laying on the floor and draining the radiator I calculated in my head what I would get from parting it out. But I got my self together and got rid of that thought. Then came the vacation. Did couple of trips, got corona for the second time, started to build a smoker and a green house. Still no motivation for the car. But then I found a thing on ebay from US that got my motivation back a little.

Empty box for the radio that will be on the car and started this whole project. Box had some mounting parts so it was not totally empty.
My radio has still protective film around the buttons so I will get a near genuine unboxing feeling when the time comes to mount the entertainment system to the car.

Had some scratches on the display.

So did some polishing.
In to the box.


Now the whole system waits for the right time in boxes. Speakers are genuine NOS parts in boxes.

The box was not cheap. I got it for $30 but after shipping and customs and taxes the sum was not so reasonable but it got my motivation back.
Then I got a period correct protection for fender. Finnoil was a oil company in Finland between 1964-1992. According to the seller this is from the 90´s so it fits the car right. Now I was ready to take care of the coolant leaks.

The cover got tight just with tightening the screws. But then I found a major leak between the head and thermostat housing. Last time I thought that was just some overflow from filling up. It got sorted with cleaning of surfaces and a new gasket.

Everything back together and just enjoying of a good feeling. It was a bit annoying that it was so close that I could get it started earlier in the summer. But you newer know.

Then I got a thought. What about putting some diesel in the tank and try to start it. I had no gasket int the filler cap so I took it from another cap and cleaned it.

Then switces to the steering column and ignition lock on their places. Connected the earth cable. Some strange buzzing sound started under the dash. I turned the key and...NOTHING! The whole car is totally dead. Not even a weak light from anywhere inside or outside the car. Just the buzzing sound that changes a bit when turning the key or light on. Batteries were a bit weak (20,5V). Put on a charger and went home. Again the parting out thoughts came in my head. Well it was not so close to get it started earlier after all. But now I have a long and depressing winter ahead of me to get it sorted. Let´s see when I find the solution for this setback.
77CruiserDog
GOLD Star
@Samppahj your work is always very impressive. I can't imagine the time it takes to achieve the level of detail you desire. I had similar difficulties with both of my rigs so rather than set my sights on the big finish (starting or driving) I would set smaller goals. One day my only goal was to install all 4 bumpstops. I ended up doing a touch more that day but with the small win under my belt, the next steps seemed easier.
Your Land Cruiser is so impressive and everytime I see an update I drop everything to go read about what you've done. Keep up the awesome work!! Also, while it may not be AS depressing in the Pacific Northwest when Winter comes.... I don't think it's too far off. Stay busy building that amazing vehicle. You've come so far!!
Your Land Cruiser is so impressive and everytime I see an update I drop everything to go read about what you've done. Keep up the awesome work!! Also, while it may not be AS depressing in the Pacific Northwest when Winter comes.... I don't think it's too far off. Stay busy building that amazing vehicle. You've come so far!!
Wow, what a piece of work this is. Way to go. I think the Toyota LandCruiser showroom plate looks best, fwiw.
Fusible links good? Got all your grounds on non painted surfaces?
- Thread starter
- #211
Thank you for your words. Messages like this gets the motivation on,@Samppahj your work is always very impressive. I can't imagine the time it takes to achieve the level of detail you desire. I had similar difficulties with both of my rigs so rather than set my sights on the big finish (starting or driving) I would set smaller goals. One day my only goal was to install all 4 bumpstops. I ended up doing a touch more that day but with the small win under my belt, the next steps seemed easier.
Your Land Cruiser is so impressive and everytime I see an update I drop everything to go read about what you've done. Keep up the awesome work!! Also, while it may not be AS depressing in the Pacific Northwest when Winter comes.... I don't think it's too far off. Stay busy building that amazing vehicle. You've come so far!!
Depends on the day for me. One day they are better and next day those other ones.Wow, what a piece of work this is. Way to go. I think the Toyota LandCruiser showroom plate looks best, fwiw.
Fusible links are ok. The problems seems to be the batteries. I had them on a intelligent charger and now the car works mostly. No power for cranking so it would start. Battery tester says one is bad and one is weak. I will have a dumb charger over night and try again tomorrow.Fusible links good? Got all your grounds on non painted surfaces?
- Thread starter
- #212
I did not start to part it out. Instead I charged the batteries. An the next day...
It is alive. Allmost every light in the front are functioning.
Drivers low beam does not work. In the rear only turn signals and brake lights work and drivers side fog light. On the instrument cluster everything works. Wiper motor works but wipers does not move. So I will need to scratch my head still a few times.
it started with a little help from booster.
And runs ok.
With EDIC bar connected.
It even shuts down.
Sammuu - https://youtu.be/17Z8A5IQgQk
As it works I put on the sticker. Only Cruiserworld sticker I bought that can be used.
This lifted my mood a big step. Last time I could turn the key to start it was around new year 2015/2016.
I tried to charge the batteries with dumb chargers for a week but they are dead.
So I bought new ones and made more stickers.
I also bought a 12/24V intelligent charger so maybe I can keep these batteries alive now.
While gathering motivation to start figuring out electrical issues I started working with spare tire I bought earlier. It was sold as never used so it was a must to buy. It had quite rough appearance but it was very interesting in the cleaning aspect.
I dug out the good old tooth brush and started working. Three evenings later I went to tire shop for a rim swap and it was ready.
Also cleaned and removed rust from the inner tube.
Needed quite lot of accessories to get it cleaned up. It was quite difficult toclean it up without destroyin the markings on the thread.
But it was woth it. Much nicer than the previous used tire.
Also did some small things. New fuses. Did not help with anything.
Rubber for the heater valve wire. It wound been much easier to kount before the valve etc.
And yellow screws for service latches.
Next step would be to fight against the electrical gremlins.

It is alive. Allmost every light in the front are functioning.

Drivers low beam does not work. In the rear only turn signals and brake lights work and drivers side fog light. On the instrument cluster everything works. Wiper motor works but wipers does not move. So I will need to scratch my head still a few times.
it started with a little help from booster.
And runs ok.
With EDIC bar connected.

It even shuts down.
Sammuu - https://youtu.be/17Z8A5IQgQk
As it works I put on the sticker. Only Cruiserworld sticker I bought that can be used.

This lifted my mood a big step. Last time I could turn the key to start it was around new year 2015/2016.
I tried to charge the batteries with dumb chargers for a week but they are dead.

So I bought new ones and made more stickers.

I also bought a 12/24V intelligent charger so maybe I can keep these batteries alive now.
While gathering motivation to start figuring out electrical issues I started working with spare tire I bought earlier. It was sold as never used so it was a must to buy. It had quite rough appearance but it was very interesting in the cleaning aspect.


I dug out the good old tooth brush and started working. Three evenings later I went to tire shop for a rim swap and it was ready.


Also cleaned and removed rust from the inner tube.

Needed quite lot of accessories to get it cleaned up. It was quite difficult toclean it up without destroyin the markings on the thread.

But it was woth it. Much nicer than the previous used tire.

Also did some small things. New fuses. Did not help with anything.

Rubber for the heater valve wire. It wound been much easier to kount before the valve etc.

And yellow screws for service latches.

Next step would be to fight against the electrical gremlins.
Any secret for revitalizing the rubber? I’m looking to update my fender ones and the gaskets seem NLALong time since the last update so here it is.
I continued with the doors. Passenger door gets another chrome strip when I have done small fixes on it.
After that I refurbished D-pillar vents. One of the hardened rubber flaps was in one piece.
Made new ones from soft rubber.
Gasket to the edge.
Got some right length staples. Marked the holes to the rubbers and punctured holes with a needle. Then folded the staples manually. Did not want to buy a stapler for this small job. Plastic parts are washed and treated.
Gaskets for mirrors and vents got washing and treatment.
Vents got some new paint and refurbished gaskets on.
Mounted.
I cannot but second this statement...@Samppahj , just read thru your thread from start to finish.....again.if anyone needs inspiration for attention to detail, this is it....
So sorry I just discovered this epic build!
It really inspires me in my future J45 Pickup restauration...
It really inspires me in my future J45 Pickup restauration...
- Thread starter
- #217
You are welcome to Finland and a visit to my garage! It was only a thought in deep desperate times...@Samppahj , just read thru your thread from start to finish.....again.
Brush the dirt off with a good solvent. I use some that is alkaline ph13 when raw. I use it raw or diluted. Scrub off with solvent and a stiff brush. I use mostly toothbrush and then I use silicon free rubber treatment that states in the can that it would soften the rubber. I am not sure if it does that anyway. I spray it on quite generously and leave over night and then wipe off. Other stuff I use is just some car detailing rubber treatment that is meant for tires. You will get good results on the looks just by a good wash/clean.Any secret for revitalizing the rubber? I’m looking to update my fender ones and the gaskets seem NLA
I am glad that I can inspire some future builds.So sorry I just discovered this epic build!
It really inspires me in my future J45 Pickup restauration...
I believe that our community learned a lot from your restauration work.
Congrats mate and thank you for sharing!
Congrats mate and thank you for sharing!
kiitos. nayttaa silta etta voidan tulla vieraileman sinun karasillaYou are welcome to Finland and a visit to my garage! It was only a thought in deep desperate times...

juu, mina ymmarran mita se oli
- Thread starter
- #220
I have also learned much during this build as it is my first car project. And I am glad I can share my tips and build process with others. And also learn something myself from other posts and builds here on mud.
Similar threads
Users who are viewing this thread
Total: 2 (members: 0, guests: 2)