How to LS Swap a FJ60 or FJ62. Quick and dirty guide for regular folks wanting to do an engine swap in their driveway. (2 Viewers)

This site may earn a commission from merchant affiliate
links, including eBay, Amazon, Skimlinks, and others.

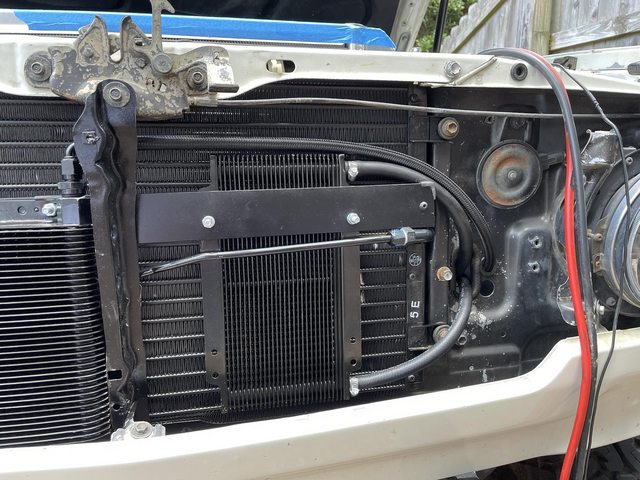
495HP is the LS3 hot cam crate. For 1700.00 more over the 430HP standard crate... well worth it if not going for the EROD conversion.

J
Hell yeah. Thats pretty much perfect. Crazy that they sell these in a nice neat box with a bow on top. If you have the money, that is definitely the motor to go after. Really blows the pants off of my LM7 haha
 
Hell yeah. Thats pretty much perfect. Crazy that they sell these in a nice neat box with a bow on top. If you have the money, that is definitely the motor to go after. Really blows the pants off of my LM7 haha

Different strokes for different folks...
 
So now that the motor is in, you can kinda get started on hooking everything up. Theres not really any set order for this, but youll need your radiator to do a lot of it. So before you put your radiator in, you can go ahead and connect your heater hoses up. There are a few ways to do this, but this is how I did it in mine. I basically tucked them into the intake area for a nice clean install. Ive seen dudes just lay them on top of the intake and throw the engine cover over them, or just have them all dangling in there. Do what you want, but this way youll have a nice clean install.

Start by completely flushing out your heater core and rear heater lines with a hose. If its really old you can put some vinegar or muriatic acid to really clean it out. You want all of the coolant out before you do the next steps

Then off youll need some heater hose. The way the heater hoses come out of the waterpump lend to using MOLDED 90* heater hoses. You will need two 5/8in and one 3/4. I used Dayco from Advance Auto. PN:80407 PN:80417 you really dont want to use straight hose here, as soon as you bend them they will kink.

These hoses are pretty long so they should be pretty much everything you need in those two sizes. The other size youll need is 1/2in if you are planning on keeping your rear heater. You can just grab like 3 ft of that from any parts store. The hose from the valve on the firewall you will have to get creative with, I used a hose with 2 90* bends in it from what i believe was a first or second generation Camaro. I do not remember the part number for it. You need a 90*bend but the direction also has to turn 90* as well if that makes any sense. Once you are in there you can see what i mean.

Anyways, pick up a hose cutter, and trim the short sections of the 90* hoses and then run them through your intake supports. The 5/8 will be on the port furthest to the rear of the motor and the 3/4 will be up front. By cutting the shorter ends of the 90*s you can get some pretty tight routing in there. If you are worried about heat on these, you can wrap these with heat wrap if you wish. Ive not had any issues without it though

rsCNrLLl.jpg


I ran the 5/8 hose under the intake support and the 3/4 over it but under the fuel rail crossover thing.

Hh3h6nol.jpg


So now that you have the fronts on, you are going to need to finish out the backs of the heater hoses. Disconnect the bracket holding your two rear heater hoses to give you some slack. If you are looking at your two rear heater hoses from the front, the one on the left is a 5/8 hose but it needs to connect to a 3/4 hose. Take the 5/8 hose with the 90* bend in it that you didnt use yet, and place it above the fuel rail, measure the length to the left rear heater hose outlet and cut it and attach it. Now you have a 90* bend matching the plane of your larger 3/4 inch hose coming from the water pump. You can use this adapter piece to make them work together.

ICT Billet Adapter

Trim the 3/4 hose to meet the adapter and that first heater hose is done. You can use two hose clamps on this adapter piece to clamp it down, or use a Gates PowerGrip Hose clamp. This is a heat shrink hose clamp that will go over the adapter completely and you use a heat gun to shrink it down. These things are freaking awesome. Im pretty sure i used GATES PN:32929, however i am not 100% sure on that. Just measure your hose OD's on the hoses and use this chart as a reference, and theres also installation instructions on it too.


You can see the Gates heat shrink hose clamp here in this photo

r02pauml.jpg


Once you have that hose done, you can probably remove one side of it to get it out of the way for now. The Rear heater hose on the right will need a 1/2 inch hose. Put the 1/2in hose onto the rear heater outlet and run it up behind the intake. Youll now need to use a Heater T to connect this 1/2 inch hose to the 5/8 hose coming from the water pump and the valve on the firewall. Be sure to use a metal heater T here. This Murray one works pretty well.

Run the 1/2 inch hose to the center of the T and connect the 5/8 from the water pump to the other end. Youll then have to find a 5/8 hose to connect to the top outlet of the valve on the fire wall. I wish i still had the part number of the one i used, but you can see the installation here. You can also use a molded 90* here but just make sure you make the bend very long and gradual so the hose doesnt kink.


Once all of these hoses are cut to the appropriate lengths and you can go ahead and clamp them down. Worm clamps work, I suggest using breeze hose clamps, as they dont have the worm gear touching the hoses and theres a protective sleeve in there.

Here it all is hooked up. you can tidy it up further with some zip ties

Hh3h6nol.jpg


So with these heater hoses, theres a bit of back and forth controversy. Some people are very adamant about putting a H connector between the 3/4 and 5/8 hose right after the water pump outlet. The thought process behind this is that the heater valve closes the flow and blocks the flow of coolant through your heater core. In GM vehicles theres like a bypass valve or something in their heater cores so the water is always moving.

If you notice I didnt do that H fitting. So if you plumb up your heater hoses just like the way i did, your rear heater will serve as that H if you leave the valve lever open on the rear heater itself. I have been doing tests for the past month with the valve closed, and the valve open. There is no difference at all. This is all done by using my water temp sensor on the LS Motor, reading off of my Scangauge2.

Ive talked to a few guys using these LS motors as drag cars and they actually plug the heat ports completely instead of looping them together.


A buddy of mine is a mechanical engineer and kind of explained it to me as that with no bypass there is no hotter/cooler coolant exchange across the boundary layer (hot mixing with cool). The thermostat sensing coolant is very close to the block temp. This allows the thermostat to open at a certain temperature.

With a bypass cooler coolant is allowed past the boundary layer skewing the true coolant temp on the thermostat preventing it from opening. With it still closed the block temp will increase to overcome the mixing of hot and cool. This will make the temp to open the thermostat higher to open it due to cooler and hot water mixing. If that makes any sense.

That explanation is way way over my head. I didnt use the H right here in the heater lines, you can go onto LS1tech or even here on mud and see it argued back and forth. There hasnt been any issues with my swap not using the H.


This install is assuming you are using the much taller, and much uglier truck intake manifold. You can still use all of these hoses and routing (for the most part) on the nicer looking car intakes. Just find where to run your lines and try to do them neat and tidy. It really makes a difference in the finished appearance. To use the Car intake on the truck youll need the corvette water pump, relocate a tensioner pulley, and trim off some of your alternator bracket. I havent done this yet, but when i do i can add it to this thread
 
Last edited:
So next youll probably need to get a radiator in there.

I used a FSR aluminum radiator and this is 2 years after i made this thread and i would go ahead and recommend not. My first one corrorded from the inside out and leaked. Voltage was within spec for electrolysis. If you want to spend the money on it, Ron davis I hear coats the inside of their radiators and have LS Swap specific fj60/62 radiators.

I removed a 34 year old radiator and replaced it with a $1,600 aluminum radiator and it lasted 2 years. Its absurd.

I think When (not if) my current aluminum radiator s***s the bed, im going to put a factory brass/copper radiator back in. The one i removed was the original radiator from teh truck. I wish i would have kept it. To mitigate the issue of the inlet being on the driver side and the outlet of the rad being on the passenger side... use a water pump from a L99 Camaro. It puts the waterpump inlet on the driver side of the motor. You might have to use the camaro Power steering pump and alternator setup, but this would allow you to use the stock radiator with relative ease. Then if you have radiator problems down the road youre not replacing an expensive radiator with an expensive replacement.

I honestly think OEM radiator, camaro waterpump and custom fan shroud with an electric fan is the move here. You can put the steam port in the upper rad hose as well as a temp switch as well. Who wants to be stranded in the middle of nowhere with their 1,600 radiator that is leaking coolant and you cant get a replacement


if you dont want to spend a boat load of money on a radiator, ive seen some people reuse their fj60 radiators without problems. You could use a CSF 2708, or a Mishimoto MMRAD-LCR-81X. Keep in mind with these you will have to build a fan shroud for them for both mechanical and electric fans. If you contact Four Seasons or literally any drag racing radiator shop they can build you a shroud as well. Bonus points if you can just take them your old radiator and tell them you need it to have the same fitment. If you go with the Mishimoto or CSF you can buy a fan shroud kit from summit and make the shroud. If you dont use a custom radiator you can just use a steam port adapter on your upper radiator hose. Dont spend a thousand dollars on a radiator just for a steam port spot if you dont want to.

This is an option that mud member @Megadoomer used on his FJ55 and would work very well on the FJ60. If you dont plan on spending a thousand bucks on a radiator, he used this from Speedway PN: 917340. It does not have a trans cooler, but you are running one externally anyways. Its about $200 or so vs over a grand for the one i used. He used one of the Shroud kits from Speedway as well and did not require welding. I think it looks great and you can not beat the price. This is in a FJ55, so you can measure your 60 radiator and see if you can get a wider one in there.


20210522_171235-jpg.2871376


20210522_171132-jpg.2871375

20210606_174841-jpg.2871377


This is a really really good option, and will be veryhelpful on the wallet because this swap will creep up and completely destroy your wallet if you are not careful. Plus you can use your (much better) Mechanical fan as opposed to Efans. His swap is a perfect example of not spending a boat load of money, but having your swap still look incredible and function right.


Once you have a radiator and shroud done and built up, Drill 2 holes in the center of the bottom of the fan shroud, so that the holes that wont interfere with the 2 diagonal frame cross supports and put some rivnuts into it and get matching bolts and save them for later. If you order a Rad from Four Seasons, when you order if you ask them they can do this for you before they mail it out to you. Mount The radiator in place on your core support and take some metal clothes hangers and simulate the bends of the inlet and outlet tube hoses you will need to connect to your water pump. Then just go to O'Reilly and ask them to look in the back for some hose to match. You might have to dig through rows and rows of hose but youll find some that will match your bends. Try and keep in mind that you will need to route an intake tube in there as well. Here is my setup with the hoses installed. (notice my mechanical fan and center point mark on the rad. See how far offset to the left it is? still kind of pissed i couldnt use my mechanical fan on this).

ddytgrfl.jpg


Now youll just need to route your steam port hose to the radiator and your cooling system is pretty much done.


Go ahead an reinstall your AC Condenser now as well. If you are planning on replacing your condenser with a new one, the part number is: 8057-05239744 for a new denso unit.
 
Last edited:
Next youll want to run to the steel yard or home depot or wherever and get a rectangle flat stock of steel. This is kind of how I mounted my coolers to my AC Condenser. Make sure you space out the metal strip out so your Trans cooler is NOT touching your condenser. You dont want any of this stuff touching each other. You will probably install and remove this thing 20 times to get it just right. There are other ways to mount these two coolers, this was just the easiest (definitely not the prettiest) way I did it.


You will also need to take a step bit to the core support right next to the oval holes for your Trans lines to run through. I ended up not using one side of them, but i did both sides to make it symmetrical. Use firewall gromets on these holes to make sure you dont cut your lines that you are planning on running through it. That center support on the hood latch was still touching my trans cooler in this pic and needed to be trimmed more.

The Power steering lines are really easy and come in a kit with the B&M Power steering cooler PN:70255.

ro8Dsm2l.jpg


Next up is your trans cooler lines. Remember how earlier you decided if you were going to reuse your hard lines or put those -6 adapters in the side of your transmission to use AN hose? The following will be assuming you chose to use the AN hose for your cooler lines.

In total for my swap i used 25 feet of AN hose. This is for the fuel line and the trans lines. The hose is not something you want to cheap out on. I used Vibrant -6AN nylon braided hose that is rated for ATF, gas, and e85. The hose i used was VIBRANT PN:VPE-11976 for 20 foot length and VIBRANT VPE-11986 for 5 foot. For the trans cooler system youll need quite a few fittings. You will need six 90* -6AN fittings. You can use summit brand if you want to save some money, or vibrant 21906 for nicer ones. If you want some seriously awesome ones you can use deatschwerks 6-02-0803 Titanium anodized. Dont buy cheap chineese fittings though. For trans lines the summit or jegs ones are fine. Just to be safe maybe grab 30 feet of hose so you dont run out.

You will want to run an external cooler for the 4l60e and B&M PN: BMM-70266 works really well. For this you will need two -6 to NPT adapters to connect your lines. Use plumbers tape on the NPT side but NOT the AN side. The adapters are PN: SUM-220649B for the black ones.


Ok now that you have all of the parts You will need to build out your lines. This was really fun and one of my favorite parts of the swap because it looks professional when youre done and if you do it right looks super clean when you install them.

The bottom outlet on the trans is the hot side. It will flow to your upper radiator fitting for the trans cooler. Run your line down your bellhousing, along the oil pan and then do a 90* left turn along the bottom of where the radiator is and then all the way up to the top outlet on your ratiator. Make sure to give yourself a little bit of slack here. You are doing this to size the line out from the longer 20 foot section of line. What you are trying to accomplish here by the radiator is tucking the hose up and under the radiator to hide it. Once you have the length you need cut this hose and take it to your bench.

You will need a bench vise and some soft jaws for this. Vibrant makes some that are anodized black VPE-20990. Install a 90* -6AN fitting to both ends of this hose. If you are worried about scratching the anodizing on your fittings, wrap the soft jaws in painters tape.

This is a video on how to install the fittings onto the ends of the hose. Dont bottom out the two metal pieces of the fitting, you want a tiny tiny gap, and do not use any sealer or anything on any of the threads. Make sure to lube threads of the part that is going to go into the hose with engine oil or something similar. You dont need a special AN tool for this s***. Use an adjustable wrench or some Knipex pliers if you have them. To cut the hose, wrap the hose where youll cut in painters tape and cut it with a cut off disc and an angle grinder.


OK now that you have the hose done youll connect the 90* fitting to the bottom outlet on the trans and run it up to the diagonal frame brace, tuck it up over that brace and feed it under your core support and up the side of your radiator and connect the other 90* fitting to the top AN port of your radiator. hand tighten these for now.

Under the radiator, where you installed the nutserts earlier, secure the hose to the fan shroud using Adel Clamps and a bolt. Dont tighten them too tight for now to allow for some movement.

ec3Kz0yl.jpg

io5X8fNl.jpg

K2LSh8Il.jpg


Next youll run your hose from the lower radiator AN port, out your firewall and above the power sterering cooler to the right side port of the Transmission cooler. Mark your hose and cut it. Remove the hose and take to the bench and install a 90* -6 fitting on each end. Once those are installed snake it through your hole in the firewall and attach one end to the radiator port and the other end to your trans cooler using the NPT to -6 AN adapters. Use teflon tape on the NPT side but not the AN side. You can tighten both ends of this hose all the way since you wont need to adjust it much when you tidy it up.

The last hose for your trans lines will be from the left side of the trans cooler, out through the firewall, down the frame to the point where it reaches your first long line. Run the line parallel (important) to your other line that you previously made earlier. Run it to the upper port on the Transmission where your AN adapter is and mark the hose to be cut. Take it to the bench, install 2 90* AN fittings and then mount it in the truck. Leave these hand tight.


The front of your truck should now look like this:

oLEv11rl.jpg


And you should have your two long hoses just kinda dangling down in there like this with the AN fittings finger tight:

0XpitDGl.jpg


Next youll use more Adel Clamps and a few AN hose holders to organize this stuff up and make it look like you know what you are doing. On Amazon you can order some 6AN Hose Separator clamps made from aluminum.

6AN Hose Separator Clamps

Here are some Adel clamps while you are there.

Adel Clamps

Youll first attach these Aluminum clamps to your AN hoses loosely to see where you need them then you can twist them and route them up along your trans pan and oil pan to tuck them up super tight and nice and away from your exhaust. These clamps are great. Use the Adel clamps in the oil pan bolts to secure the lines.

q0UReIVl.jpg

IdMb4xHl.jpg


After you are done with the routing, go back and tighten all of your AN fittings. DO NOT OVER TORQUE THESE. Your Transmission lines are all done at this point and half of your power steering lines are done.

Now that you have these all routed super nice and pretty and professionally... you can now wrap them in DEI heat wrap so they dont get hot from the exhaust. This isnt really necessary but I went full overkill on this wrap stuff. Your hoses will go from looking super tidy to looking like a food truck burrito. Once you do your fuel lines and stuff you can wrap those too. more on that later I just wrapped the velcro style heat wrap 3/4 around the hoses and secured them with stainless steel zip ties.

TKJmedgl.jpg


For your power steering hard line, you have some options. IMO the best option is to find a local hydraulic hose shop and have them make one for you. The GM pump high pressure port and the high pressure port on the Toyota box have the same attachment size on both ends. Its M16x1.5 with a flare in the hose. You can measure out the line and have a shop make them for you. A guy in Memphis named Metal Mike at Automotive AC Hose repair makes them for literally everyone here in Memphis not just land cruisers. I bought a prebuilt hose for this swap from a 3rd party supplier (not mike) that used an AN fitting as an adapter. The hose itself was made by Mike here in town. The adapter that is sold with the hose is the incorrect size (-5 or something, it was too small) and made of aluminum. If you go this route, youll want to toss the adapter in the trash immediately, buy a Stainless Steel M16x1.5 to -6 adapter and use that. I didnt and had my entire steering box leak out and blow back onto all of my freshly swapped stuff. The Steering box is like cast steel or something and the hose is also steel, so stainless is the way to go for this adapter fitting piece probably not aluminum.


After you get that hose done, your power steering is done as well.
 
Last edited:
your friend's explanation of the heater H is completely crazy but yeah they don't matter, I quit doing them. the only difference is it will warm up a little quicker if you don't have them looped or H'd. once the thermostat is open the water flows thru, simple as that
 
your friend's explanation of the heater H is completely crazy but yeah they don't matter, I quit doing them. the only difference is it will warm up a little quicker if you don't have them looped or H'd. once the thermostat is open the water flows thru, simple as that
Haha yeah man i think i completely butchered his explanation of it. His masters in mech engineering revolved around fluids and thermo and his explanation went wayyyy above my head. My understanding and what he was explaining are probably a bit off hahahah
 
Haha yeah man i think i completely butchered his explanation of it. His masters in mech engineering revolved around fluids and thermo and his explanation went wayyyy above my head. My understanding and what he was explaining are probably a bit off hahahah

No offense but a lot of those guys (which are about 90% of my friend circle) radically overthink some things like that, it’s literally just a hole that coolant goes thru, take off the thermostat housing some time and you’ll see it clear as day, if there’s an H or loop hose it just is bypassing the thermostat, its not space age science

Also, that radiator looks really nice.

And a note on the car intakes, I would not recommend that at all. Way too much work and money just for looks, and LS1/6 manifolds are getting to be $$. I sold my LS6 intake for $400 which is crazy to me.
If you want to do something get a Gen 4 truck intake (Rock Auto for $125) and find a good used engine cover, those are a lot nicer looking then the Gen 3 stuff.
 
Last edited:
No offense but a lot of those guys (which are about 90% of my friend circle) radically overthink some things like that, it’s literally just a hole that coolant goes thru, take off the thermostat housing some time and you’ll see it clear as day, if there’s an H or loop hose it just is bypassing the thermostat, its not space age science

Also, that radiator looks really nice.

And a note on the car intakes, I would not recommend that at all. Way too much work and money just for looks, and LS1/6 manifolds are getting to be $$. I sold my LS6 intake for $400 which is crazy to me.
If you want to do something get a Gen 4 truck intake (Rock Auto for $125) and find a good used engine cover, those are a lot nicer looking then the Gen 3 stuff.
yeah from what im understanding, the LS6 intake is worth 15 hp and moves the power higher in the RPMS at the expense of some torque. Its also super expensive requiring a different water pump, and some mods. Its definitely a 100% cosmetic thing for sure. And kind of not really worth it.
 
yeah from what im understanding, the LS6 intake is worth 15 hp and moves the power higher in the RPMS at the expense of some torque. Its also super expensive requiring a different water pump, and some mods. Its definitely a 100% cosmetic thing for sure. And kind of not really worth it.

I went from a LS6 intake to a Gen 4 truck intake on my 62 and I can assure you will not notice a power difference
 
…and a spare $15k

If you follow this thread and use a stock rad, a less expensive/higher mileage engine/transmission and it can easily be done cleanly for $3-4k not including recouping with sales of 2F, bellhousing, etc

Really the only fixed cost is the T-case adapter. A stock ecu can be flashed for $70.everything else can be done for almost nothing you're resourceful.
 
Awesome thread, just like streaming episodes of a series on TV, watching every one as it comes out and adding ideas to my to do list, thanks man!
 
And tools

Yeah that’s a big one. For the most part the biggest expensive specialized tool so far is an engine hoist and a big welder. The rest are normal working on cars tools. Or cheaper things that can be bought at HF. Beg borrow (hopefully not) steal!
If you follow this thread and use a stock rad, a less expensive/higher mileage engine/transmission and it can easily be done cleanly for $3-4k not including recouping with sales of 2F, bellhousing, etc

Really the only fixed cost is the T-case adapter. A stock ecu can be flashed for $70.everything else can be done for almost nothing you're resourceful.
Most definitely! And by using the cheaper summit or jegs fittings and stuff too. I’ll try and do better putting more affordable options on here going forward
Awesome thread, just like streaming episodes of a series on TV, watching every one as it comes out and adding ideas to my to do list, thanks man!
Haha thanks dude! Hoping it helps some folks out with a few ideas
 
Going out of town this week for vacation. Will be a few days before I post again. More to come!
This thread is great! I’m afraid you may be talking me into the swap, any recommendations for a good place to get a 5.3 that is willing to ship?

Thanks!
 
This thread is great! I’m afraid you may be talking me into the swap, any recommendations for a good place to get a 5.3 that is willing to ship?

Thanks!

Literally anywhere in the US
 

Users who are viewing this thread

Back
Top Bottom