
gaijin
GOLD Star
The Wix Model 24801 Air Filter Monitor is designed to indicate air flow restriction through the air filter on fuel-injected gasoline or diesel engines.
It looks like this:

Costs about US$16.00. I purchased mine here:
http://www.amazon.com/Wix-24801-Air-Filter-Monitor/dp/B0014BI1KA/ref=sr_1_1?ie=UTF8&qid=1360286501&sr=8-1&keywords=Wix+24801
The monitor is just a vacuum gauge that "locks" the maximum vacuum value until reset by pushing the yellow button on the top of the monitor. As dirt accumulates on the air filter, vacuum increases. When the gauge indicates in the red - time to replace the filter.
The monitor can be mounted either horizontally or vertically on the clean side of the air filters.
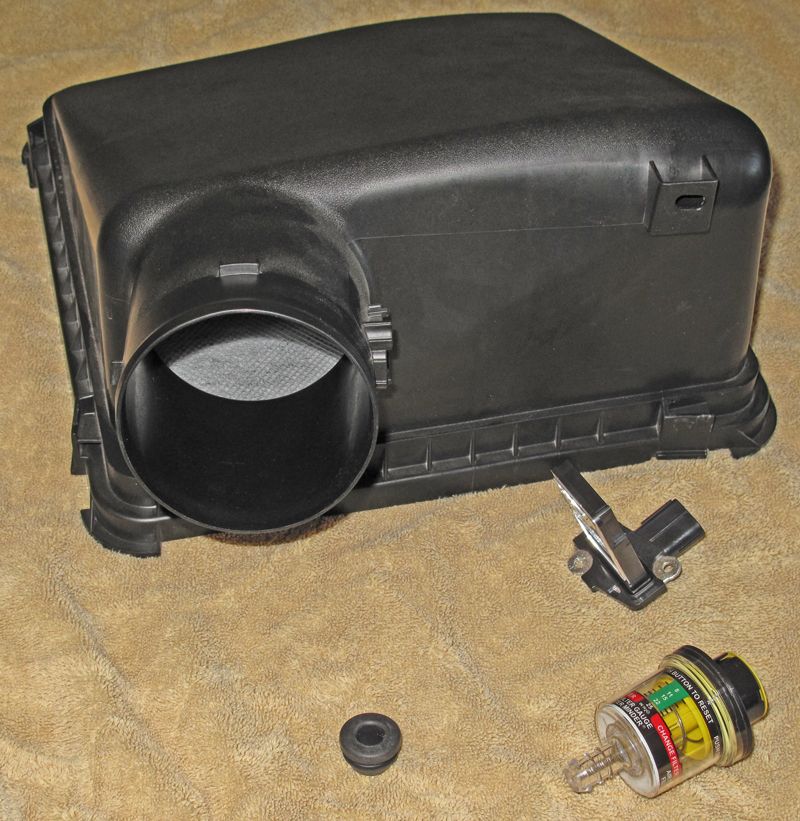
Here's what the stock air filter housing looks like on my 2013 LC200:
First installation step is to unclip the MAF sensor connector, unclip the MAF wire holder from the filter box, unscrew the clamp holding the filter housing to the connector tube to the intake and remove the upper filter housing.
After removal:
Here's what the upper filter housing looks like after removal:
Note the permanent post-filter that is part of the upper filter housing and is positioned after the replaceable air filter element.
Next the MAF sensor should be removed by removing two small Philips head screws.
Here's a picture of the upper filter housing with the MAF removed, the monitor and the grommet that will hold the monitor in place in the filter housing:
In order to mount the monitor on the upper filter housing, it is necessary to drill an 11/16" hole in the housing. It can be anywhere on the upper filter housing, but I wanted it to be easily visible when doing a quick check under the hood and obviously not obstruct anything or get jammed by the hood when closed. As a result, I chose to mount my monitor horizontally on the front of the filter housing.
Fully in the spirit of "Measure twice, cut once," I laid out where I wanted the 11/16" hole to be:
I used a spade bit and cut the hole. It is very important that you remove all little plastic bits that may fall into the filter housing. That is why I removed the MAF so that I could reach in and grab the large bits and also "flush" the interior of the filter housing with an air gun to make sure there were no residual plastic bits.
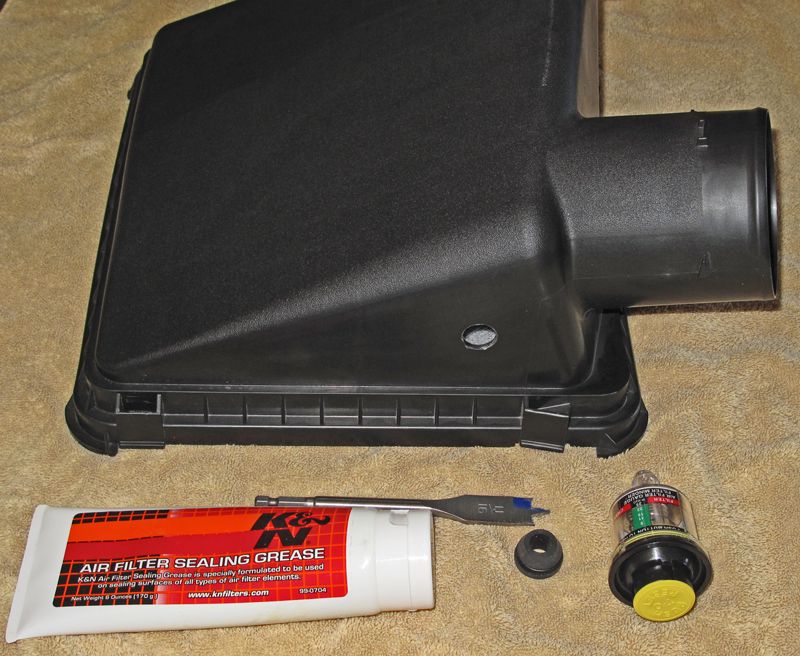
Here's a pic of the drilled hole, the 11/16" spade bit, the monitor and its grommet. Also included in the pic is a tube of K&N Air Filter Grease which is used on the grommet to allow it to be inserted into the hole in the housing easily and provide a good seal. The grease is also used on the shaft of the monitor that fits into the grommet for the same reasons.
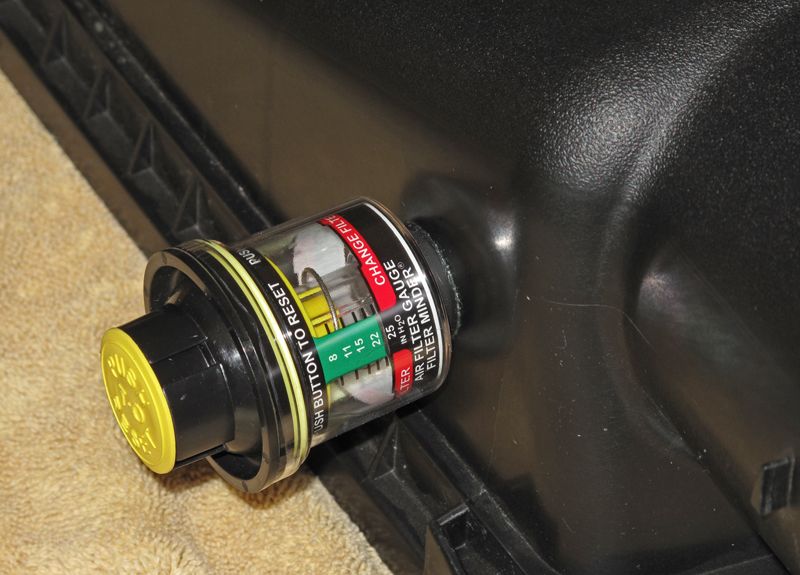
Push the grommet in the hole, push the monitor in the grommet and installation of the monitor in the housing is complete:
Re-install the MAF on the housing, connect up the intake tube, MAF clip, MAF wire holder and the 4 clips holding the Upper filter housing to the lower filter housing and the installation is complete:
Wix advises that there may be some restriction indicated by the gauge even with a new air filter when used under a "full load condition." This is normal. To determine if there is any restriction caused by my stock setup with a fairly new (<5,000 miles) stock air filter, I did an uphill 0-90mph WOT stint that should have revealed any restriction.
After the run, the gauge still indicated no restriction:
The Wix Air Filter Monitor is inexpensive, easily installed, provides a valuable indication of possible air flow restriction without having to take anything apart and it is made in the good old U.S. of A. What's not to like?
Hope you found this interesting/helpful.

It looks like this:

Costs about US$16.00. I purchased mine here:
http://www.amazon.com/Wix-24801-Air-Filter-Monitor/dp/B0014BI1KA/ref=sr_1_1?ie=UTF8&qid=1360286501&sr=8-1&keywords=Wix+24801
The monitor is just a vacuum gauge that "locks" the maximum vacuum value until reset by pushing the yellow button on the top of the monitor. As dirt accumulates on the air filter, vacuum increases. When the gauge indicates in the red - time to replace the filter.
The monitor can be mounted either horizontally or vertically on the clean side of the air filters.
Here's what the stock air filter housing looks like on my 2013 LC200:

First installation step is to unclip the MAF sensor connector, unclip the MAF wire holder from the filter box, unscrew the clamp holding the filter housing to the connector tube to the intake and remove the upper filter housing.
After removal:

Here's what the upper filter housing looks like after removal:

Note the permanent post-filter that is part of the upper filter housing and is positioned after the replaceable air filter element.
Next the MAF sensor should be removed by removing two small Philips head screws.
Here's a picture of the upper filter housing with the MAF removed, the monitor and the grommet that will hold the monitor in place in the filter housing:
In order to mount the monitor on the upper filter housing, it is necessary to drill an 11/16" hole in the housing. It can be anywhere on the upper filter housing, but I wanted it to be easily visible when doing a quick check under the hood and obviously not obstruct anything or get jammed by the hood when closed. As a result, I chose to mount my monitor horizontally on the front of the filter housing.
Fully in the spirit of "Measure twice, cut once," I laid out where I wanted the 11/16" hole to be:

I used a spade bit and cut the hole. It is very important that you remove all little plastic bits that may fall into the filter housing. That is why I removed the MAF so that I could reach in and grab the large bits and also "flush" the interior of the filter housing with an air gun to make sure there were no residual plastic bits.
Here's a pic of the drilled hole, the 11/16" spade bit, the monitor and its grommet. Also included in the pic is a tube of K&N Air Filter Grease which is used on the grommet to allow it to be inserted into the hole in the housing easily and provide a good seal. The grease is also used on the shaft of the monitor that fits into the grommet for the same reasons.
Push the grommet in the hole, push the monitor in the grommet and installation of the monitor in the housing is complete:
Re-install the MAF on the housing, connect up the intake tube, MAF clip, MAF wire holder and the 4 clips holding the Upper filter housing to the lower filter housing and the installation is complete:

Wix advises that there may be some restriction indicated by the gauge even with a new air filter when used under a "full load condition." This is normal. To determine if there is any restriction caused by my stock setup with a fairly new (<5,000 miles) stock air filter, I did an uphill 0-90mph WOT stint that should have revealed any restriction.
After the run, the gauge still indicated no restriction:

The Wix Air Filter Monitor is inexpensive, easily installed, provides a valuable indication of possible air flow restriction without having to take anything apart and it is made in the good old U.S. of A. What's not to like?
Hope you found this interesting/helpful.
 Nice write up

