
if you want the repair to be seen, TIG will be prettier in capable hands, however neither process is better or stronger.
Navigation
Install the app
How to install the app on iOS
Follow along with the video below to see how to install our site as a web app on your home screen.
Note: This feature may not be available in some browsers.
More options
You are using an out of date browser. It may not display this or other websites correctly.
You should upgrade or use an alternative browser.
You should upgrade or use an alternative browser.
This site may earn a commission from merchant affiliate
links, including eBay, Amazon, Skimlinks, and others.
More options
Who Replied?If you are learning, MIG might be prettier to start. (At least in my experience teaching folks)
Either way if you accept that there is going to be some grinding and dressing in post it really doesn't matter. TIG on the high skill side has a higher degree of control than MIG, but MIG helps make up for skill gaps much more than TIG.
If you spend time practicing with same gauge of metal, there is no reason you can't MIG that. Focus on not blowing a hole in the more than making it pretty, then grind and paint and no one will ever know.
If you have a MIG setup I'd say go for it. Get some scraps of the same gauge sheet metal from your local metal supplier and practice some butt welds to get your settings and technique dialed in. A series of short welds would probably work best to keep from blowing through.
- Thread starter
- #564
Every year on New Year's Eve I take a day of planning/solitude. Just me getting someplace quiet and away from distraction to reflect on the prior year's accomplishments and set the next year's goals/priorities. This last year (I'm late in posting this) I decided to take the Senator Highway from Crown King to Prescott.
As it happened, December 31 here in AZ ended up with a winter storm rolling through. I went from foggy/misty weather in the valley to snow at the peak of my drive. It slowed me down a bit, but that doesn't hurt so much when you're looking for solitude. I almost took the 40 but the prospect of rain/mud (I hate cleaning all the nooks on the underside of the 40) had me taking the Troopy.
Airing down...

I'm a sucker for windmills.
Rolling in to Crown King.
Fresh snow!
Palace Station is a an old stage coach station/stop (built in 1874) on the Senator Highway.
As I got higher up the snow got deeper and fresher, though I never saw it actually falling. But here the tracks I'd been following most of the morning started to disappear.
At the summit of the highway before descending into Prescott.
As it happened, December 31 here in AZ ended up with a winter storm rolling through. I went from foggy/misty weather in the valley to snow at the peak of my drive. It slowed me down a bit, but that doesn't hurt so much when you're looking for solitude. I almost took the 40 but the prospect of rain/mud (I hate cleaning all the nooks on the underside of the 40) had me taking the Troopy.
Airing down...

I'm a sucker for windmills.

Rolling in to Crown King.


Fresh snow!

Palace Station is a an old stage coach station/stop (built in 1874) on the Senator Highway.

As I got higher up the snow got deeper and fresher, though I never saw it actually falling. But here the tracks I'd been following most of the morning started to disappear.

At the summit of the highway before descending into Prescott.

- Thread starter
- #565
Several weeks ago I got out in the Sierra Ancha Wilderness/Tonto National Forest for some camping and hiking with two buddies. Just us guys. It was great.
The first picture is our parking spot in the National Forest so we could hike into a canyon in the wilderness area. You definitely needed a high-clearance 4x4 to reach this starting point. You CAN hike this without a 4x4... but you'll be hiking an additional 3 miles of a rough forest road.
You can actually see the Troopy in this shot... from about halfway up our ascent into the canyon. Can anyone spot it?
We hiked behind a waterfall...
So we could find these ruins.
The views were incredible.
Our camping spot was legit. Right next to a bubbling freshwater creek.
Leaving the area to head home...
The first picture is our parking spot in the National Forest so we could hike into a canyon in the wilderness area. You definitely needed a high-clearance 4x4 to reach this starting point. You CAN hike this without a 4x4... but you'll be hiking an additional 3 miles of a rough forest road.

You can actually see the Troopy in this shot... from about halfway up our ascent into the canyon. Can anyone spot it?

We hiked behind a waterfall...

So we could find these ruins.

The views were incredible.

Our camping spot was legit. Right next to a bubbling freshwater creek.

Leaving the area to head home...

i spot it, but I know where you are, and the other ruins next to those are EPIC for views
Last edited:
- Thread starter
- #567
Some nerdy data... I compiled a bit of solar/fridge/charging info the last trip I made.
I'm running an Engel 45 (16 years old and still runs great!) with a 100W solar panel and Victron SmartSolar MPPT 75|15.
On Friday prior to my trip I fired up the fridge in the middle of the day. Probably an 80-90 degree day... hotter inside the Troopy. After running a few minutes it was pulling 31W in "Float" mode. Meaning, the solar panel had upped its wattage to account for the draw and the battery was not being impacted.
AZ is a pretty fantastic place for vehicle-based solar. My 100W panel easily handles the fridge. I've actually recorded a Pmax of 99W so the panel can run close to it's actual rating.
At the end of the weekend (back in the driveway on Sunday late afternoon) my history showed these values.
On Saturday the truck was parked in the open, exposed to the sun. We were out hiking for 9-10 hours... nearly 7 of those the solar was in "Bulk" mode. Meaning it was recharging the battery from the previous nights' use as well as running the fridge.
On Sunday we made breakfast and leisurely made our way out of the wilderness. Far less bulk charge because driving provided the charge via alternator.
I'd intended to eventually go dual-battery on this truck. But the effectiveness of the solar plus the continued efficiency of the Engel has me generally inclined to be "done" with the power supply/storage system.
I'm running an Engel 45 (16 years old and still runs great!) with a 100W solar panel and Victron SmartSolar MPPT 75|15.
On Friday prior to my trip I fired up the fridge in the middle of the day. Probably an 80-90 degree day... hotter inside the Troopy. After running a few minutes it was pulling 31W in "Float" mode. Meaning, the solar panel had upped its wattage to account for the draw and the battery was not being impacted.

AZ is a pretty fantastic place for vehicle-based solar. My 100W panel easily handles the fridge. I've actually recorded a Pmax of 99W so the panel can run close to it's actual rating.
At the end of the weekend (back in the driveway on Sunday late afternoon) my history showed these values.


On Saturday the truck was parked in the open, exposed to the sun. We were out hiking for 9-10 hours... nearly 7 of those the solar was in "Bulk" mode. Meaning it was recharging the battery from the previous nights' use as well as running the fridge.
On Sunday we made breakfast and leisurely made our way out of the wilderness. Far less bulk charge because driving provided the charge via alternator.
I'd intended to eventually go dual-battery on this truck. But the effectiveness of the solar plus the continued efficiency of the Engel has me generally inclined to be "done" with the power supply/storage system.
Will Van
GOLD Star
Heck yeah! Looks like a great setup to me!
LED Replacement
- Thread starter
- #569
Huge shout out to @FJ73Texas for thinking of me with his speedometer overlay. Thanks a bunch Matt!
I was excited to install that. And since I had a new "glass" cluster piece to install, I figured it was a good time to also do an LED upgrade. My cluster does not have adjustable brightness and it's pretty dim/dingy at this point.
So, tearing into things you can see it's quite dirty.
Part Number 83100-60770. A 12V cluster with speedo, fuel, and temp only.
I think, based on plugs, that I could swap in one of the more feature-rich clusters with tach and oil pressure from an Aussie rig. But fore now I'll keep rolling with what I have.
This was such a quick and easy job. Here it is blown apart.
Cleaned up even the smallest parts. I really love the little "Yazaki" script on these.
I was excited to install that. And since I had a new "glass" cluster piece to install, I figured it was a good time to also do an LED upgrade. My cluster does not have adjustable brightness and it's pretty dim/dingy at this point.
So, tearing into things you can see it's quite dirty.

Part Number 83100-60770. A 12V cluster with speedo, fuel, and temp only.
I think, based on plugs, that I could swap in one of the more feature-rich clusters with tach and oil pressure from an Aussie rig. But fore now I'll keep rolling with what I have.

This was such a quick and easy job. Here it is blown apart.


Cleaned up even the smallest parts. I really love the little "Yazaki" script on these.

Will Van
GOLD Star
Fantastic work!
I was very hesitant to disassemble my cluster, but I think you have inspired me!
I was very hesitant to disassemble my cluster, but I think you have inspired me!
MPH Speedo Overlay
- Thread starter
- #571
One concern that @FJ73Texas raised was whether or not I had a metal speedo backing for the overlay to apply to. As it turns out, it is metal.
Since my cluster has a hood that covers the center of the speedo I didn't need to pull the needle, I just cut a slot so it could slide in behind the needle.
While into all of this I decided to repaint the gauge needles. It was either fluorescent red or orange... (as a side note, I highly recommend Tamiya paints for work like this. They are high quality enamel paints that go on very well if done in multiple, light coats).
So I went with the red. It seemed the better fit.

Since my cluster has a hood that covers the center of the speedo I didn't need to pull the needle, I just cut a slot so it could slide in behind the needle.

While into all of this I decided to repaint the gauge needles. It was either fluorescent red or orange... (as a side note, I highly recommend Tamiya paints for work like this. They are high quality enamel paints that go on very well if done in multiple, light coats).


So I went with the red. It seemed the better fit.

LED Replacement
- Thread starter
- #572
A little contrast of the gauge glass.
All buttoned up.
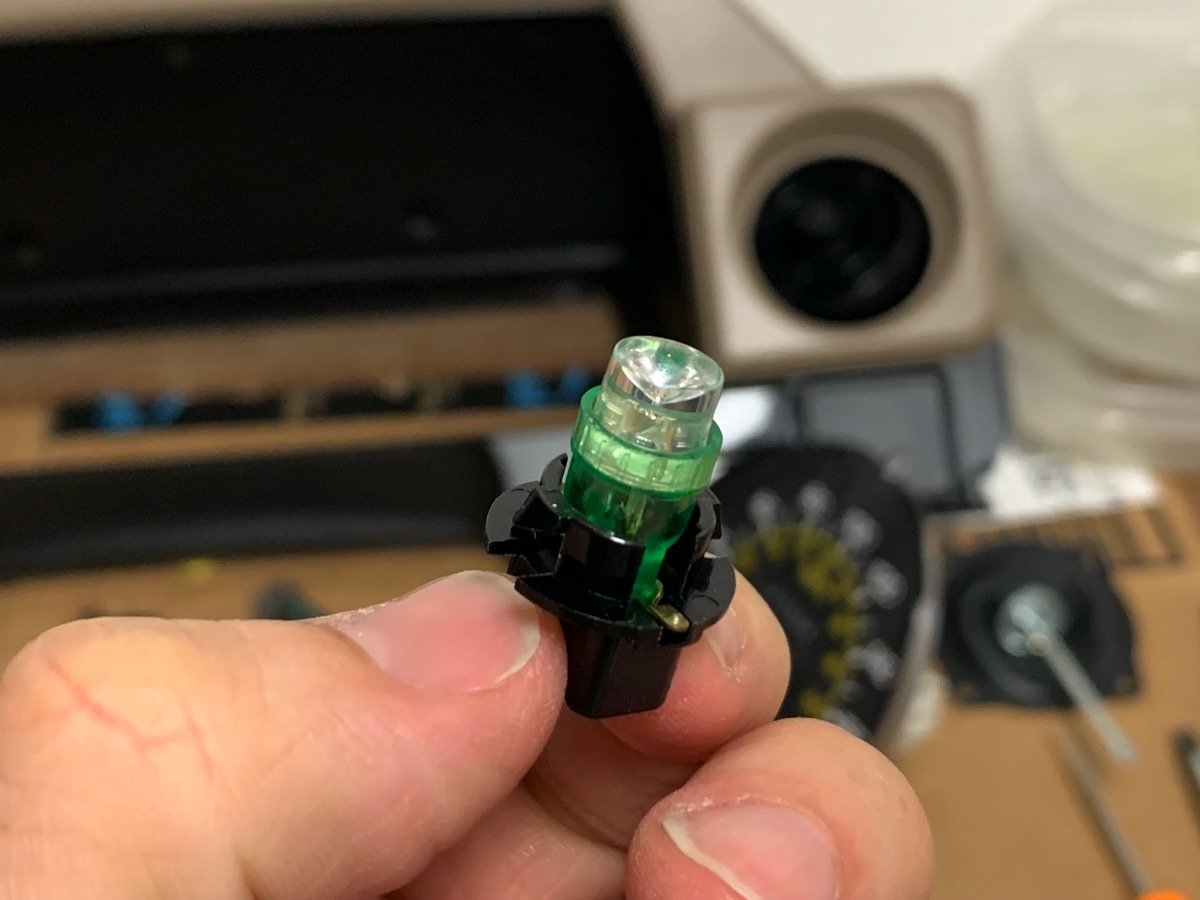
A view at night. I also replaced the climate controls with a green LED. It's a lot brighter. I'm very happy with the outcome. Much easier to see things at night. It might be a bit too bright... but that's better than being too dim. It hasn't bothered me at night in the urban area... verdict out on rural/unlit areas.
Nearly all the indicators.
In doing all of this I've discovered that my "Door Ajar" lamp never comes on (didn't know I had one til I tore into things). I've also discovered that my 4WD lamp flickers ever so faintly (only noticeable at night). So I've got more electrical troubleshooting to carry out.

All buttoned up.

A view at night. I also replaced the climate controls with a green LED. It's a lot brighter. I'm very happy with the outcome. Much easier to see things at night. It might be a bit too bright... but that's better than being too dim. It hasn't bothered me at night in the urban area... verdict out on rural/unlit areas.

Nearly all the indicators.

In doing all of this I've discovered that my "Door Ajar" lamp never comes on (didn't know I had one til I tore into things). I've also discovered that my 4WD lamp flickers ever so faintly (only noticeable at night). So I've got more electrical troubleshooting to carry out.
Last edited:
2fpower
SILVER Star
And it is spectacular.
Will Van
GOLD Star
Those LED bulbs look great! Are they a direct swap? Care to share the PNs?A little contrast of the gauge glass.
All buttoned up.
A view at night. I also replaced the climate controls with a green LED. It's a lot brighter. I'm very happy with the outcome. Much easier to see things at night. It might be a bit too bright... but that's better than being too dim. It has bothered me at night in the urban area... verdict out on rural/unlit areas.
Nearly all the indicators.
In doing all of this I've discovered that my "Door Ajar" lamp never comes on (didn't know I had one til I tore into things). I've also discovered that my 4WD lamp flickers ever so faintly (only noticeable at night). So I've got more electrical troubleshooting to carry out.
- Thread starter
- #576
Gosh. I don't recall any of the ones I made looking that spotty.
FWIW, I'm really thrilled with what I have. The MPH is pretty much dead on with actual too.
- Thread starter
- #577
I've got some photos and another post queued up with part numbers from Super Bright LED's. Standby.Those LED bulbs look great! Are they a direct swap? Care to share the PNs?
Quite possibly, the best, most useful "upgrade" that I have done. I love mine.FWIW, I'm really thrilled with what I have. The MPH is pretty much dead on with actual too.
Really digging the green Joel!!
Looks great.
Looks great.
- Thread starter
- #580
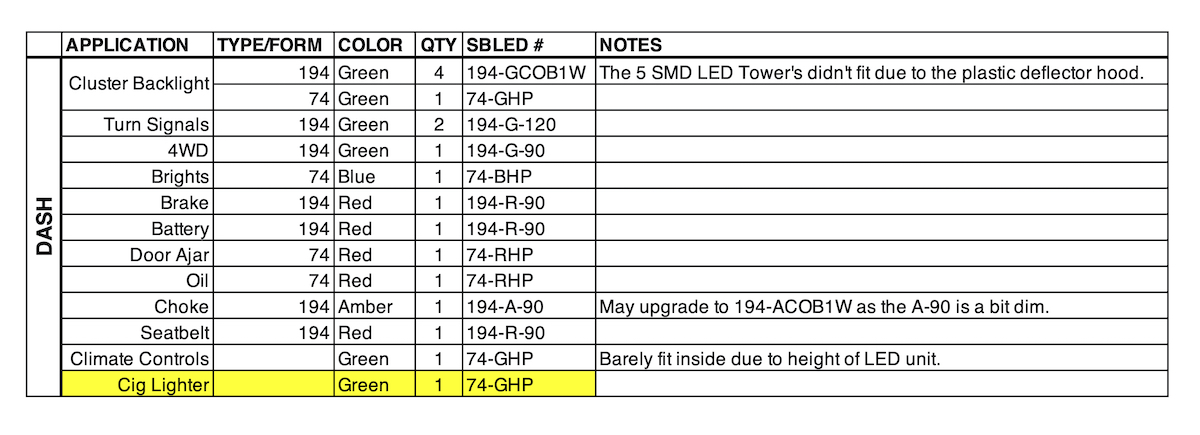
So I got my LED bulbs from Super Bright LED's. I used this FJ60 thread as a starting point for my research... and then kind of figured out what specifics I needed from there.
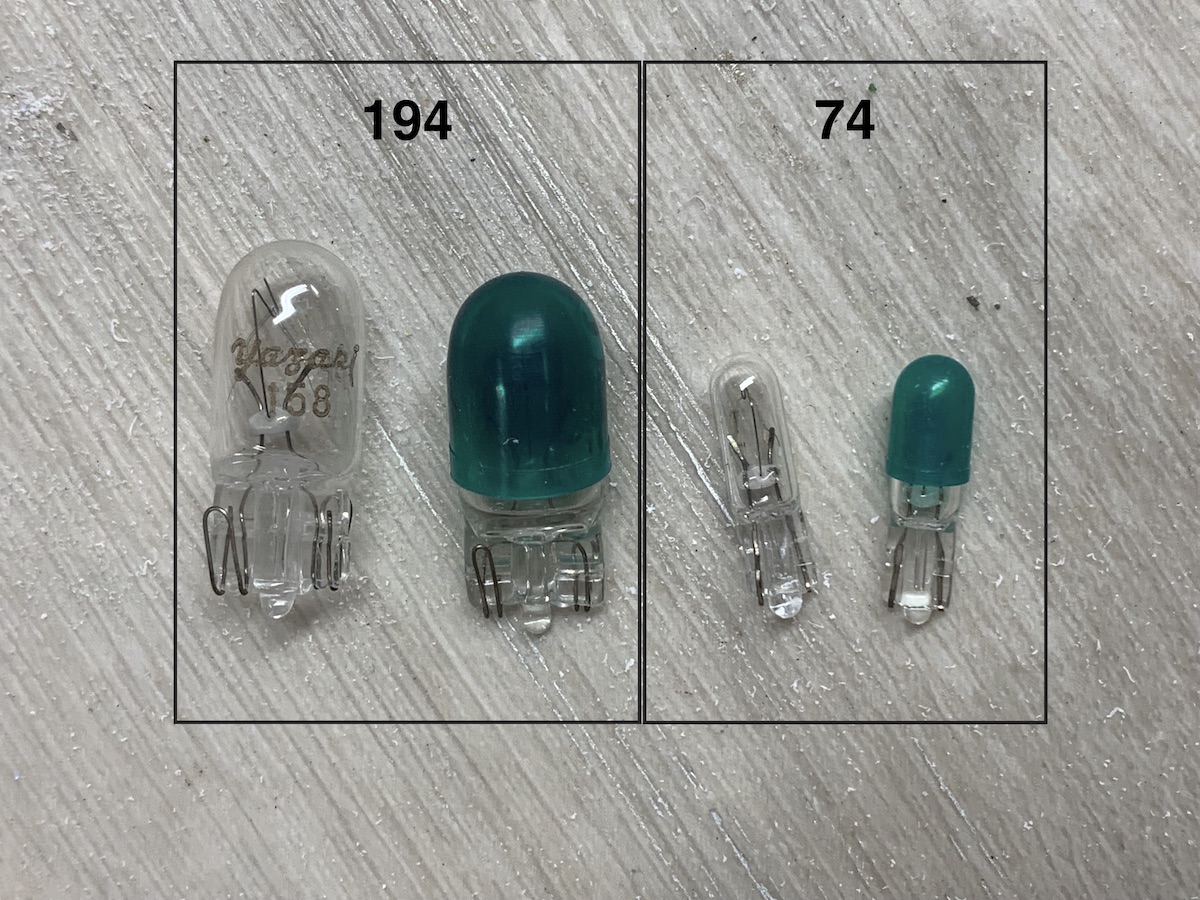
Once you dig into your cluster and dash lighting you'll generally find two types of lamps... form factor 194 and 74. Inside the cluster you'll find the general backlighting lamps covered with a green cover that gives the green tint. Those are replaced by green LED's.
So, ultimately, the LED's I ordered were as follows:
I'd recommend going through your cluster and quantifying how many you need, what size you need, and what colors you need, before making your order. I ended up with several orders to finish this project off. Doh!
My biggest mistake was ordering green LED's for the general backlighting that conflicted with the plastic hoods that reduce hotspots of light.
The plastic piece at the top kept the first 194 LED towers I ordered from working. So I ordered these instead... which much more closely match the original bulbs dimensions.
This 194 type was one of the 120-degree spread turn signal indicator LED's.
Once you dig into your cluster and dash lighting you'll generally find two types of lamps... form factor 194 and 74. Inside the cluster you'll find the general backlighting lamps covered with a green cover that gives the green tint. Those are replaced by green LED's.
So, ultimately, the LED's I ordered were as follows:
I'd recommend going through your cluster and quantifying how many you need, what size you need, and what colors you need, before making your order. I ended up with several orders to finish this project off. Doh!
My biggest mistake was ordering green LED's for the general backlighting that conflicted with the plastic hoods that reduce hotspots of light.

The plastic piece at the top kept the first 194 LED towers I ordered from working. So I ordered these instead... which much more closely match the original bulbs dimensions.

This 194 type was one of the 120-degree spread turn signal indicator LED's.
Similar threads
Users who are viewing this thread
Total: 3 (members: 0, guests: 3)