
So what mat will you use?Turns out I never posted photos of what I ended up doing
Ended up going with a sleeping platform, it is held in place by a shortened ratchet strap that hooks into the 2nd row seat points.
View attachment 2965085
View attachment 2965086
Navigation
Install the app
How to install the app on iOS
Follow along with the video below to see how to install our site as a web app on your home screen.
Note: This feature may not be available in some browsers.
More options
You are using an out of date browser. It may not display this or other websites correctly.
You should upgrade or use an alternative browser.
You should upgrade or use an alternative browser.
This site may earn a commission from merchant affiliate
links, including eBay, Amazon, Skimlinks, and others.
More options
Who Replied?- Thread starter
- #262
An old themra rest for now, @GLTHFJ60 had suggested a cheap memory foam mattress topper, which is what will likely be nextSo what mat will you use?
Cooler stays inside on one side of the vehicle, dog sleeps in front of the cooler on that side.
Will see if the dog comes out to relic run

Still looking for this?In a great adventure of curiosity, I took apart one of the door arm rests (the one in worst condition) will see how good my stitching is still
Things to purchase next time there is some super toyota sale:
driver seat foam (if seats are not already swapped)
more better wiper nozzles
2nd battery box for passenger side (if not already purchased)
105 pittman arm upgrade stuff (if current one gets busted)
uhhhhh
SOLD - AZ - 105 sector shaft OEM upgrade kit and new FJ80 OEM front spindles
1 left - 105 sector shaft upgrade kits for sale, all new OEM toyota parts. Includes sector shaft, LHD Pittman arm, sector shaft nut, lock washer and a complete toyota steering box rebuild kit. $600 each shipped USPS priority mail. SPF - 80 series OEM toyota front spindles, new version with...
 forum.ih8mud.com
- Thread starter
- #264
perhaps a bit more in the futureStill looking for this?

SOLD - AZ - 105 sector shaft OEM upgrade kit and new FJ80 OEM front spindles
1 left - 105 sector shaft upgrade kits for sale, all new OEM toyota parts. Includes sector shaft, LHD Pittman arm, sector shaft nut, lock washer and a complete toyota steering box rebuild kit. $600 each shipped USPS priority mail. SPF - 80 series OEM toyota front spindles, new version with...

I honestly don't think you "need" them. Maybe if your deciding to go +37s and a HARDCORE rock crawler.perhaps a bit more in the future
But if your going to rebuild and wanna spend the money, go for it.
I think I bought my rebuild kit (without the Pittman arm) from Rock Auto for less than $100 bucks. Don't quote me on the price, but its pretty cheap when you just buy the parts. I'll see if I can find you the thread if your interested.
I think it's this one.
 forum.ih8mud.com
Steering gear box rebuild
This is the second time I’ve seen the inside of an 80 series gearbox. I bought a used box this summer and rebuilt it with the help of a good friend and Lexus mechanic. Then we swapped it onto the truck in place of the original box, which was leaking from the input seal. Unfortunately, I managed...
forum.ih8mud.com
lumbee1
Native American
I followed the same thread and use the same rockauto kit.I think it's this one.
Steering gear box rebuild
This is the second time I’ve seen the inside of an 80 series gearbox. I bought a used box this summer and rebuilt it with the help of a good friend and Lexus mechanic. Then we swapped it onto the truck in place of the original box, which was leaking from the input seal. Unfortunately, I managed...
- Thread starter
- #268
Hit 212212 on the way out to Carolina Relic Run!
Saw a bunch of relics!
Tested the rear bumper is stout, backed into a few trees
@lumbee1 heard a bunch of exciting noises on the outside while I was driving the vehicle.
PS Gearbox needs a rebuild, debating just replacing the pump since I will have half of the system apart.
Other than that, it ran well!
And Lumbee did present valid points for why people get off road lights (and I observed said points)
Guess I will need to start looking into those as well
Power windows are quite sad, they are going to need some love as well
Got some posing shots while waiting on people / other vehicles.
Well got damn. . How'd you do that?broke the pittman arm puller tool I bought at orielys, going to see what awaits on amazon
- Thread starter
- #272
Well got damn. . How'd you do that?
A few clues were likely missed along the way
Clue 1, jaws were not wide enough for the selector shaft (had to widen them with the angle grinder
 )
)Clue 2, the tool came with a built in 3/8" drive for a ratchet (largest size they had at Orlieys) (Should have shopped around for a 1/2" model)
The outside of the tool accepted a 18mm socket, after multiple sessions with the breaker bar, I sent it with the impact, so no success.
Probably best that the threads stripped out.
lumbee1
Native American
I rent tools from O'reillys, Advanced, and Autozone. Some are clearly abused but some are brand new. Doesn't cost anything out of pocket.broke the pittman arm puller tool I bought at orielys, going to see what awaits on amazon
If you're rebuilding the box, heat the pitman arm up good and hot around the sector shaft. Next, pitman arm puller goes on and gets tensioned till it feels like it'll break. Then smack the pitman arm with a big hammer. It should pop off then.
Edit: the splines are tapered, so hit down if you can, but any hit will help break it loose if the heat and puller don't get it.
Edit: the splines are tapered, so hit down if you can, but any hit will help break it loose if the heat and puller don't get it.
Last edited:
- Thread starter
- #275
I was able to free the pitman arm earlier, had to use a heavier duty option from auto zone:
and when the directions say to hit it with a hammer, they were not joking
and when the directions say to hit it with a hammer, they were not joking
- Thread starter
- #276
2 of my favorite "tools"
1. A drip pan from the local auto parts store, an excellent thing to put on top of wooden work bench, easy to clean, and great for oily / greasy things.
2. The 2x4 contraption, has just been the right size for pounding out bearings from wheel hubs, snapped studs from rotors
Before
After:
Brushed / used a rust converting primer, and then painted the dash support black
- Thread starter
- #277
Ordered some more knipex snapring pliers 
Will likely be re-sealing my PS pump since @lumbee1 had commented that it did not sound well while we were wheeling, that and since the PS gearbox is off, things are a looooooooooot easier to get to
and while I am in there, this is the 1 remaining side that I have not rebuilt a knuckle or hub
Will likely be re-sealing my PS pump since @lumbee1 had commented that it did not sound well while we were wheeling, that and since the PS gearbox is off, things are a looooooooooot easier to get to
and while I am in there, this is the 1 remaining side that I have not rebuilt a knuckle or hub
- Thread starter
- #278
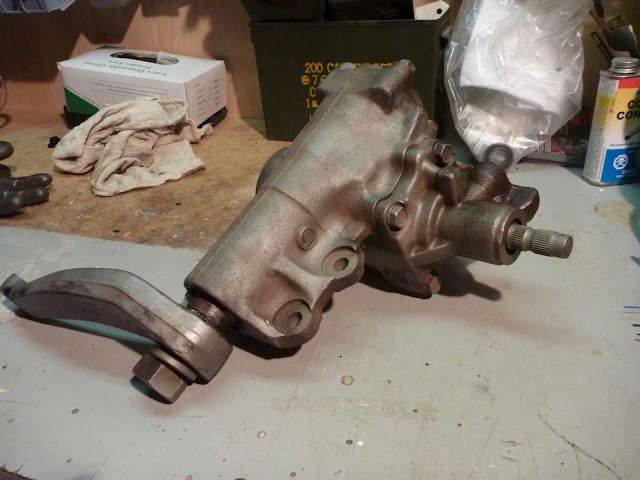
Part way through the gearbox rebuild, after re-assembling, the input shaft is a bit stiff when rotated, I marked the housing, and the inner shaft, but I seem to have not marked the lock ring.
I dont think that the lock ring controls tension?
I dont think that the lock ring controls tension?
lumbee1
Native American
Part way through the gearbox rebuild, after re-assembling, the input shaft is a bit stiff when rotated, I marked the housing, and the inner shaft, but I seem to have not marked the lock ring.
I dont think that the lock ring controls tension?
The preload nut controls bearing preload. I spun my preload nut and lock ring down to my marks and reassembled. I didn't realize I needed to keep spinning the preload nut two or three more times before it was truly tight. I had a fully 70* to 80* degrees of play in the steering wheel after it was fully rebuilt and installed on the truck. I had to remove, drain, disassemble and spin the preload nut and lock ring tighter to the marks.
The lock ring doesn't control tension but all three should have marks and they should line up. Are you sure you didn't mark the lock ring? Without proper tension from the lock ring, the preload nut could back off and cause excessive play.

Last edited:
lumbee1
Native American
If it is fully assembled, you might try backing off the adjusting screw on the top essentially keeping it loose for now. FSM states 40mm of play in the steering wheel.
Similar threads
Users who are viewing this thread
Total: 2 (members: 0, guests: 2)