FZJ80 Clogged air filter sensor and Indication (1 Viewer)

This site may earn a commission from merchant affiliate
links, including eBay, Amazon, Skimlinks, and others.

Joined
Jan 3, 2015
Threads
1
Messages
10
Location
Netherlands
Ok Ih8mud guys, this is my first thread ever on this forum and actually on any forum, so please be nice if I have screwed something up. I have been reading a lot on this forum and thought its time to do my part, so here it goes.
I own a 1996 Fzj80 triple locked, I love this car (ex range rover p38 owner for 8 years :bang:) When changing the broken light bulbs on the instrument cluster, I found that the cluster actually has some extra functions which where never connected in the North America spec FZJ80, one function is the clogged air filter function indicator, which I think some diesel 80's had in some areas (maybe aussie) and I think some Petrol 80's in the middle east, I have seen pictures of the actual sensor in the engine bay, so this started me thinking it might be nice to add this function, today I started the little project.


img_0331-jpg.1604551

So the second Bulb from the left (which ofcourse is the 2nd bulb from the right when looking at the cluster normally) is the clogged filter bulb, now you need to solder a little wire to the minus side of the bulb to the empty connection (#5 from left) on the next picture, all bulbs are supplied with 12v positive, the bulbs are controlled by functioning the minus side, normally the ecu will close the minus side for any of the bulbs when they need to light up.
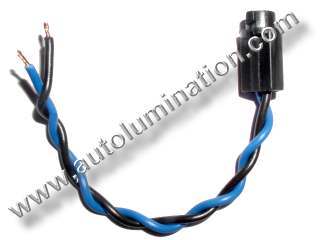
The Clogged air filter sensor is very simple, it is just a delta pressure switch which closes the loop at a certain vacuum.


IMG_0332.JPG

As you can see in the picture there is one spare connection that is not connected in the PCB, so I cheched the male side and as you can see it is empty as well, perfect for making an almost stock look and run a wire to there from the air filter sensor.

IMG_0341.JPG

Here you can see the connector doesn't have any lead in the 5th position.


IMG_0339.JPG

In this picture I have connected a 12v source to the supply side of the cluster and I have connected the minus to the newly soldered connection, light working perfectly.

IMG_0333.jpg

Here another Picture just to make it more clear.

IMG_0331.jpg

One small reminder, check if there is a light bulb inside the bulb holder, mine did not have any, so you need to place one in there.
 
Last edited:
IMG_0343.JPG

Here the sensor that took me a while to find, I am not sure at which pressure it switches to closed position, but I am pretty sure it is all the same for diesels and petrols alike, a clogged filter is a clogged filter right??

IMG_0346.JPG

2 connections, the one close to the electric connector needs to be connected to the suction side after the filter, the other one on the filter housing before the filter.

17806179948_655cfa1b8f_h.jpg

This is a picture from a 70 series but it gives an idea of how to fit it, I have not yet done this because I need to source a connector, run a wire on the Chassis as minus and run the other wire to through the firewall to the connector on the instrument cluster. Also you need to weld 2 little pipe nipples to the filter housing to fit the hoses.

IMG_0347.JPG

Here the connector.


So far thats all I have, I hope I can give you an update when all is completed.
Any suggestions or help on connectors would be greatly appreciated.
 
Last edited:
Here is the connector info you need:
Harness repair FSM
Female connector housings start in Section D, page 76, male connector housings, Section D, page 260. I've found it helpful to use the table, in Section E, starting on page 316, to find a connector, once I have the other side.

All engine bay connectors are waterproof-type (they have seals in the end the wires get into the housing from). You can get the housings from Toyota or Sumitomo.

Note, these are only housings, you still need the terminals. The terminals are 6.3-mm (wide), type II. They are Sumitomo, and can be purchased directly from the manufacturer. There's a company in the states that has them, if you can't find them in Europe.

You only need the tool listed in the FSM if you are going to remove a terminal; they go in by hand. You can get the tool from @NLXTACY, or, in a pinch, you can use a pick. The tool's much better.

Good detective work by the way!
 
Last edited:
There should be no need to add additional connecting wires on the back of the gauge cluster. There are all ready traces on the flexible circuit board for each light socket that go to the external connector points. As you have found what is missing are the wires on connecting harness plugs. You just need to examine the traces from the light socket to determine which plug and pin are already linked then add a wire to the harness at that location.
 
There should be no need to add additional connecting wires on the back of the gauge cluster. There are all ready traces on the flexible circuit board for each light socket that go to the external connector points. As you have found what is missing are the wires on connecting harness plugs. You just need to examine the traces from the light socket to determine which plug and pin are already linked then add a wire to the harness at that location.


There is no trace on the PCB for that light, if you look closely you can see this, all other bulbs have 2 traces, but not this one.
 
Here is the connector info you need:
Harness repair FSM
Female connector housings start in Section D, page 76, male connector housings, Section D, page 260. I've found it helpful to use the table, in Section E, starting on page 316, to find a connector, once I have the other side.

All engine bay connectors are waterproof-type (they have seals in the end the wires get into the housing from). You can get the housings from Toyota or Sumitomo.

Note, these are only housings, you still need the terminals. The terminals are 6.3-mm (wide), type II. They are Sumitomo, and can be purchased directly from the manufacturer. There's a company in the states that has them, if you can't find them in Europe.

You only need the tool listed in the FSM if you are going to remove a terminal; they go in by hand. You can get the tool from @NLXTACY, or, in a pinch, you can use a pick. The tool's much better.

Good detective work by the way!


Thanks a lot, i am already taking a look, my god so many connectors :)
 
;)
 
Great idea, but for ease of illumination, whenever I installed my front locker I wired the dash light up using the proper bulb size twist socket pigtail from someone like autoillumination. I think it is a type 74. Allows you to provide power directly to the bulb without regard to the circuit trace. Works great. Good luck.

 
Here's what we want to see next... A photo of the air cleaner once the light comes on. Drive behind this guy for a few hundred miles and report back :)

View attachment 1604743

My prediction, even in those conditions, as long as the tuna can is occasionally dumped, it will be years. Making a light on the dash is a cool project, but has little to no utility. Mine is under the hood, and the progression towards restricted is glacial, like takes years or hundreds of dusty trail days.
 
My prediction, even in those conditions, as long as the tuna can is occasionally dumped, it will be years. Making a light on the dash is a cool project, but has little to no utility. Mine is under the hood, and the progression towards restricted is glacial, like takes years or hundreds of dusty trail days.

I knew you were going to chime in with that info eventually. ;)
 
Yeah, agree to the minimal utility of the project. It would likely be useful on an open mine where dust in continual (even with dust amelioration protocols in place). The air filters on our 4wds have a LOT of surface area (with all the pleats), it would take years (if not decades) to clog one up in the US - given all the roads to/from are paved and at most you drive a few days on actual dirt/gravel once there. Does the netherlands (or your trips) involve months of driving in very dusty conditions? If so a cyclonic pre-cleaner on a snorkel would be a better option...

I have 2 washable filters here, every couple of years I rotate to the clean one and then wash and allow to air dry the 'dirty' one.

In oz where I do drive for weeks at a time on dirt roads I have a cyclonic pre-cleaner on the patrol's snorkel - even then after a trip there may be at most a couple of mm of 'debris' in the bottom of the bowl and a lot of that is just dead bugs, bits of foliage etc., that get sucked in while driving. It can be amusing to watch a dried bug rotating around the bottom of the bowl due to the cyclonic action of the air swirling around while the engine is running. Our tuna can on the cruiser filter housing would catch most of that junk.

Of course I can imagine the 'fun' aspect of retrofitting the warning light/sensor...

cheers,
george
 

Users who are viewing this thread

Back
Top Bottom