Honda CT90 Clutch writeup (1 Viewer)

This site may earn a commission from merchant affiliate
links, including eBay, Amazon, Skimlinks, and others.

Joined
Mar 23, 2003
Threads
26
Messages
549
Location
Emmett, ID
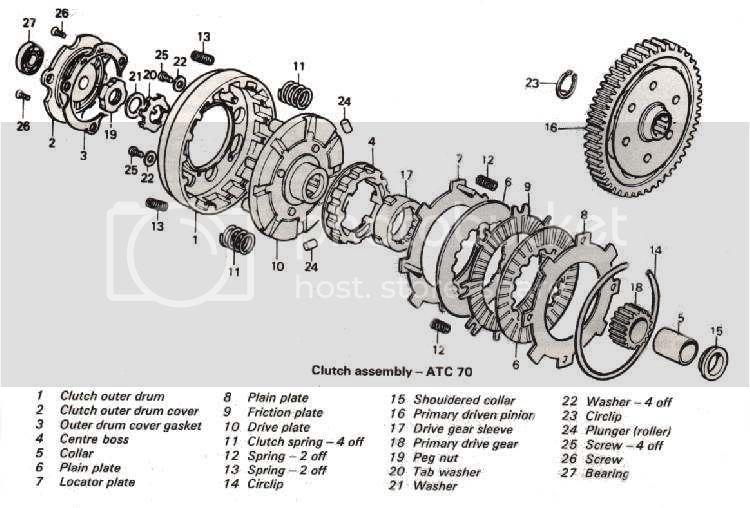
Here's a picture of all the clutch parts.

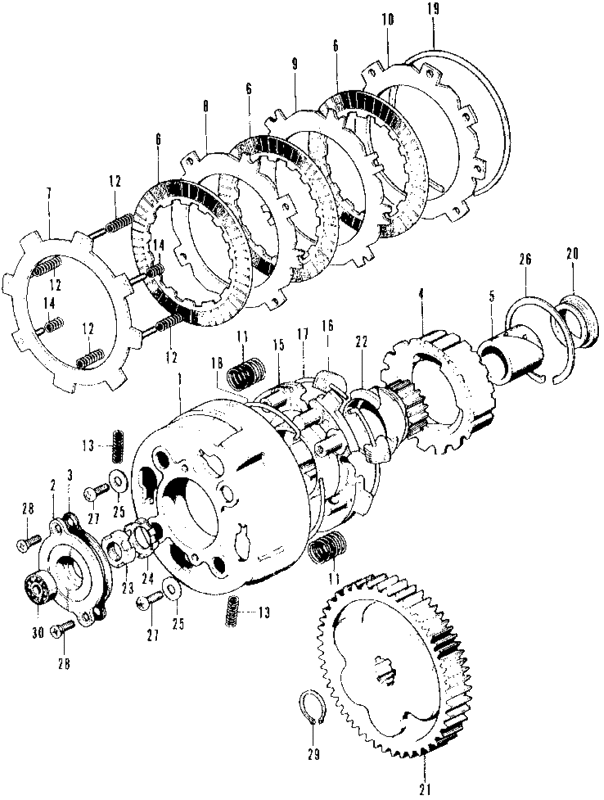
I will refer to the part numbers in this picture when describing my parts. :D

dratv_2022_233941936.gif
 
PICT0020-1.jpg


Here's all the various pieces that either fell out when I took the side cover off, or I took off to get to the clutch basket.

PICT0019-1.jpg
 
Clutch with Clutch inner cover #2 still on.

PICT0009-1.jpg


The screws were a pain to get out, but by pushing hard while twisting came out. This pic you can see the nut #23 holding the clutch basket onto the shaft.

PICT0011-1.jpg


To take the clutch basket off, you need to bend the tab of the keeper #24 back so you can loosen the nut, #23 with a special socket.

PICT0022-1.jpg

PICT0021-1.jpg

Here's the special socket, #24 keeper & #23 nut.
PICT0025-1.jpg
 
My #23 nut was only on hand tight, so I didn't need the special socket to take it off. :D That's ok, I'm sure I'll need it to tighten it back up when I put it all back together.

When I got the nut off, I just wiggled the basket off the shaft.

Here's some pictures of the basket all in one piece.

PICT0026.jpg

PICT0027.jpg

Here's a close up of the snap ring #19. It's hard to tell on the above parts diagram where it goes.
PICT0032.jpg

It came out very easy with a screwdriver.
PICT0033.jpg
 
So, once you take the big set ring #19 out the outer plate D is the first to come out. Once you pull that out, you see your first disc.

The plates are all different and are named A,B,C, and D. A being the innermost in the basket (the last one you'll come to). The one with the pegs that the springs slide onto.

PICT0034.jpg


The first clutch plate looked good and I was thinking things were looking up until I got to the second plate.

PICT0035.jpg


PICT0036.jpg


And the third plate

PICT0037.jpg


PICT0038.jpg


PICT0039.jpg


Here's the inner two clutch discs. They look to be in pretty poor shape too.... That's just oil shimmering on the discs reflecting back the flash.

PICT0040.jpg


PICT0041.jpg
 
Ordered A,B,C,&D OEM clutch plates from Dr. ATV today. He was less expensive than buying from the Honda dealership for the same parts. :eek:


Hopefully they'll be in by the end of the week so I can have it running by the weekend. :cool:
 
Ordered A,B,C,&D OEM clutch plates from Dr. ATV today. He was less expensive than buying from the Honda dealership for the same parts. :eek:


Hopefully they'll be in by the end of the week so I can have it running by the weekend. :cool:

So I ordered the parts on Tuesday the 7th and the parts were in my mailbox today, Thursday the 9th. How's that for speedy delivery. :cool:
 
Back to the clutch. I actually finished it yesterday, but haven't had a chance to post the pictures 'till tonight.

PICT0004-2.jpg


Note the location of the springs that are sitting on the posts of the first disc.

PICT0006-2.jpg


I set the "center boss down on the first disc and stacked the rest of the clutch on top.
PICT0008-2.jpg


PICT0010-2.jpg


PICT0012-2.jpg

Note the orientation of this disc.
PICT0014-2.jpg

Here's where the other two shorter "separation springs" go.
PICT0016-2.jpg

PICT0017-2.jpg
 
PICT0018-2.jpg


All the springs are in, now continue stacking. :D

PICT0020-2.jpg


PICT0022-2.jpg

Last plate
PICT0023-2.jpg


All done with the discs/plates. Time for the Set ring.

PICT0025-2.jpg

Setting the ring was pretty easy. Just make sure you start the end as it is in the picture here. Otherwise, you'll be trying to adjust the end when the whole ring is in the groove. It took a little adjusting since I didn't know where to start.
PICT0027-1.jpg
 
Since this is a wet clutch I didn't want to install it dry and there's no way to get oil on it after you put on the side case I opted to soak the completed unit in oil after I was done. I didn't want to oil each disc before I installed them since it would be a big mess.

I just found a bowl that was a little larger diameter than the basket. Put the basket in and filled it with 30wt oil. It took about ½ Qt.


PICT0031.jpg


Time for a beer while it soaks.

PICT0029.jpg
 
Now is the perfect time to check the oil filter/screen

PICT0037-1.jpg

PICT0038-1.jpg

Mine was clean, but I sprayed it off with carb cleaner anyways and put it back

Install gasket (note that the oil screen is behind the gasket)

PICT0042.jpg

Put clutch basket back on with new nut retainer & nut. You're supposed to torque it to 54-64 lbs-ft, but I didn't have anything to hold the basket from spinning, so I just got it as tight as I could.:doh:
PICT0043.jpg


I put a new gasket on the inner clutch cover, installed it and put the bearing & plate clutch cam (post #51 exploded view, part #6) on.
PICT0045.jpg
 
The manual said the clutch lever was supposed to point from the center of the shaft strait to the center of the clutch You can see that I also have the ball holder installed.

PICT0046.jpg

I didn't take a picture of pcs. 7, 11, and 12, but you can see here how it goes together. Pieces 11 and 12 fit in the center of #6

dratv_2022_234484858-1.jpg


Finally all buttoned back up. :cool: Minus the kick starter.
:doh:

PICT0048.jpg
 
I know this is a few years old, but I'm getting ready to replace the clutch on my CT110 and this is going to be very helpful. I noticed the kick starter won't even roll the engine over, so since I'm going in anyway to examine the shift drum stopper (shifting problems/false neutrals) I figured I'd replace the old clutch while I'm at it. Good write up!
 
I know this is a few years old, but I'm getting ready to replace the clutch on my CT110 and this is going to be very helpful. I noticed the kick starter won't even roll the engine over, so since I'm going in anyway to examine the shift drum stopper (shifting problems/false neutrals) I figured I'd replace the old clutch while I'm at it. Good write up!

Before you tear in, have you adjusted the clutch? IIRC, shifting problems, false neutrals, and kickstart problems can all be caused by an out of adjustment clutch. That's all that was wrong with mine. :)
 
I've adjusted it a couple times and it seems as it get's warmed up it starts kicking out of gear. It was worse until I adjusted. But now even when the bike is cold it doesn't really turn the motor very well. Almost like it's just slipping, and no compression. I just adjusted it again a little more trying to find the sweet spot so maybe third time is a charm. It was sitting for several years, so I'm prepared to replace the clutch if necessary though. Thanks for the reply!
 
I am in the midst of a CT90 engine rebuild and happened upon this thread. Never thought to see if there were other CT90 guys on here. This should help a lot when I get to rebuilding the clutch.
 
Been a while since anyone has posted on this thread. I was just doing a Google search on CT90 Clutch and got this hit. What a small world. I have two '68 CT90 that mostly collect dust in my shed. I need to get them out this year but one of them needs me to pull the transmission apart to figure out why it won't stay in gear.
 

Users who are viewing this thread

Back
Top Bottom