'07 FJ Cruiser Lower Ball Joint Replacement (with pics) (1 Viewer)

This site may earn a commission from merchant affiliate
links, including eBay, Amazon, Skimlinks, and others.

Joined
Nov 22, 2010
Threads
6
Messages
191
Location
Ottawa, Ont., Canada
Website
www.fort-wisers.ca
The front end of our truck has been in need of some TLC for a while now.
It started last fall with a nice clunking when the truck hit good size bumps.
Turns out the driver's side wheel bearing was done.
So back a few months ago I did the wheel bearings and seals, both drivers and passenger side.
Clunking got better but was still faintly there.
Well a month later it started getting worse so I took another look and it turns out the driver's side lower ball joint was also gone, so yesterday I finally got around to changing it.
I did a fair amount of online investigating before ordering anything as I didn't feel like parting with all the cash required to purchase the OEM ball joint / LCA assembly.
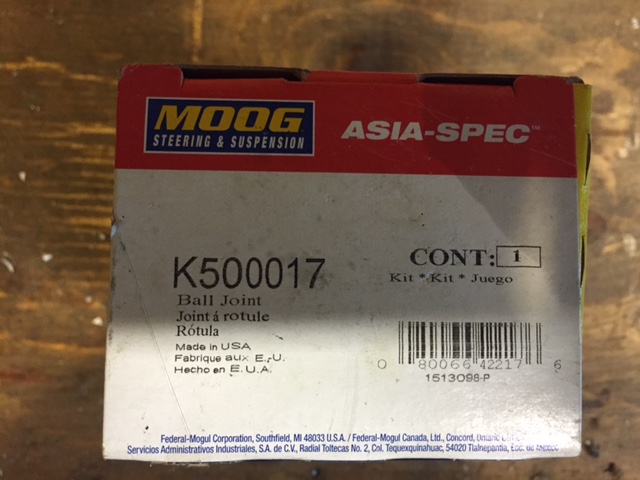
After a couple of days of research I decided to run down to the local NAPA and order two MOOG K500017 ball joints.
The driver's side seems to be the only one gone but I like to replace front end components in pairs so I got two, esspecially with a high mileage truck.

I tooks pics (sorry if some are blury) of the entire process as I found online information to be sort of scattered in bits and pieces. Perhaps I just didn't find what I was looking for, so hopefully this thread isn't a waste of everyone's time!.

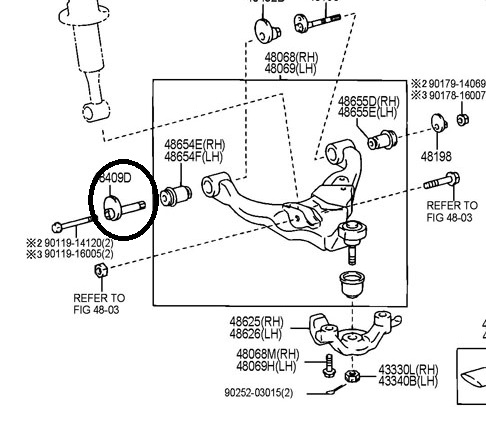
The following is the step by step prcoess of how to R&R a lower ball joint on an '07 FJ Cruiser....


Hope it helps!
 
Last edited:
Step#1

Gather your tools, I required the following:

- 1/2" drive socket wrench
- A Couple of large 1/2" drive breaker bars
- Various metric sockets (19mm and 24mm...maybe more, can't remember!)
- 12 ton shop press (minimum, and various blocks etc for supporting work piece)
- Small section of round pipe (for pressing new ball joint into LCA)
- Torch (to heat end of LCA to allow old ball joint to release)
- C-clamp
- Pry bar
- Chisel
- Hammer
- Centre punch
- Pry Bar
- Needle nose pliers (to work out the old cotter pin in the ball joint nut)
- Greasegun (for the new ball joint)
- 8mm box end wrench (for installing grease zerk in new ball joint)
- Rags
- Pentrating oil

Hopefully that's it.....
Evaluate the job and hit every nut/bolt with a good pentrating oil (PB blaster etc) while you're gathering the other tools.
Make note of the position of your front end alingment cam nuts (I centre punched both cam nut plate and frame drop-outs ears to create some witness marks)
FJ Cruiser Lower Ball Joint (1).JPG

Ball Joint I used:
FJ Cruiser Lower Ball Joint (16).JPG
 
Last edited:
Step#2:

Remove Fastners.
I did it in this order:
- Strut Bolt
- Ball Joint Castle Nut
- Ball Joint Casting Screws (where the casting meets the knuckle)
- LCA Bolts (REMEMBER to take note of those cam plate positions so you can get your alignment at least somewhere close when you re-assmeble!!)

Strut Bolt Gone:
FJ%20Cruiser%20Lower%20Ball%20Joint%20(2).JPG


Ball Joint Nut and Casting Screws Gone:
FJ%20Cruiser%20Lower%20Ball%20Joint%20(3).JPG


LCA Screws Gone:
FJ%20Cruiser%20Lower%20Ball%20Joint%20(4).JPG
 
Step#3:

This little guy gave me some trouble (tube that LCA fastner went through).
During dismantling the tube and Cam Nut actually separated as the tube was seized solid in the bushing.
I beat on it for about 15 minutes with a drift and BFH and it would not budge.
All the online investigating I found resulted in cutting the tube out and replacing it with a new one. This wasn't an option for me. I eventually worked it loose with a LOT of penetrant, a c-clamp and a socket.
I had to use a bar on the c-clamp handle to get enough leaverage to pop it loose. Once it came loose I could use my drift and hammer to drive out out completely.
Once this tube is out of the way (and all the fasteners from above are removed) the LCA (with ball joint) will drop out of the truck.

The troublesome Tube:
FJ Cruiser Lower Ball Joint (61).JPG


The C-clamp "press" used to pop the tube loose:
FJ%20Cruiser%20Lower%20Ball%20Joint (7).JPG


LCA Removed from Truck:
FJ%20Cruiser%20Lower%20Ball%20Joint%20(8).JPG
 
Last edited:
Step#4:

Press the casting from the old Ball Joint.
Then remove the C-clip from the back side of the ball joint (I forced mine out with a small chisel).
And finally Press the old Ball joint from the LCA.

Getting then Ball Joint out of the LCA took a few tries.
I had to hit it with a lot of penatrant and then finally a torch, eventually it came.
I have a small 12 ton press and it was everything it had so I would suggest bigger.

Casting Removed from Ball Joint (sorry for the poor pic):
FJ%20Cruiser%20Lower%20Ball%20Joint%20(9).JPG


Remove C-clip from Ball Joint:
FJ%20Cruiser%20Lower%20Ball%20Joint%20(10).JPG


Press Ball Joint from LCA:
FJ%20Cruiser%20Lower%20Ball%20Joint%20(11).JPG


Eventually it will POP!
FJ%20Cruiser%20Lower%20Ball%20Joint%20(12).JPG
 
Last edited:
Step#5:

Cleanup the hole in the LCA and press your new ball joint in.
I used a small section of pipe so that I could get a good amount of surface area on that small ball joint flange while pressing.
Before you press it in, be sure you line up the grease port to a sutible location, in hindsight I should have pointed mine a little further forward (a little more counter clockwise than in the picture below) as the location mine is in is a little tight once installed in the truck. (live and learn)
Once it's pressed in, install the new C-clip and grease zerk (no pictures of this, sorry).

Pressing in new Ball Joint using section of pipe to capture ball joint flange:
FJ%20Cruiser%20Lower%20Ball%20Joint%20(13).JPG


Underside view during pressing operation (be sure you leave clearance to allow the ball joint to press all the way):
FJ%20Cruiser%20Lower%20Ball%20Joint%20(14).JPG


New Ball Joint is in (Note grease zerk location, do yourself a favor a turn it a little more towards the front of the truck then what I've done here):
FJ%20Cruiser%20Lower%20Ball%20Joint%20(15).JPG
 
Last edited:
Step#6:

Finally, install everything back into the truck.
As you snug up the fasteners that attach the LCA to the truck frame dropouts be sure to re-align your witness marks on the cam nuts so your front end alingment is half decent.
I think there's a thread on this forum about dealing with these cam nuts.....

Clean up and you're all done!
As you can see from the picture, it's now obvious why I suggest pointing your grease zerk a little further forward compared to mine as the clearance from to the CV joint right above is very tight.
Personally, going through the process, I should have been more patient and waited to do the install until I could get my hands on some new bushings for the LCAs as well but that can be for another day!

Installed back in Truck:
FJ%20Cruiser%20Lower%20Ball%20Joint%20(17).JPG
 
Last edited:
Excellent write-up!
 
Just recently did this myself with the exact same MOOG part #, but did not take enough pics to do a thorough "how-to". Pressing old one out and new one in was one of those jobs where you wish you had three hands. The LCA just doesn't sit flat on the press, so you have to hold it over tubes/plates or build a jig.

Great job!

attachment.php
 
Thanks for posting this. My 4Runner is ready for new lower balljoints.
 
Hello Everyone,
Thanks for all the positive comments, this was my first thread so I wasn't sure if I was on the right track, I appreciate all the feedback. Perhaps I'll do another.
Take care.....
 
Well, this Friday past (1-Nov-2013) I finally got around to doing the passenger side ball joint.
Since the driver's side had went fairly well I wasn't expecting much.
However after I got into the job I was quickly humbled.
I could not, not matter what I tried (BFH, penetrating Oil etc etc) get the cam bolts out.:frown:
So I had to resort to cutting them (after I called a local dealer to confirm they had some in stock). After cutting them my plan was to press the remaining portion of the cut bolts out as well as press out the OEM ball joint so I could install the Moog replacement as I had done on the driver's side in the posts above.
Well, this took a quick turn for the worst when the seal on my shop press failed....:crybaby:
Fed up with the job I decided to call the Toyota dealership again and see how quickly they could get the entire LCA Assembly (comes with ball joint and bushings). Turns out they could have it first thing Saturday morning, so I went ahead, laid out the $440 for the assembly.:bang:
So I'm now the proud owner of a spare RH side LCA which, after I fix my press, I'll outfit with my Moog Ball joint and some new bushings!
Oh well, considering the KMs on this truck I guess I shouldn't be too surprised that I'd run into some trouble! Besides, jobs like this, they say, help build character........:wrench:
 
The Picture link is broken! Please fix so i can learn to do this.
Just replaced the Wheel bearing but I still have a click.
 
The Picture link is broken! Please fix so i can learn to do this.
Just replaced the Wheel bearing but I still have a click.
Unfortunately, it looks like the OP linked images to a privately owned website gallery that no longer exists. This is why we encourage members to use the IH8MUD gallery or to upload the pics directly.
 
hey gang, sorry about this......did some website maintenance and inadvertently blew some stuff away. Let me get this fixed back up asap. Many apologies.
 
Everyone, I spent a few moments today during lunch time looking on our server for the pics with no luck. I'll check more tonight. Worst case I'll take new applicable photos to fix the issue I created. Many, many apologies for this! Please bear with me as I get it sorted out......
 
Tried pressing out the ball joint on a spare rusty LCA I have. A beefy 1-inch drive pneumatic impact couldn't do it. Going to try a shop press next.

I'm genuinely concerned about the trail swap ease on these. I've seen a video or two of people being able to press them out using a typical 1/2 drive electric impact so I know it can be done. I think I'm going to use a lot of anti-seize.
 
I recently tried using a special ball joint tool that looks like a gigantic c-clamp with special cups for different size joints. I thought the tool itself was going to break when I put an impact gun on it. This is definitely not a part you could fix on the trail.

I opted to replace the factory lower arm instead because my bushings were toast as well.
 

Users who are viewing this thread

Back
Top Bottom