HDJ81 Starter Run-On, Won't Stop Cranking! (1 Viewer)

This site may earn a commission from merchant affiliate
links, including eBay, Amazon, Skimlinks, and others.

Joined
Apr 3, 2006
Threads
53
Messages
1,728
Location
Laurentians North of Montreal, QC
Hey Peeps,

Well I was just finishing refilling my AC (easy as pie), when I noticed on my second start this funny metal noise... So I shut the engine off, it was the starter, it kept cranking!!!

So I quickly disconnected BOTH batteries to stop it from running!!!

My understanding is, it would seem the starter gear is stuck to the flywheel and won't come off and the magnetic switch contacts are welded together...

When I connect the left hand side battery, the starter immediately cranks... What gives? I thought this starter needed 24 volts to turn over?!

I've never had that kind of problem before. How much work is it to fix? Now that I think of it, I've had the same kind of noise happen twice in the past year, but it didn't last very long and would stop after a few seconds so I never pursued the matter...

HELP:crybaby:
 
There is no mysteries, only undiscovered facts..... Yes it's most likely the solenoid contacts welded that are causing the motor to crank without a signal from the switch. Don't rule out other faults like the ignition switch just yet....

The starter needs a power source and connection to ground to crank. When you connected one battery you put 12v on the starter and apparently it's enough to make it work!

Check the solenoid energising lead while the starter is malfunctioning to confirm the ignition switch is not sending power to the solenoid.

You can try to tap on the solenoid housing to free the contacts, but you will need to remove and clean or replace the contacts to ensure reliability.

Rick
 
Last edited:
Thanks, Rick for your encouragement! Often, it's all that's needed :)

Good point about the switch, I'll check the solenoid tomorrow at first light (hope to get there before the blackflies launch their first attack!!!)

The sound it makes when I touch the battery post is 'ta-whoa-whoa-whoa', as if the the starter gear was already engaged to the flywheel... Which is why I believe the solenoid contacts are simply welded together...

Is starter contact 'welding' a common problem? Could it happen because the plunger has become dry and doesn't slide back into place by the action of the returning spring? Just trying to figure the science behind it... The last starter I took apart was from an old Ford... 32 years ago!!!
 
The technology hasen't changed a bit. As long as your memory hasen't failed you the Toyota solenoid will be a trip down memory lane.

I think the welded contacts are the culprit, not anything that is corroded or dry. but you will see when you pull it apart.

Let us know how she goes.

Rick
 
Actually, Rick, on that Ford engine there was a very peculiar fork mechanism that was integral to the starter. Quite weird, the 'solenoid' was actually part of the starter itself and it would engage with an external relay.

In any case I've been reading about contact replacement. Sure sounds like a common problem for 80 series starters! I never had any problem with the starter on my old 60! I just hope the starter contacts are faily standard and that I can find them locally and quickly... This is my only vehicle!

Here's a pic of that Ford Starter... Pretty cheap construction, and cheap to replace as well!!! ($39.99 or less at the time!)
302 starter.jpg
 
Toyotas also have the solenoid mounted to the drive motor. The solenoid both makes a power path for the drive motor and throws the drive gear into the flywheel ring gear.

Thats why your starter is engaged at the moment. Sorry thought you knew.

Rick
 
Yes, Rick, I did know that!!! I just never took one apart so I was looking for some practical pointers... But I've read that it's pretty much easy as pie to take a US 80 series starter off, and I hope it's the same for this starter. So I'm checking my posts anyway before going under the truck.

My good buddy Pierre happens to have a spare complete solenoid switch/magnetic contactor or whatever you call it for a BJ60 starter, we hope the plunger and contacts will fit, who knows. If not I'll try some creative filing so that I may use the thing for a litte while before getting new contacts or a reman.
 
cant offer any starter advice...but im interested in your ac recharge. are you R134a? my R134a needs a refill...the local stealership wants $169 to refill + leak test 2 weeks later. contemplating on getting the recharge kit from walmart...which one did you use? any quick how-to tips?
 
OK I was able to take the starter out without to much trouble. I took the front wheel off, removed one bolt from below and a tricky one from above (lots of wires, it's trickier) and off it went through the wheel well.

Magnetic switch cover off, the contacts were finished. One one side, I had perhaps 1 mm of metal left, that's how worn it was. On the other side, it was hardly worn at all

Decent Contact Finished Contact_S.jpg

The "good" contact had two nice spot weld marks on them:

Worn Contacts Spotweld On Right One_S.jpg

And you can see them on the plunger as well:

Plunger with Spot Welds_S.jpg

The solenoid wire was tested, and worked flawlessly. Obviously bad contacts.

For those who are far from civilization like me, in a fairly backward area, I can say that if you are in a pinch the contacts could easily be made from 1/8" plate copper. I have not yet figured out how to take the plunger off to replace the copper washer. I was lucky enough to have an old magnetic switch from one of Pierre's previous BJ60s and the contacts are a perfect match. I simply reused one good one from Pierre's (worn opposite to mine, BTW) and cleaned the contacts and washer good using a flat file first, then #120 and then #400 wet and dry paper. The magnetic switch of the BJ60 uses the same basic casing, but the connections are different. OTOH, the plunger and the contacts are exactly the same.

I did not take the motor brush holder off. I did not want to risk having the brushes fly apart. Is it worth taking a look? It's already 6PM and frankly, I'd like to put it back on before tomorrow.

Also, what is the torque setting for the contact bolts? I'm a bit weary of cracking the phenolic insulating cups...

Thanks to lostmarbles, I was able to edit this post to put my pictures inline :beer:I definitely learned something neat today :)
Plunger with Spot Welds_S.jpg
Worn Contacts Spotweld On Right One_S.jpg
Decent Contact Finished Contact_S.jpg
 
Last edited:
That's how the plunger and contacts look after careful filing, sanding and cleaning:

Cleaned out and Ready to Reinstall_S.jpg

And this is how it looks reinstalled in the magnetic switch housing:

Cleaned Housing and Reinstalled Contacts_S.jpg
Cleaned out and Ready to Reinstall_S.jpg
Cleaned Housing and Reinstalled Contacts_S.jpg
 
Last edited:
cant offer any starter advice...but im interested in your ac recharge. are you R134a? my R134a needs a refill...the local stealership wants $169 to refill + leak test 2 weeks later. contemplating on getting the recharge kit from walmart...which one did you use? any quick how-to tips?

From my extensive research on the net, there is only one way to go, IMO: DURACOOL (or Red Tek, which is similar). I got the $80 Walmart kit, includes 2 cans or refrigerant, one can of sealer, the high and low connectors, a valve and gauge and an oil testing gizmo.

According to Duracool, if the system has no other defect, wasn't opened up and just lost its charge (you can check with a tire gauge), there is no need to vaccum the system, no need to replace the drier and no need to replace seals (unless the system has a major leak, of course). The lubricant is included with the refrigerant and is compatible with both the old R12 lubricant and the new R134 lubricant. Duracool even guarantees its product to be safe in writing!

After one can and the sealer (total: about 10oz), I had about 25PSi on the low side and as soon as the compressor cycled on, it was FREREZING in there :cool: . You got to refill slowly to keep the pressure OK (no more than 35PSI), otherwise if it gets too high (I wasn't paying attention at one point because of the starter racket!) the compresor will complain (the belt screeched until I shut the valve a bit ;) )

I can't give you any more pointers for now as I couldn't finish the job as I should (check for leaks, etc) as the starter had stuck and it became more important to shut the thing down before it went in flames!!!

Duracool is totally legal in Canada and in many US states and requires no licence to install, the mollecule is non toxic (it's mostly propane), ozone friendly, is more efficient then R134 and leaks less (needs no O-Ring replacement, unles of course the system has a substantial leak), but do check your local regulation, some US States prohibit its use because it's hydrocarbon based.

I may write a separate arcticle to describe the procedure. Right now I need to get that starter back in ;)
 
I've decided to "hone" the contacts in place after reading about the importance of alignment. I knew it must be important, but after reading I decided I wanted as close to perfect a contact as possible.

Here's a picture, notice how it contacts now, the fricton marks (circled in green in the picture) are almost the same with no offset (meaning one contact on while the other doesn't touch)... Did that rotating the disk flat on the contact... Not perfect, but good enough for me!

Honed Contacts Friction Surface_S.jpg

I guess you can see why it's taking me so long... It's the way I am... Trouble is, lots of things get forgotten, the house could be falling down that I wouldn't even notice... :eek: (my wife complained about me completely not noticing her today) but as you can see I did quite a nice job on those used contacts...

Since it's late now, I think I'l have a quick look at the brushes while I have it on the bench... ;)
Honed Contacts Friction Surface_S.jpg
 
Last edited:
So the starter motor was basically fine, although it had been running on for almost a full minute!!!

There was some carbon/copper powder in the housing, but not that much. I cleaned that out easily.

Starter with Top Cover Off_S.jpg

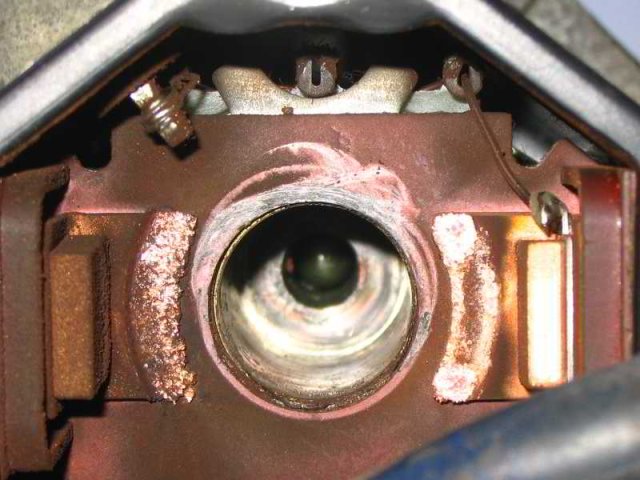
There was very slight discoloration on the collector, but very, very slight, and none on any wires and none on the brush springs.

The brushes were still around 19mm long (should be between 21 and 13 or so according to the FSM) so for those who worry about the brushes wearing fast, well, that should be reassuring.

Brush Holder Detail_S.jpg

I simply used a 600 grit wet and dry paper to clean it out, wish I has some 1000, but didn't have any.

Commutator after a light #600 W&D Buffing_S.jpg

The bearings are still turning very smoothly, as new, but the grease is a bit dark and I would prefer to replace it. What kind of grease should I use? I presume it has to be heat resistant... A synthetic wheel bearing grease perhaps? Any ideas?
Starter with Top Cover Off_S.jpg
Brush Holder Detail_S.jpg
Commutator after a light #600 W&D Buffing_S.jpg
 
Last edited:
thanks for your writeup on the AC recharge. i think i'll also get the $80 kit from walmart and give it a go.

your starter looks spakin' clean! i ended up putting in new contacts as well, although i just had dead start clicks, and not the infamous run-on start. For grease, my FSM just said to use a high temp grease...but all i had on hand was white lithium spray grease, which i just used on the plunger shaft, spring and ball. didnt open up the armature and inspect brushes...hopefully i wont need to!

after all your work, i hope you still wont have a possessed starter!

:cheers:
 
Well Folks, I'm in Deep s***.

I've reinstalled the starter and the relays operate, but the solenoid won't budge.

I have checked the voltage converter: works fine. I get 24V at the starter in the start postion. The solenoid has 3ohms in windiong (power to ground) adn 1.5 ohms in the other winding (power to starter motor).

However, I have only 12V going to the solenoid, whereas my manual states I shoudl have 24 volts. I have checked the fusible link, it hasn't melted.

I'm stumped. I have work tomorrow morning and I need to figure it out, reinstall the starter, the battery tray and all the other nuits and bolts I took off to be able to get at the starter itself.

Hope you don't mind if I post this in another thread also, I really, really need help, in 10 hours I need to be on the road!!!
 
I'm an IDIOT!!! (but don't rub it in!!!)

Well, it turns out I had the starter connections reversed on the solenoid casing... D'Oh!!! I made the mistake basing my connections on those of the old BJ60 solenoid I had as a spare and from which I used the contacts, which are reversed from that of the HDJ81...

I discovered my mistake not long after my last message... I figured it out after taking the starter out once again and checking it against the picture I took of it for this article before I took it apart...

Here it is before I took it apart
Starter_S.jpg

And after... D'Oh!!!
I'm and Idiot!!!_S.JPG

Notice how the starter motor cable is in the front and top in its original, proper configuration, and how it was when I reassembled it? :whoops:
Starter_S.jpg
I'm and Idiot!!!_S.JPG
 
Also, if you look at my previous posts, you will notice, when looking closely at the contact picture I posted previously, that I wrongly installed the long stud on the right instead of on the left, like it should have been.

This is how I had it connected... NOTICE , IT'S THE WRONG WAY!!!
How I had Reinstalled It... D'Oh!_S.JPG

This is how it's supposed to be connected... THE CORRECT WAY!!!
How it Should have Been Done!_S.JPG

This is also confirmed by the schematic in the manual:
View attachment Solenoid Schematic_S.jpg

Notice how the long stud connection (terminal 30, near the terminal 50) is on the right of the image, or, if you turn it downside up like on my pictures, it will be on the left.

I had it all wrong... instead of starting with the pull-in coil, it was using the hold-in coil. No wonder it didn't work!!!

I also noticed that even though the electrical diagram I posted in another thread shows the solenoid pull in coil seeing 24V, it does in fact see just 12V! Hmmm! Any Ideas?
How I had Reinstalled It... D'Oh!_S.JPG
How it Should have Been Done!_S.JPG
 
The Cloud with the Silver Lining!

In fact, it was a good thing that I didn't install it correctly. When I took the starter apart to reverse the contact studs, I noticed the ball bearing at the end of the plunger was missing!!! I looked all over for it, to no avail. No!!! Not another problem!!!!

Then on a hunch I decided to shake the starter... Sure enough, there was a lose part in there!

Turns out the ball bearing had come off while I was playing with the gears with the plunger out and FELL into the gear casing!!!

Imagine if it had lodged itself between the gears, the mess it would made!!!

With a magnetized screwdriver tip, I managed after some patient wiggling to extract it without having to dismantle the gear set!!!

So: make sure you reinstall the ball bearing at the end, just before installing the plunger and the cover! If you leave it in the "hole" and play with the gear, it WILL fall into the gear case and could then get lodged in between the gears and destroy them!!!

By the time I was finished it was close to 2AM and as I had a job the following day at 8AM, for which I had to leave my house by 7, I had no choice but to boot it!!! I haven't been that focused on a job in years! I reassembled everything, reinstalled everything and tested the installation in just over 1.5 hours, and that includes the starter, the battery tray, the voltage converter relay, the starter relay, the windshield washer pump (I removed all these things trying to find the problem!), the mud flap under the wheel well, the chassis protective plate under the starter, the wheel, all the connections and getting all the tools back in the house, including picture taking for documenting the job!!!

If you guys show an interest and if I have enough picture space left I'll post a separate write up on the correct way to tackle the contact replacement job on the HDJ81 ;)
 
I'd be interested to see your "correct starter repair" thread, if you ever do it.
thanks for sharing the pics, etc.
 

Users who are viewing this thread

Back
Top Bottom