Split Case Rebuild (2 Viewers)

This site may earn a commission from merchant affiliate
links, including eBay, Amazon, Skimlinks, and others.

Mounting it.

So I don't have a build thread on my frame off but I have been working on a '72. It is a POR 15ed rolling chassis with MAF discs up front I got for a song and 2.5 inch springs. I mated the H55 and split case to an old F engine I took out of my trail rig for fitment and to work bugs out (and because I can not afford to rebuild my 2F that is tucked in the corner of my shop just yet) and I set the monstrosity in place.

Like Poser did in his thread, I set the hard mounts on the bell housing directly on the frame mounts. I then checked to ensure clearance of the emergency brake drum. It could not have been closer.

02-07-09 005.jpg

02-07-09 007.jpg

The I bolted the early FJ60 center mount to the tranny and then the cross member.
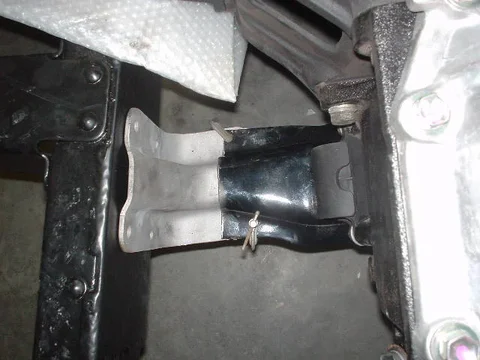
I fiddled with the side mounts (the ones shaped like an L) and determined that I would trim the drivers side of the cross member about 3/4 inch. I then removes the nut plat from the passenger side L bracket and trimmed it about 3/4s of an inch. On the passenger side of the cross member, I slit the corners and bent the tab up just a hair and plan on welding the cuts to reinforce it a bit.

Here are some pics of the cross member bolted in place and the L brackets clamped to the frame.

Passenger side.
02-07-09 001.jpg

You can see above where I just slit the corners on either side of the center hole of the cross member and bent it a bit to match the slope of the L bracket.

I was very pleases that the 1/4 inch plate I had a friend weld in was in the exact correct position.
02-07-09 005.jpg
02-07-09 007.jpg
02-07-09 001.jpg
 
Last edited:
Mounting it.

Driver's side

02-07-09 002.jpg

And then from the bottom

Driver.
02-07-09 008.jpg

Passenger
02-07-09 009.jpg

So I plan on removing the engine and tranny and replacing the 4 speed bell housing with one out of a 60 and eliminated the bell housing mounts. The other bell housing will allow me to mount the clutch slave directly to the housing.

So just have some holes to drill and tap and a bit of welding and painting and I am on to other things.
02-07-09 002.jpg
02-07-09 008.jpg
02-07-09 009.jpg
 
Thanks for the detailed writeup. I found a 13B-T with an unknown 5 speed out of a light truck , no transfer case down here. It is in a city 500km from here, so I haven't seen it. I am hoping to buy it and put my '83 split case on it, unless they can provide me with one from another outfit.
 
Well here is a weird deal. I removed the engine and tranny and replaced the bellhousing with a 3F from a 60. This will incorporated the slave cylinder mount to the housing and I will not have rear engine mounts, just a transmission mount. I attached the "L" brackets to the frame with bolts and set the engine and tranny in place and bolted it all down. I set the body in place so I could start working on modifying the hump and work on the steering shaft and I discovered something outta wack.

The transmission looks crooked and a protractor showed it was off 5 degrees.

03-10-09 002.jpg

The truck frame is level as is the bottom of the transmission mount. I had checked this before to ensure it was straight. Now the right side L bracket is significantly lower than the left side but the crossmember is straight.

03-10-09 007.jpg

From the pics, it actually looks like the tranny is crooked on the bellhousing :hmm:

Any thoughts?
03-10-09 002.jpg
03-10-09 007.jpg
 
It is. The 3F bellhousing slightly rotates the transmission to the right. That's why you have to match the crossmember to the bellhousing that you use. It also explains why the shift is a little close to you if you use the 2F bellhousing since it's made to work with the rotated bellhousing..

That's why I just stayed with a 2F bellhousing and modified it to fit the "ears" of the H55f input bearing cover. Then I could stay with my stock crossmember and all the angles came out right.
 
Is your engine now "clocked" as well?
 
Is your engine now "clocked" as well?

Nope. Engine is straight.

It is. The 3F bellhousing slightly rotates the transmission to the right. That's why you have to match the crossmember to the bellhousing that you use. It also explains why the shift is a little close to you if you use the 2F bellhousing since it's made to work with the rotated bellhousing..

That's why I just stayed with a 2F bellhousing and modified it to fit the "ears" of the H55f input bearing cover. Then I could stay with my stock crossmember and all the angles came out right.
Thanks Drew!
Interesting. I had no idea. What was the purpose of this and what are your thoughts on my setup then? The frame is a '71 and the cross member is adapted from an early FJ60.
My only concern is that I set up the rear cross member with the 2F bellhousing that I had moded for the "ears" so I may be putting a bit of stress on the rear rubber mount on the tranny.
I am a bit relieved. I thought I had f#cked up but good :lol:
 
Nope. Engine is straight.


Thanks Drew!
Interesting. I had no idea. What was the purpose of this and what are your thoughts on my setup then? The frame is a '71 and the cross member is adapted from an early FJ60.
My only concern is that I set up the rear cross member with the 2F bellhousing that I had moded for the "ears" so I may be putting a bit of stress on the rear rubber mount on the tranny.
I am a bit relieved. I thought I had f#cked up but good :lol:

I'd run it with the 2F Bellhousing or redo the crossmember. I would not want that strain on the rear mount-it will break and they are $$.
 
I'd run it with the 2F Bellhousing or redo the crossmember. I would not want that strain on the rear mount-it will break and they are $$.
Redoing the crossmember is no biggy. It is bolted in. Have you any idea why the 5 degree tilt was added to that bellhousing?
 
Redoing the crossmember is no biggy. It is bolted in. Have you any idea why the 5 degree tilt was added to that bellhousing?


I think they did it to lower the t-case and ease the driveline angles. Note, they eliminated the double cardan shaft at the same time. I don't really know, though. The 2F bellhousing will give a bit better clearance under the t-case, but slightly steeper driveline angles.
 
Hey Chris, great thread!

Just came across it and spent the last 2.5 hrs reading! Really helped me on my current t'case rebuild, even though I've done one before.

How's it runnin', btw ?
 
:lol: It is sitting in my frame off resto that I do not have a thread on. I am getting close to carrying the body to paint. It will be another year before I find out if I did it right.

>Here< is the rest of the story.
 
Last edited:
Hugh,
Great thread I just re-read it. I wish I had the tools and the shop and the skilz to do this. If I did folks would almost never get me out of the garage. As I am about to install an H55 in mine getting a re-build kit and turning it over to a pro is my only option. Got any ideas where to source a re-build kit for an H55?
Thanks,
John
 
Tick-tick-tick :)
 
Well thanks. I know that this case is way far gone as you will see from the picks that Steve asked for. But also I think that as Bret pointed out, what I would expect to see is large shavings on the magnetic plug once it goes into service as it begins to deteriorate. At that point I will be willing to rebuild again. I am not kidding myself by thinking this thing is going to last 50K miles or even maybe 10K but if the bearings don't get thrashed I will not mind getting into it again and doing another.

For me this is a hobby and if I come up with something that works I will be pleased. I also figure this thread - good or bad parts included, will be useful down the road.

What I did not realize was that the retainer should be very loose as the FSM says you need a puller to remove it. It came out easily once I got the puller under it. I had troule just getting the puller on it.

Everything is still round, so that it a good thing. The gear teeth are another story and I am certain I will have problems down the road. Sorry for the huge pics but I did them 2 meg so you guys could enjoy the damage (This appears to be the worst of what I could find and note that there is considerable amount of PB anti corrosion spray on them):

Input1.jpg


Input2.jpg


So pile on!

Your pics look dead?
 

Users who are viewing this thread

Back
Top Bottom