Lately I have been trying to ignore some strange noises coming from... (1 Viewer)

This site may earn a commission from merchant affiliate
links, including eBay, Amazon, Skimlinks, and others.

Joined
Apr 10, 2004
Threads
139
Messages
1,640
Location
san pancho, ca
Lately I have been trying to ignore some strange noises coming from my lunch-box locker.
I was kinda surprised, as the locker's only 3yrs old...kinda hoping to get at least 6 trouble free years.

I gave my buddy Doug a call, and asked If I could get a second opinion.
I called Joaquin and asked if he had a spare 3rd (just in case), and I grabbed the last of my Private Reserve ALE on the way out the door (thanks Marc :D ).

We jacked up the truck, and verified that the noise was indeed coming from the 3rd :(
Joaquin showed up, so we started to work on getting the 3rd out from under the truck and on to the bench.

The pinion had more then average play and as we rotated the ring gear, we could feel that something wasn't right.
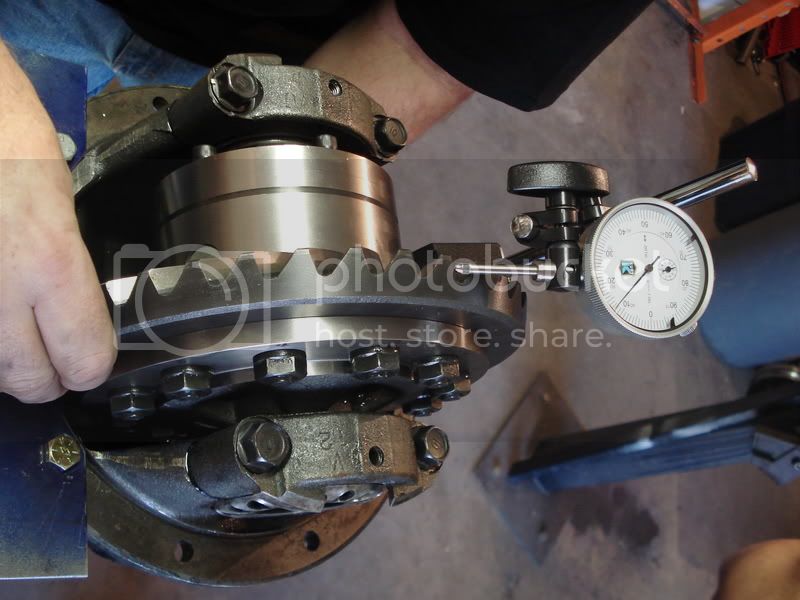
So we Marked the bearing adjusters before pulling the caps for a better look.

third1.jpg


What's wrong with this picture?
Once I removed the cap, I pulled the bearing and the machined collar was still attached inside the bearing.

third2.jpg


Mystery solved...Has anyone seen this before?

third3.jpg


Doug pressed out the collar while I cleaned up the internals.
As you can imagine, we found a light metal-gray film on everything :(

Ring gear had an occasional chip, but the pinon looked ok.

third4.jpg


Doug's Carrier jig that worked perfect.

third5.jpg


I was a little apprehensive when we talked about welding the collar back onto the carrier.
I figured worst-case, I could track down a spare 3rd.
Turned out great :D

third6.jpg


I'll let the Picture do all the talkin, reassembled...wear patter looks GOOD

third7.jpg


Just got home after a long day, It was nice to drive home noise FREE

It was really nice of Joaquin to give me a hand w/this...Doug, you wanted a break from his buggy anyways :D

happy april fools day :flipoff2:

manny
 
Last edited:
I was a little apprehensive when we talked about welding the collar back onto the carrier.
I figured worst-case, I could track down a spare 3rd.
Turned out great :D

happy april fools day :flipoff2:

manny

Yikes. :eek:

That is a new one.

Welding that cast iron carrier is an April fools joke, right?

I have a spare carrier that you can have if you feel like tearing into it again.
 
GOOD ONE MANNY:beer:
 
Sorry guys, break is real...just not mine (one of Joaquin's 3rds).

We actually had a Detroit Install-Fest Yesterday and when we encountered the broken collar, and I guess I've been hanging around Joaquin too much...sorry :D


Detroit install guide ::cool:

Please refer to manual/instructions to verify torque settings listed below.


Pull the 3rd, and install onto the bench jig (ignore the auburn, focus on the jig).

detroit1.jpg


Grab hold of the pinion flange so that it doesn't move.
Now rotate the ring back-and-forth...the dial indicator will measure the play, giving you your measured backlash (for reference).

detroit2.jpg


Mark the adjusters before pulling the caps, races and complete carrier...placing everything on the bench (preserving their orientation).
Cleanup the races and examine for unusual wear.

detroit3.jpg


Remove the ring gear and pull the carrier bearings w/Dougs new toy

detroit4.jpg


I found the stand particularly helpful :D (btw, that's a dana 70HD in the background)

detroit5.jpg


Install the ring onto the new Detroit carrier

detroit6.jpg


Place the carrier onto a broken axle (secured in a vice) and torque the ring bolts to 80lbs.

detroit7.jpg


Here's a shot of Joaquin's paper-weight (aka new-tool) and Marc's special-reserve ALE (tasty).

detroit8.jpg


Press-ON the bearings onto the carrier, until they are fully seated.

detroit9.jpg


Return the carrier onto the housing, and install the races/adjusters before the caps.
Do not torque caps yet as you will need to turn adjusters for correct backlash.

detroit10.jpg


Measure and adjust for backlash (I believe the measurement was .008?) and torque caps to 72lbs.

detroit11.jpg


When examining the pattern, you must grab the ring-gear to simulate drag (turning the pinion w/your other hand) for the pattern to be accurate.
Re-install the adjuster locks, and call it good :D

detroit12.jpg


One of the issues we encountered was with "the bolt"...or should I say lack of clearance to remove bolt.
This bolt has to be pulled in order to gain access for installing your C-clips in a Rear Axle application.

detroit13.jpg


Notching the cap was a solutino, but I am surprised Detroit hasn't provisioned for a cleaner solution?

detroit14.jpg


Does everyone really pull the cap to install C-clips?


Doug, Thanks Again for the Detroit 101 install-session...as always, it is appreciated :beer:

Joaquin, Please thank your charming wife for me...still can't believe I scored a $480 Detroit @truck-fest :D
 
Finally installed the Detroit this weekend...also found out about the two different axle designs.
Notice the pressed on race and the slightly smaller button on the left axle

axle-2.jpg


out w/the old, and in with the new

axle-3.jpg


no C-clip issues were encountered during the install

axle-4-1.jpg


I did find that the springs of my aussie springs were in pieces when I pulled the cover :(

axle-5.jpg


shot Bill@aussie an email, replacement springs are in the mail.
customer service is outstanding :D

Replacement 3rd is also a fine spline...a simple yoke swap takes care of the drive-shaft side
axle-6.jpg


thanks again Georg for the yoke, and Doug for setting up the 3rd :D
manny
 
still running strong :p
 
i was searching forever for a pic of someone notching the bearing cap...
nice... i will do that the next time i have the rear apart...

i have also read in another thread awhile back about cutting a 1/4 inch off the allen head bolt to get the same results... any thoughts on this...??

but i do like the notching of the bearing cap
 
is this in the FAQ section at all??
 
These bearing caps are pretty stout, so I wasn't concerned about removing material for clearance.

Reducing the allen-head height would also be a good solution, as all it does is hold the center pin in position.
maybe a combination of both, so you can remove less off the cap?

Will give it a try when I've saved enough for another Detroit for the front...better start bringing my own lunches to work :p


Don't know if this thread is in the FAQ....Brian?
 
its a good thread with good pics of what you did with the bearing cap...
 
still going strong :p
 
is this in the FAQ section at all??

These bearing caps are pretty stout, so I wasn't concerned about removing material for clearance.

Reducing the allen-head height would also be a good solution, as all it does is hold the center pin in position.
maybe a combination of both, so you can remove less off the cap?

Will give it a try when I've saved enough for another Detroit for the front...better start bringing my own lunches to work :p


Don't know if this thread is in the FAQ....Brian?


Who uses the FAQ?
 
Great info, Thanks
 

Users who are viewing this thread

Back
Top Bottom