CruiseOrlando
Conveniently Enhanced
I haven't seen a step-by-step on the rear axle rebuild. Granted, this one isn't nearly as bad as the front, and can be done in just a few hours, depending on the condition of some of your parts.
First things first: it doesn't mention it in the FSM, but if you have lockers, lock the rear axle before you start this project. Then pick a side to start on. All of the following pictures are from the PS, but the process is the same for both.
This writeup is based on a the full-float rear, which is the most common.
The parts you'll need:

43422-60040 x2 (gasket for axle to hub)
90311-62002 x2 (inner oil seal)
90310-35001 x2 (outer oil seal)
Other parts to consider:
Bearings:
90368-49087-77 x2
90368-45087-77 x2
If your studs are old, you might consider replacing them as well. If your cone washers don't expand anymore, you might want to replace them. Washers are washers.
90170-08204 x6 (Nuts)
90201-08042 x6 (Washers)
90116-08325 x6 (Stud bolts)
42323-60010 x6 (Cone Washer)
A few obvious steps first. Take the tire off, then remove the two 17mm bolts on the back of the caliper so you can take the brake caliper off. Put the caliper on top of the axle to get it out of the way.
Now you can remove the brake disc hub, and you're left with the axle hub.
Note mine is all silvery looking because I painted it. But not for long... if your axle is like mine, you're in for a treat to get thru the next part!
For those of you who have done the front axle already, this is the same thing. Get your brass drift or brass hammer or whatever, and bang the crap out of the studs. Sometimes you can hit on the hub right where the cone washer is, and that helps. For me, nothing helped. They were stuck in there good... so it took me a good bit of PB Blaster, heat and more heat to get mine to move. After a bit of frustration, I got out my stud puller and tried using that. A word to the wise here: if the stud doesn't want to turn, DON'T FORCE IT. It will snap. Just use more PB Blaster and heat until it starts moving. Trust me, it WILL move. Eventually.
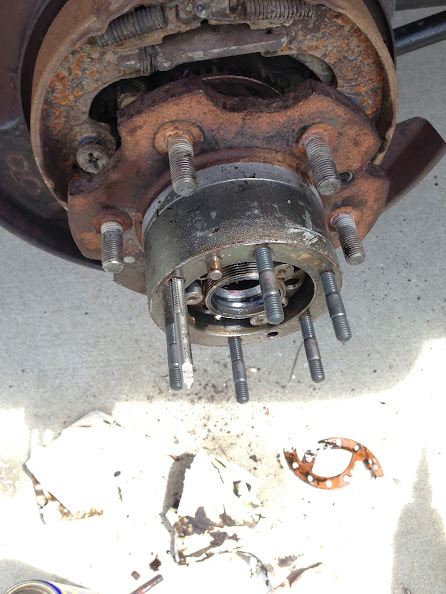
Carnage!!!!
Once you have all the cone washers out, you'll end up with what might be a familiar sight:
Note my paint job doesn't look so good anymore!!
Now, a little tapping around the rim should allow you to get the axle out. I used a chisel-type device - screwdrivers might work too. Note if you've overfilled your crank case or if you have water intrusion in the axle, you'll get a good leak once you separate the axle. You might want a drip pan just in case.
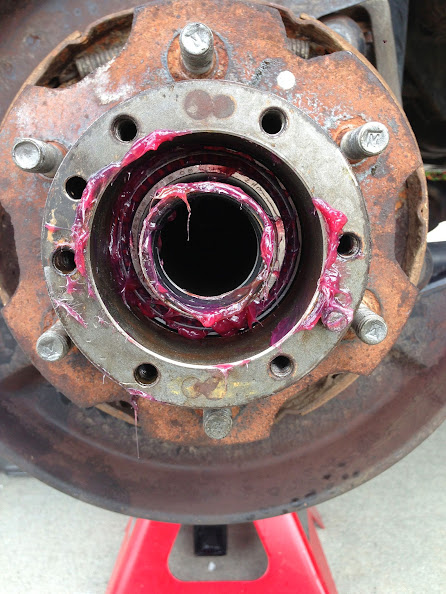
Pull the axle and set it somewhere safe. Now, depending on what kind of life your truck has lived will depend on the condition of the inner part. You can see mine was a big gooey mess...
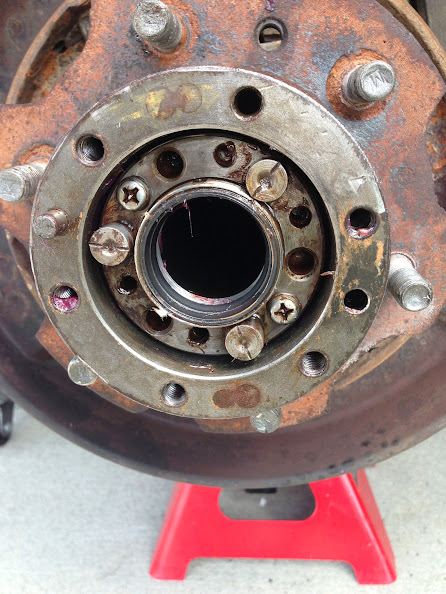
Clean some of this up - you're looking for two philips screws. And oh, an impact will be a good thing to have here too. I took my cordless impact and put a 1/4 driver with a philips #3 on it. Once it's cleaned up you'll see the screw heads. Remove these two philips screws and set aside:
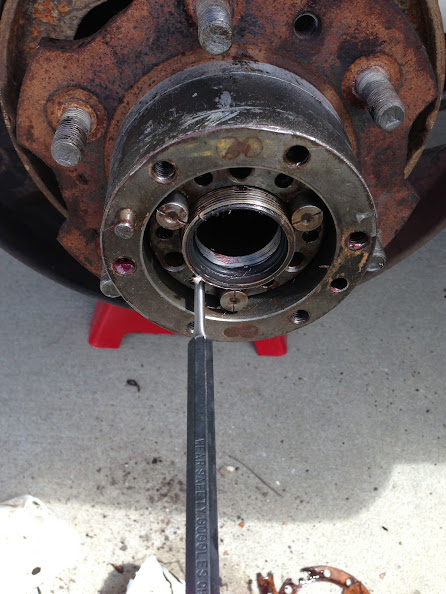
Once you have them out, now the bearing lock nut can come off. This bearing lock nut will spin counter-clockwise off. Depending on how much preload is on it will depend on how hard it is to get off. Spin it off and put it aside to be cleaned.
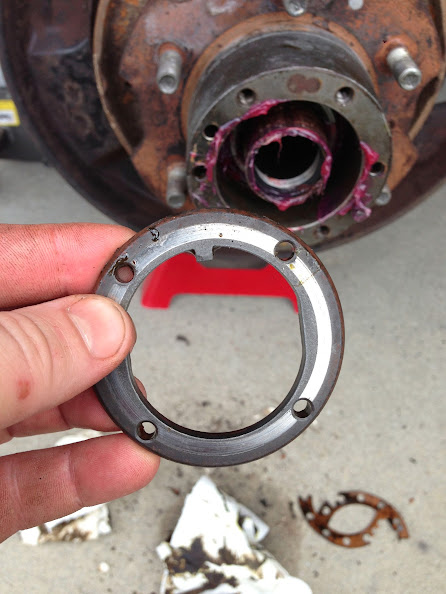
Once that's off, the whole hub will just come right off. There is still a thrust washer (lock nut plate) and outer bearing in there, but that will come off when you pull the hub off. Once you've got it out, you're left with just the spindle left.
You can pull the oil seal out of the end of the spindle since you'll be replacing that as well. Heck, change it now if you want.
Clean off the parts and inspect your bearings. Mine were so burned I just replaced them, so I really didn't care about the condition. YMMV.
Clean out the old grease in between the bearings - mine was pretty nasty. Lots of towels!
Now it's time to get that rear oil seal out. This one isn't so easy if you don't have a vise grip on a bench. I put mine on the ground, and placed my oil seal puller in the lip of the seal, then hit the handle of the puller with a handle a few times.
Then I worked my way around the seal until it came out.
Now the inner bearing can come out. I tossed this one as well since it was trashed, YMMV.
More cleaning is probably in order at this point.
Now it's time to get the races out (if you're putting in new bearings). You can see my Harbor Freight SST here:
There are two spots designed to allow you get the races out. Bang it a bit - getting them out in the end is a little odd (again, easier if you have a bench vise).
Races out, cleaned up:
Now, I've said it before, I'll say it again: this race installation kit from Harbor Freight is one of the best things you can buy for $35. Here's the one for the outer race:
Another word to the wise: PUT THE OUTER RACE IN FIRST!!!
But, if you're like me and DON'T do it that way (and then install the oil seal...) you end up with a little bit of a problem. You really don't want to be hammering in a race and smashing your oil seal! Sooo... I started looking around for some kind of a jig... and whadda know, the perfect one came to mine - the tire!
So I installed the hub into the rim, like so:
And knocked in the outer bearing race.
But you're going to be smart and not do that - you're going to install the outer race, then the inner race. Now, go pack the inner bearings with fresh grease. If you're reusing the old bearings, make sure you clean them very well before introducing new grease.
Here's another tip: if you don't have a bearing grease packing tool, go get one. They look like this:
And they are well-worth the money. They do a great job at making sure grease gets everywhere it needs to be. Once you've got the bearing packed, put the outer bearing back into the race:
And now you can install the oil seal. You might note this thing is kinda big and you probably won't have a socket big enough to fit. I just lightly tapped mine with a hammer all around the outside until it seated. Doesn't take much effort or work - just make sure you're seating the oil seal properly (at the same rate all the way around, if that makes sense)
You also need to pack the inside of the hub with grease. Build it up so it's about even with the races - maybe 1/2" thick?
Now go clean off the spindle, inside and out as best you can. Take some grease and put a light coating on the spindle. You know how it should feel...
(End part 1)
First things first: it doesn't mention it in the FSM, but if you have lockers, lock the rear axle before you start this project. Then pick a side to start on. All of the following pictures are from the PS, but the process is the same for both.
This writeup is based on a the full-float rear, which is the most common.
The parts you'll need:

43422-60040 x2 (gasket for axle to hub)
90311-62002 x2 (inner oil seal)
90310-35001 x2 (outer oil seal)
Other parts to consider:
Bearings:
90368-49087-77 x2
90368-45087-77 x2
If your studs are old, you might consider replacing them as well. If your cone washers don't expand anymore, you might want to replace them. Washers are washers.
90170-08204 x6 (Nuts)
90201-08042 x6 (Washers)
90116-08325 x6 (Stud bolts)
42323-60010 x6 (Cone Washer)
A few obvious steps first. Take the tire off, then remove the two 17mm bolts on the back of the caliper so you can take the brake caliper off. Put the caliper on top of the axle to get it out of the way.
Now you can remove the brake disc hub, and you're left with the axle hub.

Note mine is all silvery looking because I painted it. But not for long... if your axle is like mine, you're in for a treat to get thru the next part!
For those of you who have done the front axle already, this is the same thing. Get your brass drift or brass hammer or whatever, and bang the crap out of the studs. Sometimes you can hit on the hub right where the cone washer is, and that helps. For me, nothing helped. They were stuck in there good... so it took me a good bit of PB Blaster, heat and more heat to get mine to move. After a bit of frustration, I got out my stud puller and tried using that. A word to the wise here: if the stud doesn't want to turn, DON'T FORCE IT. It will snap. Just use more PB Blaster and heat until it starts moving. Trust me, it WILL move. Eventually.
Carnage!!!!

Once you have all the cone washers out, you'll end up with what might be a familiar sight:

Note my paint job doesn't look so good anymore!!
Now, a little tapping around the rim should allow you to get the axle out. I used a chisel-type device - screwdrivers might work too. Note if you've overfilled your crank case or if you have water intrusion in the axle, you'll get a good leak once you separate the axle. You might want a drip pan just in case.

Pull the axle and set it somewhere safe. Now, depending on what kind of life your truck has lived will depend on the condition of the inner part. You can see mine was a big gooey mess...

Clean some of this up - you're looking for two philips screws. And oh, an impact will be a good thing to have here too. I took my cordless impact and put a 1/4 driver with a philips #3 on it. Once it's cleaned up you'll see the screw heads. Remove these two philips screws and set aside:

Once you have them out, now the bearing lock nut can come off. This bearing lock nut will spin counter-clockwise off. Depending on how much preload is on it will depend on how hard it is to get off. Spin it off and put it aside to be cleaned.

Once that's off, the whole hub will just come right off. There is still a thrust washer (lock nut plate) and outer bearing in there, but that will come off when you pull the hub off. Once you've got it out, you're left with just the spindle left.

You can pull the oil seal out of the end of the spindle since you'll be replacing that as well. Heck, change it now if you want.

Clean off the parts and inspect your bearings. Mine were so burned I just replaced them, so I really didn't care about the condition. YMMV.
Clean out the old grease in between the bearings - mine was pretty nasty. Lots of towels!
Now it's time to get that rear oil seal out. This one isn't so easy if you don't have a vise grip on a bench. I put mine on the ground, and placed my oil seal puller in the lip of the seal, then hit the handle of the puller with a handle a few times.

Then I worked my way around the seal until it came out.

Now the inner bearing can come out. I tossed this one as well since it was trashed, YMMV.

More cleaning is probably in order at this point.
Now it's time to get the races out (if you're putting in new bearings). You can see my Harbor Freight SST here:

There are two spots designed to allow you get the races out. Bang it a bit - getting them out in the end is a little odd (again, easier if you have a bench vise).
Races out, cleaned up:

Now, I've said it before, I'll say it again: this race installation kit from Harbor Freight is one of the best things you can buy for $35. Here's the one for the outer race:

Another word to the wise: PUT THE OUTER RACE IN FIRST!!!
But, if you're like me and DON'T do it that way (and then install the oil seal...) you end up with a little bit of a problem. You really don't want to be hammering in a race and smashing your oil seal! Sooo... I started looking around for some kind of a jig... and whadda know, the perfect one came to mine - the tire!
So I installed the hub into the rim, like so:

And knocked in the outer bearing race.
But you're going to be smart and not do that - you're going to install the outer race, then the inner race. Now, go pack the inner bearings with fresh grease. If you're reusing the old bearings, make sure you clean them very well before introducing new grease.
Here's another tip: if you don't have a bearing grease packing tool, go get one. They look like this:

And they are well-worth the money. They do a great job at making sure grease gets everywhere it needs to be. Once you've got the bearing packed, put the outer bearing back into the race:

And now you can install the oil seal. You might note this thing is kinda big and you probably won't have a socket big enough to fit. I just lightly tapped mine with a hammer all around the outside until it seated. Doesn't take much effort or work - just make sure you're seating the oil seal properly (at the same rate all the way around, if that makes sense)
You also need to pack the inside of the hub with grease. Build it up so it's about even with the races - maybe 1/2" thick?
Now go clean off the spindle, inside and out as best you can. Take some grease and put a light coating on the spindle. You know how it should feel...

(End part 1)
Last edited: