Flip Window Installation Instructions and Production Thread (1 Viewer)

This site may earn a commission from merchant affiliate
links, including eBay, Amazon, Skimlinks, and others.

kevinmrowland

Forum Lifer
Joined
Sep 2, 2005
Threads
89
Messages
2,282
Location
Eugene, OR
Website
www.wagongear.com
If you've been following along with the project in the build thread (now archived) here:
https://forum.ih8mud.com/wagongear/307003-so-kevin-about-those-windows.html

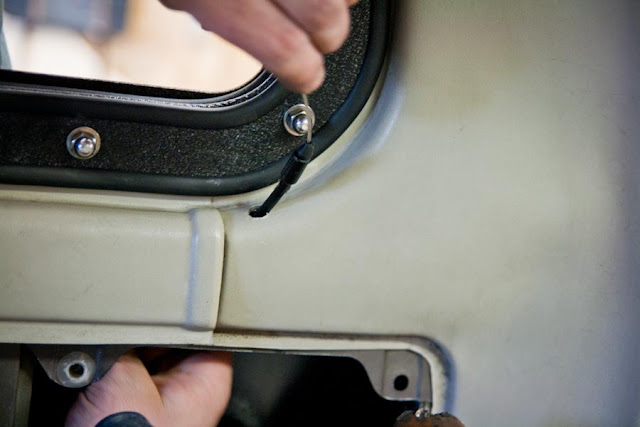
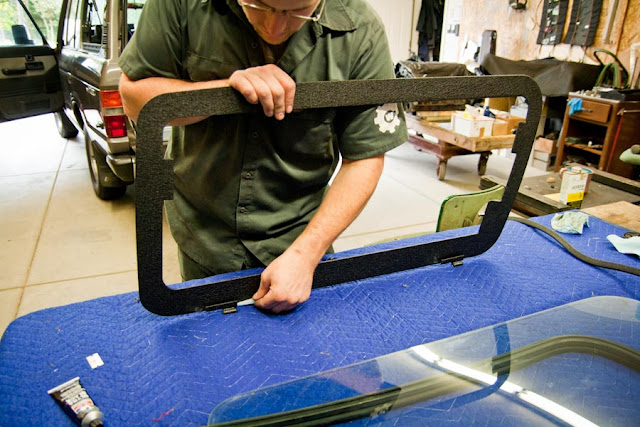
You know that it's been a long road but I just installed the first production flip window in jwalker's truck. The process went great and the motive for the install was to be able to document the whole thing for a set of instructions.

So here goes. :cheers:


It's kind of a long process with a lot of little details so the primary instructions are videos, I'll link to the pertinent ones as I go and provide an overview here. There is about an hour of video ramble if you want to watch all of it. :p
The installation itself should take about 4 hours for both sides if you are good, about 6 hours average, and eight hours typical. ;)


To start, this is still my favorite shot of the windows, even if they are of a prototype set:

IMG_7227.jpg


And how that truck sits now:

IMG_0236.jpg


And the first production set:

IMG_0221.jpg
 
Last edited:
EDIT- I have posted a striped down version of the installation instructions here:
https://forum.ih8mud.com/wagongear/740647-80-series-flip-window-installation-overview.html
They are specific to the 80 series windows but the details and small changes/updates apply to all the series


To start with here are all the tools we used that day:

IMG_0237.jpg


And an overview of what's-what:


First up is getting the glass out of the truck.
Video overview of the process:


You really just need a bunch of flat-head screw drivers and some patience.
Start near a top corner and and pull the gasket away from the body.

IMG_0061.jpg


As you do this the window will move away from the body, the objective is to start pushing the gasket underneath and outside of the pinch weld.
(you do not do this by prying, you loosen the grip by inserting the drivers and once you have enough room you start to tuck the gasket under)

IMG_0070.jpg


The corners are going to be the most difficult, you can see that it can be a bit of a balancing act.

IMG_0083.jpg


One screwdriver holding the gasket out, one (burnished one) pushing it under the pinch weld.

IMG_0093.jpg


Once you get the top edge and the top two corners tucked under you can push out on the glass.

IMG_0104.jpg


Grab hold and lift it out of place.

IMG_0107.jpg


That's how i do it anyway.
 
Last edited:
On to the new frames.

I will be sending them out mostly assembled. This makes sure I've included all the hardware, starts to seat in the gaskets so they are easier to bolt in, and gives you a direct example for how to put them back together.


IMG_0109.jpg


Video 2 for disassembly and frame prep:


I recommend taking apart just one side at a time so that you don't get the parts mixed up, there are lefts and rights for most things.
Here I am unbolting the sandwich plates. The hardware is all stainless steel and since the bolts are not easily replaced I will be putting anti-seize on the threads that need it before hand. It is a good idea to keep the "clean" hardware separated from the "dirty" stuff.

Anti-Seize can make a huge mess if you don't pay attention, keep some paper towels and brake cleaner on hand and keep up on any smudges you get.

IMG_0125.jpg


Once the frames are separated, set the inner and outer frame in place.

IMG_0127.jpg


And hold them in place with just the 4 longest bolts and the threaded standoffs that go on them.

IMG_0128.jpg


At that point the frames will be held in place but will be loose enough to get centered in the openings.
You want them centered side to side and justified towards the top, but not so much that there is not enough room for the gasket to compress once bolted in place. This is all explained in detail in the video.

Also check and double check both the inside and outside, make sure all the edge trim pieces are in place and both plates are lined up nicely. This is the only chance you have to make adjustments, once any more hardware is installed the frames are locked in place, you would have to remove all the hardware to move them a little bit. Once you are satisfied start to bolt the frame in place from the center out, leaving the corners for last.

IMG_0132.jpg
 
Last edited:
Video 3 for bolting the frames in place:


Some force will be needed to draw the frames together, a bar clamp works great, just make sure it's clean and oiled.

IMG_0134.jpg


Work towards the corners and install the hinge plates as well. These plates are adjustable but for right now we are just using them to hold the frame where it is supposed to be, we will loosen them up, and line them up, to install the window glass frame.

IMG_0138.jpg


Once all the hardware is in place, go around and snug everything up evenly, not a lot of force, one fingers worth, enough to snug the frames together and fully compress the gaskets.
Don't break the studs off!

IMG_0143.jpg
 
Video 4, window frame and latch adjustments (primary video)


Now grab the latch assemblies and loosely bolt them in place. There are lefts and rights, fronts and backs.

IMG_0161.jpg


Once they are set inplace shift over to the window glass frame.
Remove the edge trim from the frame.

IMG_0145.jpg


Snag the two little washers for the hinges (that you didn't loose yet) and head for the truck.

IMG_0147.jpg


Put the washers in place.

IMG_0149.jpg


Try to set the window frame onto the hinges.

IMG_0150.jpg


You are going to need to loosen up the bolts in order to get the hinge to line up and get the frame sitting in the opening correctly.

IMG_0151.jpg


Lots of eye-balling at this point, you want to get the window frame centered and looking nice in the opening by adjusting the hinges as necessary, once it's set, slowly bolt the hinges in place making sure everything stays lined up.

IMG_0156.jpg
 
With the window frame in place we can shift to the latch plates.
With the window latched into the latches go ahead and loosen the button head bolts that hold the actual latch in place.
With those loose, use the bolts on the inside of the frame to get the latch holder assembly lined up with the tab on the window frame.

IMG_0168.jpg


You can snug them up in stages and use a rubber mallet to tap them into alignment.


With the latch holder lined up, shift your focus to the latch itself.

IMG_0170.jpg


The button head bolts will let you move the latch all around in the holder to get it lined up perfectly with the latch tab pin.
The objective is to get the pin to engage the roller in line and centered with no friction or drag on any part. This is covered in detail in the video above.

IMG_0174.jpg
 
Last edited:
Video 5, the last of the latch adjustments and the actuator installation.


Now that the latches are in place and adjusted to the window frame we can play with the actuator.

Remove the tail and marker lights.

IMG_0111.jpg


Save the marker light gasket for the actuator.

IMG_0112.jpg


Disassemble the actuator (this is the extent of the disassembly needed) remove just the one 10mm nut in the center and the two plates will separate, thread off the washers and nuts to use for install.

IMG_0116.jpg


You may need to file the inner or outer edges of the mount holes to get the actuator to fit correctly, these holes are not all the same.

IMG_0118.jpg


Set the outer plate and gasket in place, take the inner plate, locate the short cable and put it towards the rear and bolt the two plate together.

IMG_0119.jpg


With the two hold down nuts in place install the square hole of the cam on the square stud of the actuator and bolt in place, all set.

IMG_0120.jpg
 
Video 6, actuator install and drilling for the cables.


With the latches and actuators in place and adjusted we can mark for and drill the holes for the cables.

IMG_0177.jpg


IMG_0178.jpg


IMG_0179.jpg


Snake the cables up through the holes, short one toward the back.

IMG_0181.jpg


The front one can be difficult.

IMG_0188.jpg


Slide the rubber grommet over the cable.

IMG_0182.jpg


Snake the cable into the latch, clip it in place, adjust the free play on the cable and snug the set screw onto the ferule.

IMG_0186.jpg


Set the grommets into the holes.

IMG_0194.jpg
 
Once everything is all set and adjusted the last step is to remove the window glass frame, install the glass and button it all up.


Video 7, final cable adjustments and window glass installation.


We didn't do a complete installation here since the windows needed to come out to get tinted very soon. I'll do a more comprehensive documentation of the glass install on my truck.
The only thing we really left out was the RTV sealant step, if this were a complete install we would have put a tiny bit of RTV under the top lip of the hinge like so:

IMG_0197.jpg


Then slide the glass under the tabs and set it in place.
Line the glass up with the frame, run a tiny bead of RTV along the seam between the glass and frame and instal the top lock stip.

IMG_0200.jpg


Then the rest of the lock strip, keeping it tight to the hinge tabs, working around the window, putting it tight to the other hinge tab and then working backwards to compress it into place.

IMG_0201.jpg
 
Once the frame and glass are conjoined we can put them on the truck.

Video 8, finishing up and some final notes.


Slide the glass on the hinges (make sure you haven't lost the little washers)

IMG_0203.jpg


Instal the gas shock on the top nub.

IMG_0204.jpg


Put the ring clip in immediately.

IMG_0205.jpg


Then install on the lower nub, with ring clip.

IMG_0209.jpg


Then it's done.

IMG_0210.jpg


You wont be able to slam the window shut at first, the gaskets will need to seat in for a few weeks, but then you will just be able to slam it like it was an OE feature.
Until then you will have to push directly on each latch location to compress the gasket and make sure they catch properly.


IMG_0222.jpg


IMG_0225.jpg


IMG_0228.jpg
 
And a simplified step-by-step set of written instructions.


Tools Needed:
  • Collection of flat-head screwdrivers
  • Brake cleaner
  • Paper towels
  • RTV sealant
  • Razor blade to scrape windows clean
  • 11mm (7/16") gear wrench
  • 13mm (1/2") gear wrench
  • 1/8" allen drive
  • 5/32" allen drive
  • Recommended- 1/4" drive ratchet with 10mm socket and 11mm (7/16") socket
  • Bar clamp
  • Round file
  • Marker
  • Center punch
  • Pilot drill
  • Step drill or other to go to 3/8"
  • Small screwdriver to help push grommet in place
  • Rubber mallet
  • Electric drill

Remove factory glass and gasket
  • Disassemble one side of flip window set parts, be careful of anti-seize, note hardware order, keep "dirty" and "clean" hardware separate. DONT LOOSE THE LITTLE WASHERS
  • Set inner and outer frame in pace on truck, loosely bolt in place with 4 washers and standoffs on long bolts
  • Center in opening, justify toward the top on the outside
  • Check that weatherstrip and edge trim is all in place
  • Check inside
  • Check outside
  • Check inside
  • Snug up standoffs, start bolting frame in place, starting from the center out, leave corners for last
  • Install hinge plates
  • Snug all nuts
  • Loosely install latches
Window Frame

  • Remove window lock strip from window glass frame
  • Put the 2 spacer washers on hinge pins, install window glass frame, loosen hinge bolts to get then to line up
  • Latch window glass frame into latches to hold in place
  • Adjust frame to be centered in opening
  • Slowly bolt hinges into place making sure they stay in adjustment
Adjust Latches
  • With window frame latched, loosen allen head bolts of latch catch.
  • Line up latch holder assembly with tab on window frame, bolt assembly in place (tap with mallet to adjust as needed)
  • Line up latch catch "roller" with window frame latch pin
  • Center tab for latch pin in latch notch
  • Tighten down latch button head bolts and make sure there is no drag or contact
Actuators
  • Remove tail and marker light
  • Disassemble the actuator plates by removing the single 10mm nut
  • Use marker light gasket for actuator outer plate, thick end towards the back.
  • Install actuator with "lock" symbol as desired to dictate key direction
  • Install inner cable plate with short cable to rear of truck
  • Bolt in place with the two 7/16" lock nuts
  • Bolt cam to square stud with 10mm nut
Install Cables
  • Pilot drill for cables underneath latch assemblies
  • Drill a 3/8" hole
  • Snake cables into place
  • Put rubber grommet on cable
  • Put cable through the lock collar and into the clip of the latch assembly
  • Adjust cable free-play to get them both to actuate at the same time
Install Glass
  • Remove window glass frame from truck
  • Put RTV under top lip of hinge barrel on frame (tiny bit)
  • Slide glass under lock tabs and line up with frame
  • Stand up on bottom edge, run a tiny bead of RTV along seam of glass and frame, then install top lock strip
  • Do the same around the window with the long lock strip, keeping it tight to the lock tabs and making sure the glass stays lined up.
  • Put glass and frame on truck (make sure the spacer washers are still in place)
  • Install gas shock on top ball stud, instal ring clip
  • Install gas shock on lower nub, install ring clip
  • Check window operation.
  • Enjoy
 
Last edited:
For right now these windows have to cost $1430 for the set.
I do not know if I will be able to keep making them at that rate, here is the parts list break down so you can see where the funds get eaten up:

HatchSheet04.08.13.jpg


As I talked about in the seat box thread, I will be doing these lists for all my stuff now

This is what I'm going to do for all the new stuff (and old stuff too as I get around to it) So everyone can see where the funds actually go.

I have the labor marked down as what I think they should end up taking me to make once I have some practice and figure out the best order, not what it is actually taking me to make right now. :p
I also have the time at my higher rate of $55 since it needs to (hopefully) cover all the overhead and the things that are not counted in the parts breakdown.
If I'm just doing normal mechanical stuff and not using a lot of shop resources I go as low as $35.

Any business majors are welcome to tell me how stupid my breakdown is and how little chance it stands of making a profit. :p
But now you know where the funds go at least.

And, that's what they have to be so expensive for a silly set of flip up windows. :p
With how much they cost me to make I can only afford to make one set at a time.


The first set is pictured here, I've just finished up welding the second set and they are heading to the powder coater.
So who wants to be next?

:cheers:
KR
 
Last edited:
As always my hat is off to you sir. Great work, another amazing project. I only wish I hadn't seen this the day after I realized my sliding windows are leaking!
 
Do you have any thoughts on selling them one side or the other or just as a set? I would like to have access on one side and slider on the other. Maybe someone wants to go in with me?
 
Not sure if I've mentioned that anywhere, but yeah, no problem, I figured that would be the case. Some folks will only need/want one side.

I do that with the side panels sometimes as well.

In that case though I will want to know ahead of time and build the window as one side. This #2 set is a set.
 
Would love to see an 80s version as well....would match your great tailgate lid on my truck :)
 

Users who are viewing this thread

Back
Top Bottom