I figured I'd post a thread here with some pic's & details. Hopefully it will save other electrical novices like myself some time.
I wanted to go with a dual battery setup as I'm adding an Engel fridge in the back. A winch is also planned later this year. I wanted the simplest install due to my limited electrical knowledge. After reading through all of the dual battery threads about a dozen times each I decided to go with the National Luna system. The only downside seemed to be the $375 price tag. After pricing cable at West Marine (almost $4/ft. for 6 ga) the price didn't seem so bad considering it comes with 40' of slightly heavier cable as well as the "intelligent solenoid", controller, connetctors, etc. The kit is complete, the only thing I chose to buy was some heat shrink and split loom.
On a side note, the cable supplied is 16mm2 gauge. This converts to 5ga. AWG-
AWG - metric conversion table
My first step was to install a Slee washer bottle relocation kit and battery tray from a '91 LC. Installing the NL system was very straightforward. I did steal many of my install ideas from a few threads-
https://forum.ih8mud.com/80-series-tech/175892-national-luna-dual-battery-install.html
https://forum.ih8mud.com/80-series-tech/220528-who-has-national-luna-dual-battery-setup.html
National Luna Dual battery install - Expedition Portal Forums
The entire install consists of-
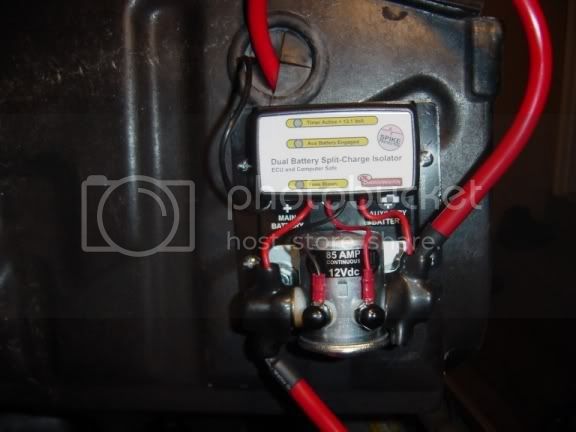
-Mount the intelligent solenoid
-Run a fused hot wire from the solenoid to each battery
-Run a ground wire between the batteries
-Run the controller cable from the solenoid into the cab.
-Connect a ground wire from the solenoid to the aux. battery
-Plug in the controller to the solenoid
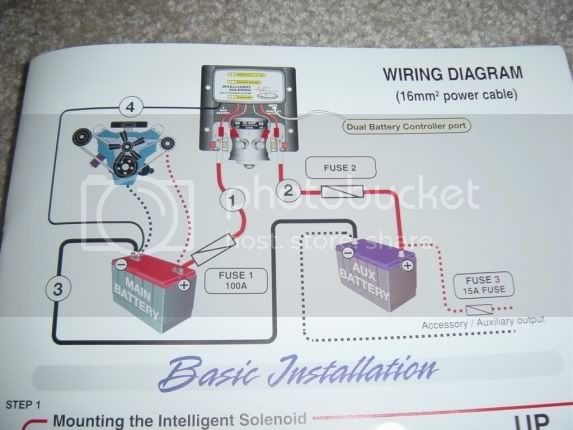
Here is a schematic - simple.

I wanted to go with a dual battery setup as I'm adding an Engel fridge in the back. A winch is also planned later this year. I wanted the simplest install due to my limited electrical knowledge. After reading through all of the dual battery threads about a dozen times each I decided to go with the National Luna system. The only downside seemed to be the $375 price tag. After pricing cable at West Marine (almost $4/ft. for 6 ga) the price didn't seem so bad considering it comes with 40' of slightly heavier cable as well as the "intelligent solenoid", controller, connetctors, etc. The kit is complete, the only thing I chose to buy was some heat shrink and split loom.
On a side note, the cable supplied is 16mm2 gauge. This converts to 5ga. AWG-
AWG - metric conversion table
My first step was to install a Slee washer bottle relocation kit and battery tray from a '91 LC. Installing the NL system was very straightforward. I did steal many of my install ideas from a few threads-
https://forum.ih8mud.com/80-series-tech/175892-national-luna-dual-battery-install.html
https://forum.ih8mud.com/80-series-tech/220528-who-has-national-luna-dual-battery-setup.html
National Luna Dual battery install - Expedition Portal Forums
The entire install consists of-
-Mount the intelligent solenoid
-Run a fused hot wire from the solenoid to each battery
-Run a ground wire between the batteries
-Run the controller cable from the solenoid into the cab.
-Connect a ground wire from the solenoid to the aux. battery
-Plug in the controller to the solenoid
Here is a schematic - simple.
Last edited: