cleaning female connectors (1 Viewer)

This site may earn a commission from merchant affiliate
links, including eBay, Amazon, Skimlinks, and others.

Joined
Feb 8, 2006
Threads
52
Messages
2,523
Location
Vancouver (not BC), WA (not DC)
cleaning female connectors - and EDIC issues

Hey all,

I was wondering if anyone has a good way to clean the female side of a 10 pin connector.

Here's the story: I just recently picked up the EDIC relay for my 1981 BJ42 from the PO. He told me it was blown/no good, but I wanted it anyway because I like to tinker with things. After doing some tests this afternoon (thanks Lostmarbles and others for posting up this process here on Mud), I realized that my relay is functioning properly - clicks at the appropriate times during the tests. So, I connect it, but nothing happens. After a little more reading, I test the EDIC motor and it seems to function just fine - spins when I jump the M terminal. Hmmm?

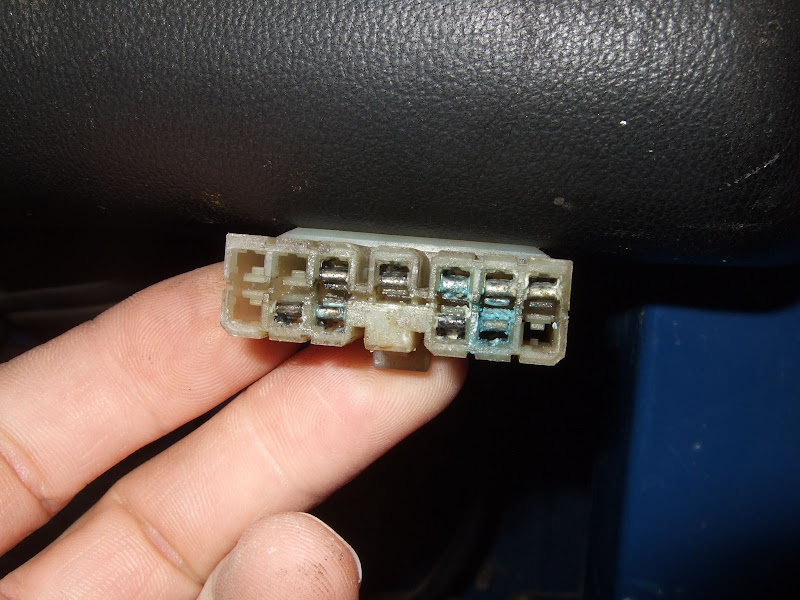
So, I start looking at the connector and see quite a bit of corrosion. I use some baking soda and water to clean up the corrosion, but now there's a gooey mess inside the female side. I used some sand paper and a small screwdriver to clean up the male side, but how do I clean out the female side? I've tried wire, but that just rubs the goo around. Sand paper just wads up and doesn't go in. I don't have a file small enough to fit inside there. So, any ideas?

I'd like to get the EDIC system working if I can. I should mention that I do not have the EDIC arm attached currently. I have a choke cable set up to kill the engine. But, with the relay attached, the EDIC motor does nothing no matter what position the key is in - no movement. That's why I'm guessing maybe the corrosion is causing too much resistance in the circuits.

EDIC%20Relay%20plug%202.JPG

You can see the corrosion inside.

And here's a video of the EDIC motor turning. Off topic, but how do you embed a youtube video?
YouTube - EDIC motor

So, any ideas?

Thanks!

:cheers:
 
Last edited:
You can use a small tool (dental pick works a treat) to move the little plastic tabs inside the connector which "unlocks" the metal parts and allows each individual one to slide out of the plastic connector. Do them one at a time so you don't lose track of what was where ;)

The youtube video looks embedded to me :meh:
 
You can use a small tool (dental pick works a treat) to move the little plastic tabs inside the connector which "unlocks" the metal parts and allows each individual one to slide out of the plastic connector. Do them one at a time so you don't lose track of what was where ;)

Never thought of that. :eek: I just kept trying to stick something in there to clean it out.


The youtube video looks embedded to me :meh:

Hmmm, interesting. I just posted the URL. It wasn't embedded when I looked at it the first time. Now it is. Oh well. Nevermind...

:cheers:

PS If anyone has any ideas about the EDIC other than corroded terminals, I'm all ears. Thanks!
 
Remove the harness and flush it with some water pressure then dry it and add some electrical grease re=install and you should be good to go.
 
Thanks for the replies. I got it pretty well cleaned up last night, at least well enough that there was good contact. It still doesn't work. With the starter relay disconnected, I can hear a click in the EDIC relay when I turn the ignition on. I can hear another click when I turn the key to the start position. But nothing moves on the EDIC motor. So, I started looking at the wiring. I remembered reading Tmarx's thread about how he had a missing wire after his rebuild. That's when I discovered that my relay has 10 wires going to the plug, and the wiring loom only has 9 wires. :hmm: Now I'm thinking I might have the wrong relay. Anyone know the proper part number for the EDIC relay for a 10/1980 Canadian Spec BJ42?

Thanks again!

:cheers:
 
Brake cleaner will clean the s*** out.
 
28590 RELAY ASSY, FUEL CONTROL
28590-57020 3B..BJ42

Not sure if this is the relay you are looking for this is the only one I see but I know there is another box under the dash which I believe is the timer and not a relay
 
28590 RELAY ASSY, FUEL CONTROL
28590-57020 3B..BJ42

Thanks Dieseler!

That's the one I got. Well, back to the drawing board. Somewhere, things aren't syncing up properly. Like I said, the relay clicks at the appropriate times, but nothing happens to the EDIC motor. And like the video shows, the motor works when I jump the M terminal. It just seems kind of weird that the relay has 10 wires going to the plug, and the wiring loom only has 9 into the plug. I'll have to do a little more research as to what this means.

Using Lostmarbles' picture below, the extra wire on the relay is the LW (blue/white stripe) which he has labeled as "unknown". It doesn't connect to an opposing wire on the loom. The other thing I noticed, the wiring loom wire colors don't necessarily match the wire colors on the relay. :rolleyes:

Granted, none of this is critical, but I would like to get it working if possible. So any other ideas are welcome!

:cheers:
12VBJ42FCRFCM.jpg
 
There is a product called "Electra Clean" or "Contact Cleaner" (those are two local names for the stuff anyway), It will disovle the green death growing in your plug without disassembly. Most parts shops or auto electrical shops will stock it.
 
I have the same problem , ie my engine will not shut off with the key . I have a cable system installed for the time being. I presume you hot wired the edic motor to make your video?. I believe the edic control attached to the side of my glove box is the problem with my edic system. I hear some very smart electrical guys have successfully tested / repaired these. You do not want to know the Price of these from Toyota if you can find one.
 
I have the same problem , ie my engine will not shut off with the key . I have a cable system installed for the time being. I presume you hot wired the edic motor to make your video?. I believe the edic control attached to the side of my glove box is the problem with my edic system. I hear some very smart electrical guys have successfully tested / repaired these. You do not want to know the Price of these from Toyota if you can find one.

Yeah, I have a choke cable hooked up right now, so its not a huge issue. But, if possible, I'd like to fix this and get it working properly, mostly because I like to have things working the way they did from the factory.

Besides, I've done the tests to the EDIC relay lostmarbles posted up here - https://forum.ih8mud.com/diesel-tec...ic-fuel-control-relay-woes-please-help-2.html -post 37. Doing all those tests, the EDIC relay worked just fine. And like I said, when I apply 24V to the M terminal, as described in post 46 of the above link, the arm moves (that's what I did in the video). So why doesn't everything work in harmony? Again, in the thread above, Tmarx had many of the same issues and it turned out to be a missing connection (brown wire) to the battery. I checked for this problem, but the wire in question on mine does have battery voltage.

I'm starting to suspect the fusible link section of wiring. I'm not sure it is properly hooked up, and it does have some interesting PO mods...

001.JPG


002.JPG


So, once again, I'm open to ideas!

Thanks for everyone's help so far! It is much appreciated!

:cheers:
 
relay

does sound like a bad relay but test it
do you have a meter or a test light?
maybe it looks inside like your connector!

Ohm through the relay and across the contacts
across the contacts should be very little resistance like .1 to 1 ohms and across the power for relay I dont know but it will be fairly high and the resistance might be written on the side of the relay

a relay can go bad in a few ways
not throwing--but clicking is a good sign
bad contacts on the switches--welded, corroded, broken
Also 1 contact can be broken and the rest good

jumper power to the relay and check power on each contact

So far you know you have power to the relay and you know the motor works---seems to make sense its the relay but also ohm out wiring from the relay to the motor and like you said you might be missing a wire? Need a schematic for that

interesting that there is a stop contact --i am thinking it might get voltage there to immediately stop the motor without any run on like old wiper motors on 40s, this puts voltage to both sides of the motor so that it freezes instantly---just speculating that it might be that way though you would have to check that per schematic

I'll go check coolers site and see if there is a BJ schem there

def use elec grease on the corroded connector or it will come right back
 
Hi Kyle.

You have a BJ42 and the EDIC system on it is significantly different to the one on my BJ40.

Rockcrawler/Alex is in a similar situation as he owns a 1977 BJ40 ...which incidentally I saw this week when I was over in Melbourne. ........ V. nice too. (So I think his good info on the relay should be taken in that context too.)

I had some BJ42 EDIC parts in my garage back when tmarx was having his EDIC troubles. And this is why I was able to offer him advice then. However I no longer have any of that stuff to experiment with.

So if you've gone back over those threads then you're actually much more "up to speed" than I am at the moment (because I tend to forget most of the stuff that doesn't apply to my own vehicle).

But having said this, from what I gather your EDIC motor (also called "Fuel Control Motor" or FCM) spins around fine when juice is applied to the "M terminal" of its connector. So does it also open-circuit the O.I, S and D wires at the appropriate positions (of the EDIC arm travel) as indicated here:

edicTestingBj42.jpg

I believe this "open-circuiting" is what tells the EDIC relay (which is also known as a "fuel control relay") when to cut the power to the "M wire" to stop the motor (when the arm reaches one of the O.I, S or D positions).

Beyond this ....... I have a vague memory that tmarx discovered the "Brown unknown wire" on the BJ42 EDIC relay was actually a live feed? (+Ve)

And to have a reliable electrical system you certainly cannot afford to have any connectors filled with the sort of green gunge you pictured ... so I suggest following the advice you've already received of cleaning that up and ensuring all the spades in all the connectors are making good/clean electrical contact.

Hope this helps.

:cheers:
edicTestingBj42.jpg
 
Last edited:
edic wiring

Found this schematic probably close but at least it will show functions

might have a prob with your oil pressure switch also
edic.jpg
 
Thanks Bsmith and Lostmarbles for your help!

I have tested the relay quite a bit. I have opened it up (it is nice and clean - the corrosion was only on the wiring loom side of the plug) and tested it quite a bit with a multimeter. All diodes ohmed out good. Also, the IG and ST contacts (?) in the lower left corner energized when the key is turned to on and start respectively. I'm not sure what the thing is in the upper left corner, but that may be what isn't working correctly. Anyone know how it is supposed to work. It seems to energize when I turn on the key to 24v, but it slowly de-energizes over about a minute down to 0v.

EDIC%20relay%20%281%29.JPG

The inside of the relay looks good. The white stuff is a little bit of baking soda/water that dripped in when I was cleaning it. It has since been cleaned up.

EDIC%20relay%20%285%29.JPG

The back side looks good also. The brown stuff just appears to be glue or something that is stuck to the circuit board.

I still need to work more on the FCM. It is still in the truck, so I think I need to pull it. I tried the test Lostmarbles posted above, but I never did get an open circuit when the arm passed the OI, D, and S positions. I'm thinking it had more to do with my ground on the body of the motor. I'll mess with it more later.

Overall, this is taking up way too much of my time. I have plenty of other stuff I should be doing to my truck, especially since its not even driveable at this point! This is where it sits currently:

002.JPG


003.JPG


Which is a far cry from where I was when I picked it up 6 months ago:

new_landcruiser0002.jpg

new_landcruiser0004.jpg

new_landcruiser0001.jpg


It had some rust issues, but now has an aluminum 3/4 tub and has been cleaned up quite a bit. But I still have a long ways to go. The EDIC relay was just the newest, shiniest object that drew my attention away from the rest of the build. :rolleyes: That's okay, though. I'd still like to get it working, but I'd rather get this thing on the road! With that said, I'll still gladly accept anyone's ideas on what my be the problem. And it could definitely be the relay, but I'm not ready to give up on it just yet!

:cheers:
 
Hi Kyle.

Certainly don't give up!!!!!!

BTW - Nice work you're doing there and that relay sure looks clean/good.

Compare it to this one that I believe Sandcruiser brought back to life:

edicRelaySandcruiser.jpg

edicRelaySandcruiser2.jpg

And here's some stuff Rockcrawler posted some time ago on his BJ40 relay (but I doubt it will be much help for your BJ42 relay):

edicRockcrawler4.jpg

Do you have part numbers for both your relay and motor? (I could maybe check them on the EPC to see if they match your vehicle.)

And if you aren't getting "open-circuit readings" when the arm passes the correct positions due to whatever reason then I think this could well account for the motor failing to stop in those positions. (So earthing may indeed be all that's wrong here?)

:cheers:
edicRelaySandcruiser.jpg
edicRelaySandcruiser2.jpg
edicRockcrawler4.jpg
 
So, I pulled the FCM off the side of the engine to test it. It was pretty corroded on the mounting bracket, so I had to kind of break it off the bracket. I hooked up 24v to the motor (M) lead and then ohmed out the other 3 leads. The OI had about 20 ohms of resistance when the arm passed over the correct position. The D spade had about 18 ohms of resistance when the arm hit the correct spot. The S spade was an open circuit the whole time. It never changed.

With that info, I decided to open up the case and see what was going on. This is what I found:

EDIC%20motor%20%284%29.JPG

There was nasty black grease jammed in everywhere!

One snap ring held in the gears, so I took them out to clean and found this:

EDIC%20motor%20%287%29.JPG

If you look closely, you can see the 4 contacts coated in grease. The back of the gear looked like this. Sorry, bad pic - its looks like copper and was green and corroded with black grease on it.

EDIC%20motor%20%286%29.JPG


So I cleaned out all the grease. My daughter lent a helping hand sanding down the bottom side of the gear for the contacts.

EDIC%20motor%20%289%29.JPG


EDIC%20motor%20%281%29.JPG

And mostly cleaned up, you can see the contacts clearly.

I also checked the brushes on the motor, and they were in great shape.

So, I put it all back together with a good dose of white lithium grease. I walked back out to the garage and hooked up the M spade to power and put a ground wire on the body of the motor. The arm moved freely, so I started Ohm'ing it out. All three had resistance of about .5 ohms in the correct spot during the arm's arc. Otherwise, it was an open circuit. Sweet! So, I unhooked everything and plugged the motor into the loom. As soon as I did that, the blower motor for the heater turned on. Huh?! Then it dawned on me that I needed to ground it. I looked at the nasty, corroded bracket that it came off of, and realized a big part of my problem. I cleaned off the mounting bracket, hooked it all back up...


And...


Sucess!!!! It works perfectly, just like God and Mr. Toyota intended!

Basically, I think the big problem was the FCM not being grounded properly. The mounting bracket was nasty. The other problem was the grease inside the motor causing too much resistance on the OI and D contacts, and completely blocking the S contact.

And a little video:

YouTube - 004

As you can see in the video, I might need to adjust the arm a little bit. I think it is off a little from where it needs to be, but the main thing is that its working!

:cheers:
 
Congratulations Kyle. Well done :clap::clap:
 
That cruiser has a great home!
 
Thanks guys!

I'm pretty happy I got this working. Like I said before, this was just the newest, shiny object that caught my eye.

For future reference, mark the gears' orientation to each other before removing them. It's this orientation that determines where the arm stops. A Sharpie would work perfectly to mark a line across both gears. I didn't and now I need to play around with getting them oriented correctly. Not a huge deal, because I'm close, but it would have been much easier just to mark it before removal. Oh well. At least its working!

:cheers:
 

Users who are viewing this thread

Back
Top Bottom