
Navigation
Install the app
How to install the app on iOS
Follow along with the video below to see how to install our site as a web app on your home screen.
Note: This feature may not be available in some browsers.
More options
You are using an out of date browser. It may not display this or other websites correctly.
You should upgrade or use an alternative browser.
You should upgrade or use an alternative browser.
April 1971 FJ40, questions and longterm build. (2 Viewers)
- Thread starter 93jspec
- Start date
This site may earn a commission from merchant affiliate
links, including eBay, Amazon, Skimlinks, and others.
More options
Who Replied?93jspec
Cruising Central Texas
- Thread starter
- #22
Did some work today, just minimal stuff to include cleaning out the garage so I could get the FJ back in before I head back to Afghanistan in a few days:
Took apart the headlight assembly and cleaned it out, got the chrome ring all shiny again (before and after)

Some notes on the Metal tech tube doors. I am very happy with the overall look and finish of the product before installation. On the other hand some things I am not to pleased with.
1.) Where the latch hits the striker, and the slots in the striker for the bolts are to far apart.
2.) Give me a tab so I can attach the arm to keep the door from swinging all the way open and hitting the fender ( I will do this myself when I get back )
3.) I understand the full wrap of the tube on the back of the door, but it interrupts the flow of the body lines...I can live with it..just being picky now.
On the other hand I am VERY VERY happy with the Man-A-Fre sliders, perfect fit. I am considering trimming about 2 inches off the bottom of the tub so I can pull these up a bit higher, Also have the completed drivers seat done.
Took apart the headlight assembly and cleaned it out, got the chrome ring all shiny again (before and after)


Some notes on the Metal tech tube doors. I am very happy with the overall look and finish of the product before installation. On the other hand some things I am not to pleased with.
1.) Where the latch hits the striker, and the slots in the striker for the bolts are to far apart.
2.) Give me a tab so I can attach the arm to keep the door from swinging all the way open and hitting the fender ( I will do this myself when I get back )
3.) I understand the full wrap of the tube on the back of the door, but it interrupts the flow of the body lines...I can live with it..just being picky now.


On the other hand I am VERY VERY happy with the Man-A-Fre sliders, perfect fit. I am considering trimming about 2 inches off the bottom of the tub so I can pull these up a bit higher, Also have the completed drivers seat done.

Sorry if I missed it, but did you get the roll bar supports for inside the wheel wells? I have read that the roll bar could be less than effective if you don't put those on.
Cool that you stayed stock with the engine and tranny
Cool that you stayed stock with the engine and tranny
93jspec
Cruising Central Texas
- Thread starter
- #24
Sorry if I missed it, but did you get the roll bar supports for inside the wheel wells? I have read that the roll bar could be less than effective if you don't put those on.
Cool that you stayed stock with the engine and tranny
I will probably make plates for the underside of the wheel well, I might think about tying that into the frame by adding some tubing to the plate and running it to the frame. Not sure right now, I have 6-7 months to research and figure things out as I finish my Afghanistan deployment.
93jspec
Cruising Central Texas
- Thread starter
- #25
Just put in an order for gears, ARB lockers, master install kits and 30 spline yokes:
Complete Master Package for Toyota FJ40 Land Cruiser:
Rubicon Tested. We Test Review and Sell High Quality Off Road parts.
Austin put together a great steal for me, he beat out everyone else.
$2492.00
Tomorrow I will be calling Bobby Long for some axles. then I will have to wait 5-6 months to begin. I hope to be able to get on here from Afghanistan, but the computer nerds on my FOB have this forum blocked for some reason.
Complete Master Package for Toyota FJ40 Land Cruiser:
- 4.88 Gears Front and Rear
- Overhaul Kit Front MKTLC-A
- Overhaul Kit Rear MKTLC-B
- ARB Air Locker Differential Front and Rear
- Toyota LC Yoke Front and Rear
Rubicon Tested. We Test Review and Sell High Quality Off Road parts.
Austin put together a great steal for me, he beat out everyone else.
$2492.00
Tomorrow I will be calling Bobby Long for some axles. then I will have to wait 5-6 months to begin. I hope to be able to get on here from Afghanistan, but the computer nerds on my FOB have this forum blocked for some reason.
My71FJ40
SILVER Star
Any Updates? Hope your back safe and sound. Hooah!
Also have a 71' and born in 71'
(Former US Army Medic, Sgt)
Also have a 71' and born in 71'
(Former US Army Medic, Sgt)
93jspec
Cruising Central Texas
- Thread starter
- #28
Any Updates? Hope your back safe and sound. Hooah!
Also have a 71' and born in 71'
(Former US Army Medic, Sgt)
Yup, got back a week ago. Have been going through reintegration and had very little time to work on the FJ. I have been driving to work though..topless and 45-50 deg out, perfect Alaska weather. I will be going on leave in about 25 days, driving down to Oregon to pick up some stuff for the FJ. Thinking rear bumper, some fenders that are in better condition and maybe a good frame if I can find one. BTW, downloaded the IH8MUD iPhone app to make updates easier.
I have decided to get bucket seats for the FJ, no idea what I am going to do with my refurbished seats. I am looking at the Mastercraft Military seats we have in the MATV's.
How it looks now:

Last edited:
93jspec
Cruising Central Texas
- Thread starter
- #29
So I decided to work on the interior, Herculiner at Lowes $69, at NAPA $99, Lowes won.
Going to Herculine the inside of the tub.
Using primarily and angle grinder, sander, and my cordless drill with wire wheels.
Typical rust being found once you start clearing off some of the paint. This is about 2 hours worth of work including removing the seats, seat belts and rollbar.
I will get more into it tomorrow. I have a four day weekend and want the liner in and the FJ drivable by Monday mornings drive to work.

Going to Herculine the inside of the tub.
Using primarily and angle grinder, sander, and my cordless drill with wire wheels.
Typical rust being found once you start clearing off some of the paint. This is about 2 hours worth of work including removing the seats, seat belts and rollbar.


I will get more into it tomorrow. I have a four day weekend and want the liner in and the FJ drivable by Monday mornings drive to work.
Last edited:

Hey Chris,
Welcome back to the AK! I just joined the site last night, I'm in Anchorage. It looks like you found a pretty clean body. Was it in the interior for years? I've had mine almost two years now but just got it out of the shop about 3 months ago.
I went through all the decisions you are looking at. Mine is actually my wife's so the goal was to be very off-road capable but also as smooth and reliable on the street as possible, plus she likes high tech bells and whistles. Where to begin? But I have learned the real question is where to stop?
I see you are thinking about buckets seats. That was one of the first things I did and worth every penny. The qualifier to all of my decisions is that we decided bone stock was not part of the goal for our build. Comfortable, safe seats transformed the driving experience greatly. Save money somewhere else, but not on seat selection.
I have always liked the idea of keeping the 2F in our rig so that it stays Toyota at heart, and vintage to some degree. But after the 35's it seems a bit under powered. The big decision is 383 SBC or gear up to say, 4.56 and call it good with the 2F. I hope we can meet up some day in the future. There are not too many of us up here.
Cheers,
Rob
93jspec
Cruising Central Texas
- Thread starter
- #32
1st coat of Herculiner in. Supposed to wait 4 hours between coats.
Sanded and repainted the fuel tank and fuel tank straps:
Last pic here has the tunnel cover and all 3 of my vehicles. 1971 FJ40, 2010 Ram 1500 (HEMI), and my 93 4Runner.
More to come, thanks for looking!

Sanded and repainted the fuel tank and fuel tank straps:


Last pic here has the tunnel cover and all 3 of my vehicles. 1971 FJ40, 2010 Ram 1500 (HEMI), and my 93 4Runner.

More to come, thanks for looking!
Last edited:
Sweet! Glad you are back safe and sound! I might be interested in your refurbished seats pending price and sneaking it by the boss. I still haven't started mine up yet this year. Too many other projects.
TK
I still haven't started mine up yet this year. Too many other projects. TK
93jspec
Cruising Central Texas
- Thread starter
- #34
Beings my Unit just got back from Afghanistan we are working half days. So when i got home I caught my wife putting on the second coat of Herculiner...she gets my vote for BEST WIFE EVER, that and she bought me two guns while I was deployed..good woman..none the less here is the progress so far today.
I resurfaced the cluster too while I was bored...
More to follow i am sure tonight after it cures enough to not be tacky to the touch.
Overall the process exactly what I expected. A lot of prep work and very little time actually applying the coating. I was pleased that their was less rust than I expected. I used basically and angle grinder with sanding attachments and a Dremel 6300 with the triangular sanding attachment. The Herculiner kit came with 1 gallon of coating, 2 rollers and a brush. It does not come with the roller pan, latex gloves, masking tape or Xylene ( I just used a spray on degreaser ). I still have 1/3 of a gallon in the can for touch ups or other things. I would recommend having another paint brush for the second coat. This job took me 5 days overall because of weather. That includes removal of the roll bar, seats, rear compartment heater, tunnel cover, and gas tank. It will probably take me about 4 hours to reassemble everything if their are no issues. I am going to let it cure for the next 24 hours in the heated garage then get into it tomorrow after work/gym.
-Once again, thanks for looking.


I resurfaced the cluster too while I was bored...

More to follow i am sure tonight after it cures enough to not be tacky to the touch.
Overall the process exactly what I expected. A lot of prep work and very little time actually applying the coating. I was pleased that their was less rust than I expected. I used basically and angle grinder with sanding attachments and a Dremel 6300 with the triangular sanding attachment. The Herculiner kit came with 1 gallon of coating, 2 rollers and a brush. It does not come with the roller pan, latex gloves, masking tape or Xylene ( I just used a spray on degreaser ). I still have 1/3 of a gallon in the can for touch ups or other things. I would recommend having another paint brush for the second coat. This job took me 5 days overall because of weather. That includes removal of the roll bar, seats, rear compartment heater, tunnel cover, and gas tank. It will probably take me about 4 hours to reassemble everything if their are no issues. I am going to let it cure for the next 24 hours in the heated garage then get into it tomorrow after work/gym.
-Once again, thanks for looking.
Last edited:
93jspec
Cruising Central Texas
- Thread starter
- #35
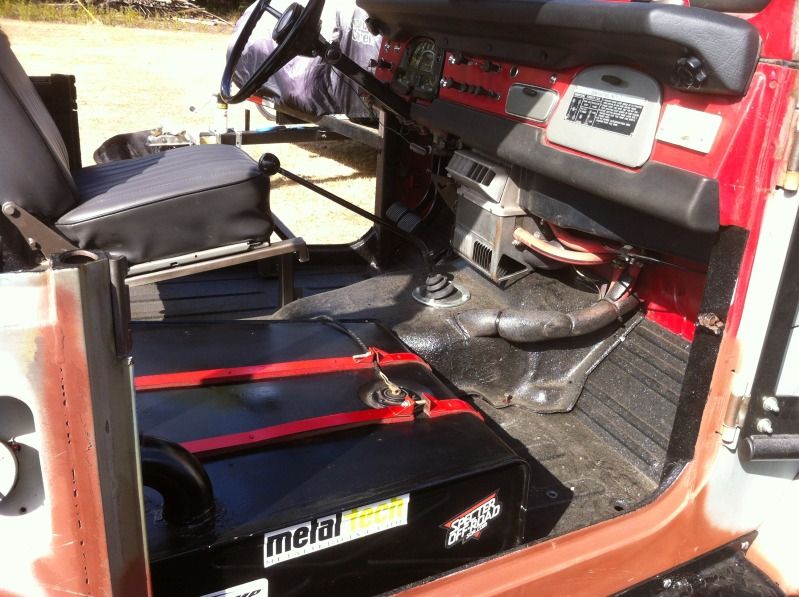
Got it all in and back on the road. I just put the roll bar in so I can drive to and from work without hassle from the MP's here on post. I will eventually pull it out and redo it as well.
If you look at some of the older interior pictures you will notice the rear compartment heater hoses went along the transmission tunnel and got int the way of the passenger, not anymore. I also took the bracket it sat on and chucked it into my scrap metal bin and mounted it lower to the floor.
-Thanks for looking.
93jspec
Cruising Central Texas
- Thread starter
- #36
Got these in today, and I have a 2003 TJ fold and tumble seat.
Going to be going on leave and drive to Oregon at the end of this month. Hope to pick up a new rear bumper with tire carrier and a few other odds and ends while I am back in the lower 48.

Going to be going on leave and drive to Oregon at the end of this month. Hope to pick up a new rear bumper with tire carrier and a few other odds and ends while I am back in the lower 48.
Nice! Like those seats! Procars are on my dream list for the Yellow 40.
TK
TK
Looks great
93jspec
Cruising Central Texas
- Thread starter
- #39
Nice! Like those seats! Procars are on my dream list for the Yellow 40.
TK
They are $162 each from Amazon...the best part for us Alaskans is the free shipping..so that was $324 to the door brother. See you Saturday.
Looks great
Thanks, it is slow work because I drive it to work everyday...just like a Cruiser should be. Things will pick up in July after I get back from leave at the end of June. Still have to rebuild my second set of axles, re-gear and lock them. Clean up the rear quarter of the frame a bit and probably get some bracing welded in there. Then put the SOR lift, power steering and disk brake conversions. I will be picking up my Longfields and a rear bumper/tire carrier while on leave in Oregon.
-Thanks for looking. Suggestions and ideas are always more than welcome.
93jspec
Cruising Central Texas
- Thread starter
- #40
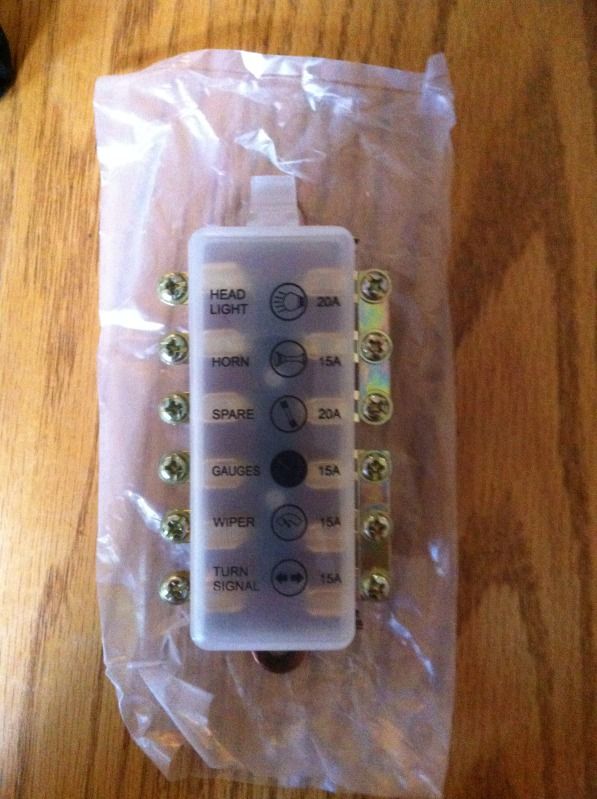
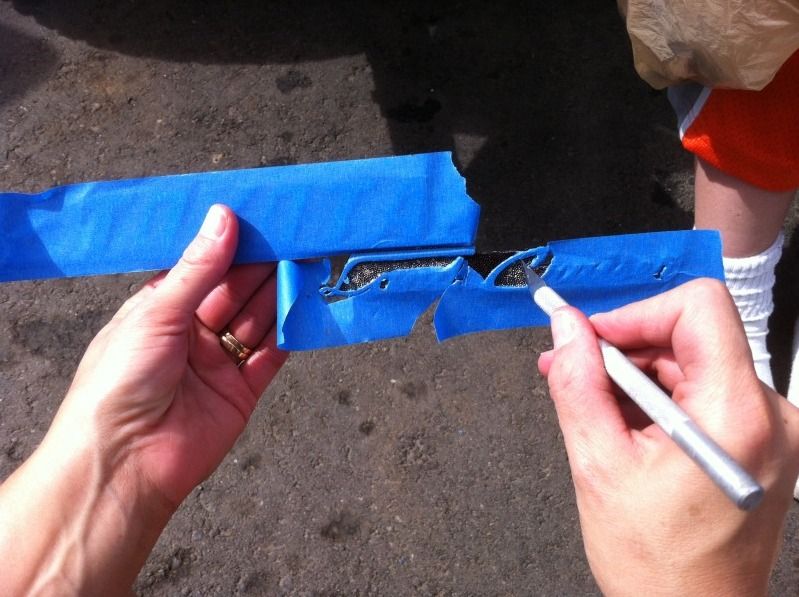
I had the new fuse block I won off ebay come in today and decided to fix something that was bothering me. I got the wife out and she worked on the apron emblems while I redid some wiring...
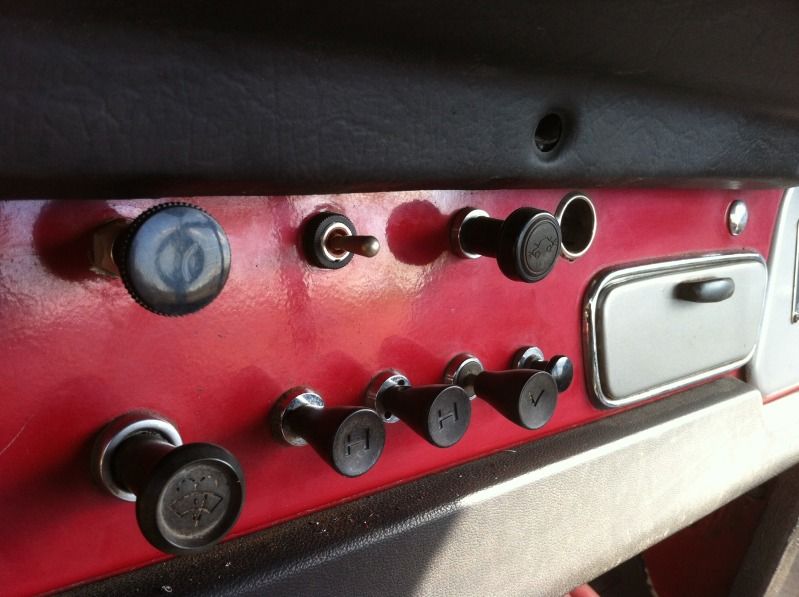
In this picture I moved a switch to my electric fuel pump. It was a unattractive switch that you can see in earlier pictures. I had an older toggle switch that I moved next to the choke. If you look at this picture the little chrome button is where the switch used to be.
Here a few shots of my wife's handy work, when they have dried enough for me to remove the tape I will post those pics.
****UPDATE**** Finished working on the emblems.
This is all the work ahead of me still, shelf with nothing but parts for the FJ, on the ground to the right are the leaf packs. Not pictured are the new wheels that are under a work bench.
...and I got it almost all the way back together...
Thanks for looking, more to come in the next 10 days before my drive to the lower 48.
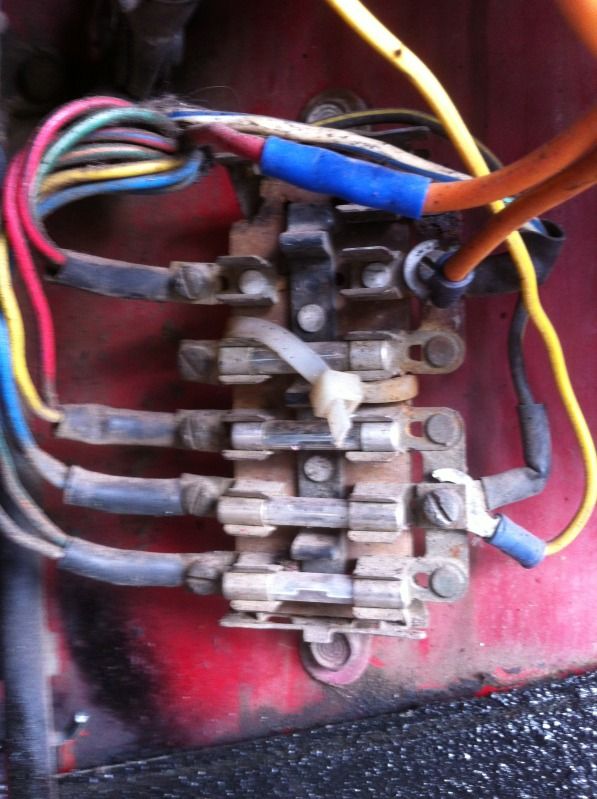
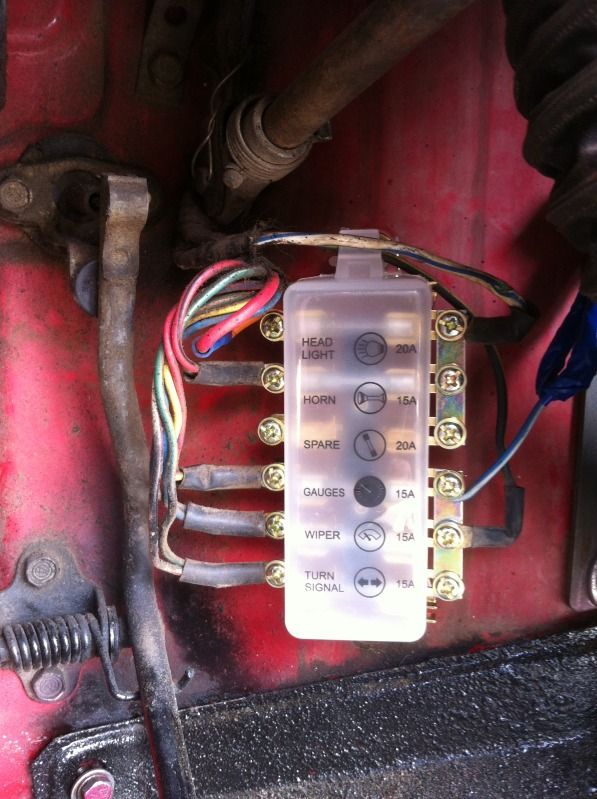
In this picture I moved a switch to my electric fuel pump. It was a unattractive switch that you can see in earlier pictures. I had an older toggle switch that I moved next to the choke. If you look at this picture the little chrome button is where the switch used to be.
Here a few shots of my wife's handy work, when they have dried enough for me to remove the tape I will post those pics.
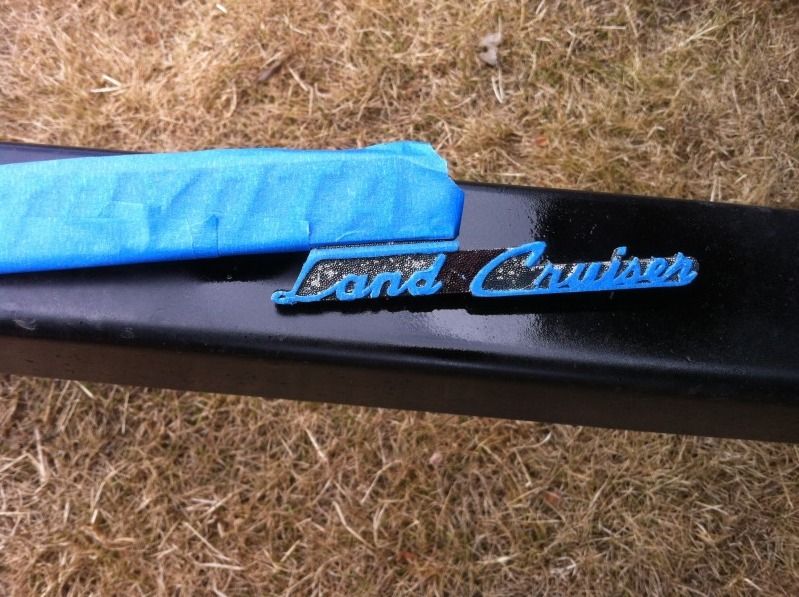
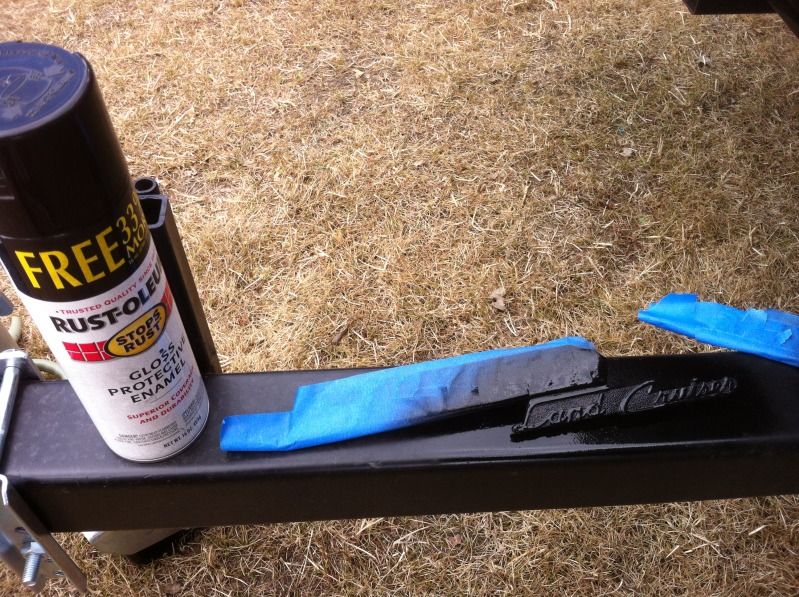
****UPDATE**** Finished working on the emblems.

This is all the work ahead of me still, shelf with nothing but parts for the FJ, on the ground to the right are the leaf packs. Not pictured are the new wheels that are under a work bench.

...and I got it almost all the way back together...
Thanks for looking, more to come in the next 10 days before my drive to the lower 48.
Last edited:
Similar threads
Users who are viewing this thread
Total: 3 (members: 0, guests: 3)