1976 Jeep CJ5 Resto-Mod or How to spend your children's inheritance before you die... (1 Viewer)

This site may earn a commission from merchant affiliate
links, including eBay, Amazon, Skimlinks, and others.

Joined
Jul 18, 2015
Threads
20
Messages
602
Location
Canton, Michigan
My never ending project that started 19 years ago, and is still not complete. Here's the agony and the ecstasy....

Project started as the classic $500 Jeep I towed home in December 1996:
BeforePic.jpg


I scrapped the body, and picked up a 'new' OEM steel tub from Willys-Overland in Toledo. This was welded up from NOS stampings. The fenders, dash, and windshield frame are all aftermarket (Taiwan) stampings. The grill is a genuine Jeep (Chrysler) item. Hood is the only remaining body part from the original Jeep. The corners and rockers are from 'off your rocker'.
TopandTopless.jpg

I've also recently added highback seats and a tilt column (no pics of that yet):


I had the stock frame boxed and a six-point roll cage built (Performance Off-Road in Alexandria, KY) along with rock sliders, although I don't have a pic of the tub with the cage installed.

The axles are stock narrow track Dana 30 / AMC 20. I converted the front to disc brakes using parts off an 84 CJ. The rear has Moser 1pc axles and 11" drums. Both have been regeared to 4.56 and have ARB lockers with stainless steel lines. They're hung on a BDS 2.5" SUA lift with ConFer 3/4" shackles. It's riding on a set of 32x11.50x15 TSL/SX tires, which are a disappointing 30.5" tall. Gonna go to a 34x9.50x15 TSL for replacements. Or go metric with 16" wheels.

Using the M.O.R.E. mounts caused some 'issues' with the stock skidplate/crossmember. I ended up ordering one from Throttle Down Kustoms and having to custom machine a new stabilzer stud because the Energy Suspension trans mount is 'taller' than a stock mount:
Skidplate.jpg


TorqueArmStuds003.jpg


It also placed the clutch fork arm real close to where the combination valve was supposed to mount:
MotorInFrame004.jpg


I ended up relocating it to get better clearance:
PropValvePlumbing001.jpg


Also had to 'cut the trans opening a bit':
JeepClutchLinkage007.jpg


All the brake lines are stainless steel that I purchased from Inline Tube (along with the combo valve). I'm debating whether to go vacuum or hydoboost. Money is naturally a factor.

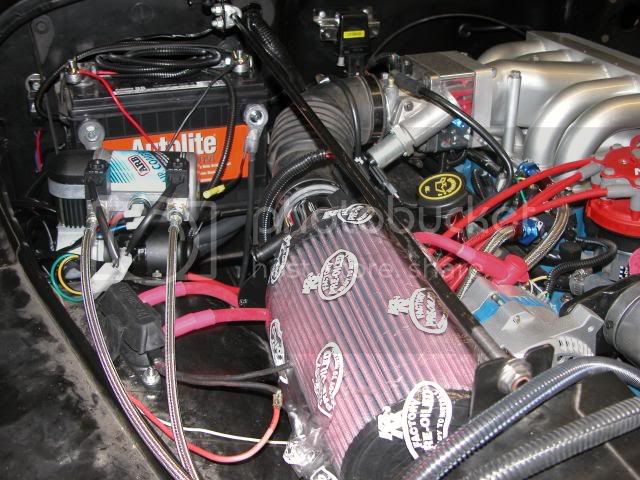
The motor is a Ford Racing GT40 5.0L Crate Engine. One of my 'better' purchases off eBay. It came with the GT40 tubular manifold, B cam, 65mm TB, 24# injectors (and a whole lot of other Mustang stuff that got sold). I added the Ford Racing F-150 headers (had them Jet-Hot coated), and the Saginaw PS pump conversion was done with a bracket from Wild Horses and a Ford Racing AC eliminator kit. I removed the smog pump and smoothed off the bracket. The alternator is a 160amp unit from RJM Injection Technology as is the computer harness. I'm running a Goodyear 74.75" serp belt. The starter is a mini PMGR I picked up locally:
Motor003.jpg


HeaderProblems002.jpg


WiringProgress005.jpg


I'm hiding the ECM (A9L) behind the dash above the heater box (which was totally rebuilt and upgraded to a 3spd fan):
ECMPlacement001.jpg


The VSS is mounted on the firewall and connected with two cables from Lokar. You can also see how I Hack Fab'd the stock Mustang throttle cable:
VSSInstall007.jpg


I hid the Inertia Switch inside the Tuffy Glovebox:
InertiaSwitch.jpg


The transmission is a Ford T18 that I picked up (literally off the ground at Stevenson's in Highland-Damn I miss that place!) for $35. It was rebuilt, the stock CJ T18 shifter adapted to it, and I used the Jeep T18b mainshaft along with an adapter from Advance to mate it to the rebuilt, TeraLow'd, and twinstik'd Dana 20:
TrannyandT-case.jpg


The clutch is a LuK 11" pro gold. I Hack Fab'd up a clutch linkage bracket for the z-bar which allows me to use the stock Jeep CJ mechanical clutch:
ClutchBracket003.jpg


Here's how I worked the return spring issue:
ReturnSpringBracket004.jpg


The custom intank fuel pump for my TrailQuest 23gal tank (not a 'bolt on' by any means) was Hack Fab'd from a stock Jeep CJ pickup/sender and a stock Mustang unit (another eBay item with a 255lph pump):
FuelPump006.jpg


I was going to use stainless hard lines along the frame, but they proved too difficult to bend. So I went with stainless braided line from Russell and an Aeromotive inline filter:
FuelSystemPlumbing003.jpg


FuelSystemPlumbing001.jpg


Lot's more to do.......
 
Last edited:
Summer 2006...

Dealing with the mess:
WiringProgress006.jpg


I purchased the aftermarket replacement speedometer. What a pos. Sent it right back. Ended up finding a used OEM and taking the guts out of my 76's and putting them in the used case. My original was rusted through in one spot, and the fuel/temp gauges were shot. This worked out much better. Still looking for 'the right' oil pressure and voltmeter. The aftermarket ones are also crap...Sent those back too. Will probably use either Autometer or SW. Leaning toward SW as they were who Jeep used as a supplier. Had I to do this again...I would have went total custom dash. I just don't want to change directions now.

Finally, Finally got the intermittent wiper conversion to work. Turned out it was a bad (brand new, aftermarket, OMIX) 4 wire motor. I sent that back and although I've got a real nice used original....I want what I paid for. Or my money back.
 
Last edited:
I managed to get the front fenders/grill installed before I took the header off my son's 400EX at SLSD (Silver Lake Sand Dunes) on 9/15/2006.

This is what a broken collar bone looks like:


The two broken ribs also added to the pleasure...

FrontEndPics001.jpg


Sorta set back the 'plan' to haul it over to the exhaust shop by the end of the September. Looks like I might get it over there in another week or two.

I did manage some work this past week (broken collarbone/ribs and all). Got the Coil bracket Hack Fab'd using a stock Mustang one:
CoilMount001.jpg

CoilMount002.jpg


I cut off one of the 'legs' and bent it into a 'L', then welded it to the original. It made a quick trip through the blast cabinet and a coat of POR-15 to seal it up.

The MAF posed a different problem as I wanted to use the stock Mustang tubing. I had an aftermarket MAF bracket that was made out of 1/16" (12ga?) steel that I cut and massaged with a BFH to fit the contour of the inner fender. When I got the height correct, I clamped it and welded it back together. It's made the trip through the blaster, but my dang shoulder hurts too much to take it apart again tonight. Tomorrow it'll get a coat of POR-15.
MAFMount004.jpg

MAFMount005.jpg

MAFMount003.jpg


I've got to design a shield for the K&N filter so the fan doesn't cause problems. Should be a simple thing to do with some stainless or aluminum sheet to shield the motor side of the filter.
 
Last edited:
Got outside for a few hours and after debating the various options decided to just bolt the damn compressor to the inner fender. Here's what she looks like:
ARBInstallation002.jpg


ARBInstallation003.jpg


I ended up calling ARB USA tech support again because the directions weren't specific as to which way to put the solenoid on. They're stamped with a '1' and '2' each side. The '1' goes toward the compressor. In the second pic you can make out the '1' on the back side of each solenoid.

The compressor does vibrate the fender a bit when it's running, I might get a piece of 1/4" rubber to isolate the metal base from the inner fender. Haven't tried the actual lockers yet, perhaps tomorrow I put the jack under the axles and give it a shot of air...
 
I worked the ARB harness into the tub and finished up the RJM alternator charging kit:
ARBSwitches.jpg


And no...They aren't going to stay looped over the column. Got to Hack Fab up a switch plate.

AlternatorCable.jpg


AlternatorCable001.jpg


I'm getting the wiring organized right now. I'm going to need to fabricate up a couple battery cables as the stuff I got from Murray's isn't gonna cut it.

I got my son to come over and we put the old hood back on:
Hooded.jpg


Hooded001.jpg


Just a temporary situation until I can pick up a good used one. It'll help protect things when I'm towing it to the exhaust shop and the driveshaft shop.
 
Couple new developments:

Check out the custom side terminal studs my son machined for me:
BatteryCables002.jpg


The ones that were available on the aftermarket were just a bit too short. I'll be hooking up the ARB, Fuse Panel (check the Maxi fuse attached to the battery box in place of the original fusible link), and ECM power wires to them.

Also check out the way overkill 2/0 cables and how I ran power to the other side of the CJ:
BatteryCables003.jpg


BatteryCables004.jpg


BatteryCables005.jpg


I attached the headlight brightener harness to the terminal studs and I'll also use it for the winch and any additional auxiliary lighting relays.

The really 'sick' part is that the pics don't show the 'Hack Fabrication' lettering that was printed on the cables by the company I purchased them from.

Just a bit of 'Hack Humor'....

I also repaired the horn button on my sport steering wheel...Ya'll know the plastic lens that gets cracked/broken? Well I located a company in NY that sells watch crystals in various sizes, they aren't the fit of the original, but with a bit of Pliobond adhesive and some Permatex black....Just like new:

HornButton001.jpg


Next stop...Exhaust shop.
 
Project has hit another wall. I did manage to get it tow'd over to Keith's Muffler for the exhaust system:
ExhaustSystem001.jpg


ExhaustSystem007.jpg


ExhaustSystem003.jpg


ExhaustSystem006.jpg


ExhaustSystem005.jpg


It's 2.5" head pipes into a 3" pipe, running through a 3" Turbo muffler. Then out the back with a 3" tailpipe. Only complaint was the location of the O2 sensor on the driver's side. It's a bit low. I'll probably get it re-done when I pull the body next year for paint. Otherwise, good job and decent price for a 'custom' exhaust fab.

Added a bit of 'bling' to the driver's side plug wires:
WireLoom.jpg


I couldn't get the passenger side to work because the MSD wires I got were a few inches too short. The 'critical' side was the d/s because the wires were laying on the headers. I'll fix the p/s later...

Waiting for the custom 'Extreme' radiator to arrive via FedEx this Friday. Also I've decided to go with the hydroboost brake system. Just need to have Van at vanco give me a call...He was having a pre-Christmas sale with $100 off. Which will help me also get the dang power steering plumbed, as his kits include all the hoses and fittings for the install.

I haven't gotten the courage up to put gasoline in the tank and pressure test the fuel system. I was really hoping that the weather would get into the 40's so I could roll the heep out into the driveway and do it. I don't want to 'light up' my house for the holidays...At least that way.
 
Okay, I finally got a break from snowblowing the neighborhood, and the outside temp is where I can warm up the garage a bit. I spent yesterday chasing all over the tri-county area looking for 'that part', and found it in Troy. Anyway, I bent up some prototype power steering tubes:
PowerSteeringTubes010.jpg


PowerSteeringTubes009.jpg


PowerSteeringTubes008.jpg


The problem I'm facing is that the adapter fittings for the flare to -AN don't 'fit' under the lower radiator tank. That's why I need to Hack Fab up some custom ones.

I FedEx'd them off to Gene's Automotive (Tubes N' Hoses) in MO. He'll machine bend up a duplicate set in stainless steel, and braze the -AN fittings on the ends.

All this so I can plumb in the hydroboost set up from Vanco....And, no I don't have the originals. And no, the aftermarket replacements wouldn't work either. Hence...Hack Fab to the rescue.
 
I got the finished tubes back from Gene's Tubes N' Hoses in Missouri. He bent up a set out of stainless steel, silver soldered the -AN ends on:
PowerSteeringTubes.jpg


PowerSteeringTubes012.jpg


I'll Hack Fab up a bracket to support them along the frame rail when I tear the CJ down for paint.

Now I'm dealing with the brake issue. I just ordered the fittings to run braided line from the master cylinder to the prop valve. They should be here in a couple of days. Then, it's start measuring and making up the lines.

Gotta get this big hunk of iron mounted today:
Hydroboost003.jpg


Hydroboost001.jpg


Well, I managed to get the hydroboost installed on the firewall:
HydroboostInstall001.jpg


The -AN adapter fittings on the prop/combo valve were not too difficult to install. Just took some creative gymnastics. I had to order the -3AN DOT approved lines, so it'll probably be next week before they come from Missouri. I did get one of the power steering lines fab'd:
HydroboostInstall006.jpg


But I've got to wait for the shop to get some more SS braided line in. Hopefully tomorrow.

I'm finding that it's a bit 'tight' down by the prop valve:
ReturnSpringBracket004.jpg


So I'll probably take the clutch linkage out before I start wrenching the fittings into the valve.

I've got to give a ton of props to John at Plymouth Rubber and Transmission. He helped me with the SS hoses. Here's what got done today:
HydroboostInstall008.jpg


HydroboostInstall009.jpg


HydroboostInstall011.jpg


I'm waiting for the inline power steering filter to arrive UPS from Texas. So when it shows up, I'll splice it into the rubber line. When the master cylinder to combo valve lines get here from Missouri, I can 'think' about bleeding the brakes.

Hope to do an engine start before the end of this month....
 
Got the DOT ss brake lines on Monday:
HydroboostInstall012.jpg


These have a clear vinyl cover over the stainless steel braid. I also got my inline power steering filter, which I'll splice into the rubber return line. After that, it's figure out the radiator hoses, fill everything up with their specific fluids, add 6 gallons of premium to the tank...And try to start it up.

Well, I determined that the stock Mustang mechanical fan was not going to work. It's too big, and actually hangs down below the lower radiator tank. So, it's time to think electric.

Went to Scrap Busters and loaded up a wheelbarrow full of fans. I got a Contour dual fan, two 3.8L Taurus fans, and two T-Bird (3.8L & 4.6L) fans. The Taurus fan could work with some Hack Fab'n to the shroud. Here's what I was thinking: Taurus fan, CJ shroud:
TaurusFanandCJShroud001.jpg


Put them both together:
TaurusFanandCJShroud002.jpg


Looks factory. There would be a bunch of trimming to the Taurus shroud, and then some 'filler', either vinyl or rubber, to bridge the gaps. But it might work. But it's a real power hog.

The T-Bird fans are 18" fans. Way too big for my 16" radiator core. But I bet they really move the air.

Now comes the Contour fan:
ContourFan001.jpg


ContourFan002.jpg


Damn that's sexy! And only a minimum of trimming:
ContourFan008.jpg


ContourFan011.jpg


ContourFan010.jpg


It slid into my Extreme 4-row radiator (core has been offset 3/8"). And fits 'like a glove'.
ContourFan012.jpg


I'm researching both the DCcontroller and the SPAL controller. But right now I've got the fan torn down for cleaning, some additional trimming, and Hack Fab'n up the mounts.

Well, the Delta Current Controller was a no go. If anyone is interested as why, send me a PM and I'll tell you the 'story'.

So... Flex-A-Lite to the rescue. Their new controller will work with fans up to 35amp continuous draw. More than enough for my dual Contour fans, and probably enough to run a 3.8L Taurus fan. Here's some pics of the install:
ContourFan019.jpg


Mounting the controller:
ContourFan029.jpg


Wiring/placement of the 30amp Maxi fuse for the controller (other is main power fuse):
ContourFan027.jpg


The FAL controller uses a regular temp probe, which I could insert into the water neck on the 5.0L:
ContourFan026.jpg


Routing the switch wires:
ContourFan032.jpg


A bit of conduit to finish it off:
ContourFan038.jpg


Switch and lights mounted:
ContourFan037.jpg


The controller will allow for an 'Always Off' and an 'Always On' position. It works by grounding the unit. I wired it to a DPDT switch with a yellow light for 'On', and a red light for 'Off'.

The FAL controller uses PWM to soft start the fan. It basically 'hits the motors' with a brief pulse of voltage to get them started, then gradually brings up the power. No need for relays. Downside: It makes a 'rattling' sound when it first starts. I don't think with the engine running, that I will ever hear it.

I also got the radiator hoses fitted, dumped three gallons of coolant in, and I'm just about ready to attempt an engine start.
 
July 2007....

IT'S ALIVE!!!!!!!!!!!!


And now it's dead.....

I got is started. And had it running. I actually did this four times... Now it won't start. However.... It sounded really good! Probably something easy (naw, probably something expensive). But for now I'm having :
cigar.jpg


And a lotta:
HomerWoo-hoo.jpg


Tomorrow I'll toss something to the Jeep God... Probably my neighbor's barking-ass dog....
 
Last edited:
Finally got the CJ5 over to JCR Offroad on December 6, 2008, for a list of things that I either couldn't do, didn't want to do, or just didn't have the time/equipment to do. The trip there was uneventful as the snow hadn't fallen, and I pulled it behind my Blazer with the towbar.

During the summer of 2008, I picked up a 'new' (1987) Warn 8274:


So this just had to be put on the front.

The trip to pick it up went like this:
It started out at 9AM to get the u-haul trailer: Covered with snow, lights weren't working, three times as much safety chain as you'd ever need. Two hours to Kazoo to get the CJ, stop for gas 1/2 mile before the shop, have problems with a gas pump (and the dumb toothless biotch behind the counter), move to another pump and fill it up.

Get to the shop at around 1pm, shut off the Blazer, go inside to check on the CJ (they're finishing up the tow bar brackets, so I snap a few pics. Then I go outside to position the trailer for easier loading.... Blazer no start. Cranks, but no start. Daryl and Brian work on it, still no start. By this time I've called my brother (who lives in Tecumseh) to come rescue me with his pickup and he's on the way. It's 2pm now.

We mess around with the Blazer for another 40 minutes, but it's getting late, so I go inside and call AAA for a tow back home. They cover the first 100 miles, so I have to pay for the extra 30-40 miles. AAA says an hour. It ends up to be two. In the interim my brother shows up with his Chevy PU, we hook up the u-haul (thank God he has the 7 to 4 converter plug), and position it for loading. The CJ comes out of the shop with Daryl at the wheel (under its own power...WooHoo!), and the front wheels start to skid. Brakes are sticking. Of course the snow/ice in the parking lot isn't helping matters either. So Daryl and I messed around with them, don't come up with a short term resolution, and it's getting around 4:30.

AAA shows up, I go to put the Blazer in neutral so he can winch it up on the flatbed, and I think: Hell I'll try and start it. You guess it: Started right up. Driver asked what I wanted to do. Yeah, 4:45pm getting dark, snow on the way. No way was I going to drive it back home. I told the driver he's gonna tow it, I'm not going to trust it now. I toss the driver a $20 and tell him to get dinner on the drive back to Kazoo.

In the mean time we've hook up the winch, thinking that we might have to winch the CJ up onto the u-haul. Daryl drives the CJ out into the lot, he get's it lined up and drives it onto the trailer. Where we find that the front wheel nets/tiedowns aren't long enough to work with my 32" tires. Even though I SPECIFICALLY asked the guy if they would work on my 32" tires, and he told me they would work on 17" truck wheels. These wouldn't work on 14" trailer rims. Luckily, my brother carrys all sorts of crap in the bed of his truck and he had three heavy duty straps that we used to span the difference.

Two hours later (and about 400 deer sightings-no shortage of whitetail between Battle Creek and Jackson) we are in front of my house on the packed snow over ice covering the street. I jump aboard, fire up the 5.0L, and attempt moving the CJ off the trailer (it didn't want to move - front brakes). Finally get it off, then several attempts (and some floor dry) to get it up the small 'dip' onto my clean driveway. Too bad the last 'professional shop' that did the exhaust didn't leave adequate room for the front driveshaft, 4WD would've been handy with sticking front brakes. Which is what I believe is the problem. Hell, the rebuilt front calipers have only been on the CJ for ten years without any brake fluid in them. Probably will have to R&R them. Anyway the ARB locker in the rear functions well. As does the SBF making a nice roar in the quiet 'hood at 7PM. It's resting comfortably in the garage again.

Anyway, I'm super happy with the work the shop did. Here's some pics of the new winch bumper, and the reworked rear tire carrier with Jerry Can and Hi-Lift mounts:
JeepBumper003.jpg


JeepBumper004.jpg


JeepBumper002.jpg


JeepBumper001.jpg


Trans Cover (Sweet):
TransCover001.jpg


TransCover002.jpg


They also cut the rear spring perches, spun the axle and set the pinion angle for the new Tom Woods CV driveshaft (I've got a new TW front one too-just not installed. See above.). And a bunch of 'little stuff'.

:thumb: JCR Offroad. These guys do good work at a very reasonable price. They'll be seeing my CJ again this spring/summer.
 
Last edited:
Fast forward November 2013...

Yep. Over five years since my last update on the 'Never Ending Project'. I debated with myself for the last couple of years whether to sell the project, or just give it away. Considering the value of an unfinished CJ5, and the amount of money I've burnt through, selling it would be comparable to giving it away.

Since I returned to working full time in 2008 (after retiring in 2005), I'm working rotating days and shifts. Not a ton of extra time to dedicate to completing the project. I looked at a variety of shops to finish it up for me. Checked out one in the Lapeer area, but when I was almost ready to have it moved there, the IRS came knocking. Ouch. Another couple of years went by, and the Jeep started to look like a shelving unit.

Decided to 'pay the band', and went with these guys:


The owner, Dave, came by last November and loaded it up.

Fast forward and some progess:

Body removed from frame and waiting:


Tub being worked on:


Bedliner sprayed inside and underside. Difficult to see, but driver's side rear wheelwell has been modified to allow seat to move back further.


Custom dash from DD Fab:


Custom gauges from Autometer Custom Shop:


Jeep Natural Green Pearl:


Still needing color: Grill, Windshield frame, Tailgate, and numerous small parts.

Still needing bedliner: Front/Rear bumpers.

Getting ready to put it back together:


More progress:


Winch installed and wired with quick disconnect:


Working on the dash:


Back to the 70's:


I believe those yellow smiley covers are going to have to go....

Looking like a Jeep:


Got a top:

 
Last edited:
Still lots of little things left to finish up. Caster angle was non-existent. -.3* and -.6*. Factory spec is +5* to +7*. Mechanic said it liked to 'dart left and right' while he was testing it and calibrating the speedometer. Luckily he didn't need to go above 30 mph and experience 'death wobble'. I ordered a set of 6* steel shims from: Axle Shims | Camber | Caster | Axle Wedge | Custom Parts | WFOConcepts.com. Hopefully that will have the CJ tracking straight.

I also ordered this kit: RipTech Engineering: 1968 - 1986 Jeep® CJ - Basic Wiper Upgrade Kits. The stock CJ wipers don't 'park' flat. Rather they park like this (but on the passenger side - these are 180* off at the motor pivot):


The kit will allow them to lie flat when parked (not my CJ):


Anyway, seat/shoulder belts are installed, I have some roll cage padding on order for the bar behind the seats (that would be a serious/fatal head injury waiting to happen), and a couple other 'nick-nacks' on the way.
 
Picked up another Warn 8274:


This one needs the full resto:


I'll add a resto thread to the growing number when I get it done. currently it's fully apart awaiting my attention:


I'm going to mount it on this portable unit I got from davesport.com


That's some fine work! I'm curious why you went with the Ford motor, seems like most people go the GM route.
 
Decided on the 5.0L, because:

There are a lot of Chevy powered CJ's out there.
Used Chevy engines (in my area) were more money than the Ford.
The distributor is in the front on the Ford, yielding more room against the firewall.
Parts are plentiful (and reasonable) for the 5.0L engines.
The EEC-IV MPI EFI (lot's of acronyms in the EFI world...), is simple and easy to adapt.
The Ford Racing 5.0L with the 'B' cam, 24# injectors, and headers, is rated at 345 horsepower. More than enough for a CJ5.
The Ford A9L computer is easy to 'Hack' using aftermarket tuners. The present shop has put a good tune on it (CJ on the dyno):


At one time I had two used 5.0L HO Mustang motors:


But after weighing the cost to rebuild them, I decided on a crate engine. When the one I have showed up on eBay, I got in touch with the seller, made the deal, and drove to Germantown, MD that weekend and picked it up. The engine had very little miles, he (old dude like me) had installed it in his 1986 Mustang convertible, and got rear ended. Insurance company wouldn't give him crap for the vehicle, so he parted it out. The bonus was all the Ford Racing stuff I got with it: GT40 aluminum heads, upper/lower intake, injectors, MAF, etc. Saved me a boatload of money over having to 'piece meal' one together out of the two used engines I had. Had I known he had a NEW Vortech V-2 supercharger also for sale, I would have been temped to buy that too. When I pulled the oil pan, it was in like new condition. Good deal for a bit under $3,000.

BTW: I lived in Rock Island, IL a few lifetimes ago. Taught school there 1976-1977.
 
Last edited:
Picked this up:


Kenworth gear shift lever boot. Heavy duty, unlike the aftermarket crap sold for Jeeps.
 

Users who are viewing this thread

Back
Top Bottom