SAS'd 90 anyone??? (1 Viewer)

This site may earn a commission from merchant affiliate
links, including eBay, Amazon, Skimlinks, and others.

Joined
May 5, 2014
Threads
1
Messages
13
So I decided that I wanted more from my shorty "Dirty Gal" than she was willing to give so now I am on with a Solid Axle conversion. I am using 80 series axles and had hoped to use the 80 transfer box to bring the drive to the front axle down the correct side.

Well 80 series transfer case was a no goer. There was far too much to alter and adjust to make it feesable to use so I went for a surf one. Now when people tell you that they just bolt on DO NOT believe them. First things first you will need a 40mm minimum body lift. Our transmission tunnel is shaped to the passenger side to allow the transfer box to fit so coming down the other side the isn't room. Thankfully I have the lift. Next there is the final bearing on the output shaft of the gearbox which needs to be swapped over for the one from the surf box. Then there is the fact that the selector fork in the adaptor box in much thicker on the surf and has to be ground down to fit. Both the gear leaver and transfer lever are much further forward so centre console will need to be rethunked.

But all that aside it's in. This does mean that I loose full time 4wd but that's not a massive issue. might even help out the fuel economy. lol. So is the rear axle. Ride height is a little higher than I had hoped. I can't remember what everyone else was measuring but from the top of the rim to the bottom of the fairing it is 53cms.

Fitting the rear was relatively straight forward ish. Lower control arms needed to be shortened 150mm, rather than shortening the upper by the 100mm they needed I made new brackets for them on the chassis. Panard rod is a bit of a cobble at the moment. It needed to be shorter than the 80 but longer than the 90 and the 80 one won't fit into the chassis end so I went half and half but will rose joint it and make it adjustable at some point. Shocks were fine and a straight swap over but springs have been an issue.

The 80 rear springs are far to wide to fit in the top spring cups and the front 80 ones I have been using on the back of my 90 are too narrow at the bottom to fit the cups on the 80 axle. Solution was to make some new cups for the axle.

Everything is just cobbled on at the moment but will be all strengthened up when the axle comes back off for blasting and paint. (I'm thinking bright green.)

Anyway I think that's about it for now. unless you would like to see some piccies.
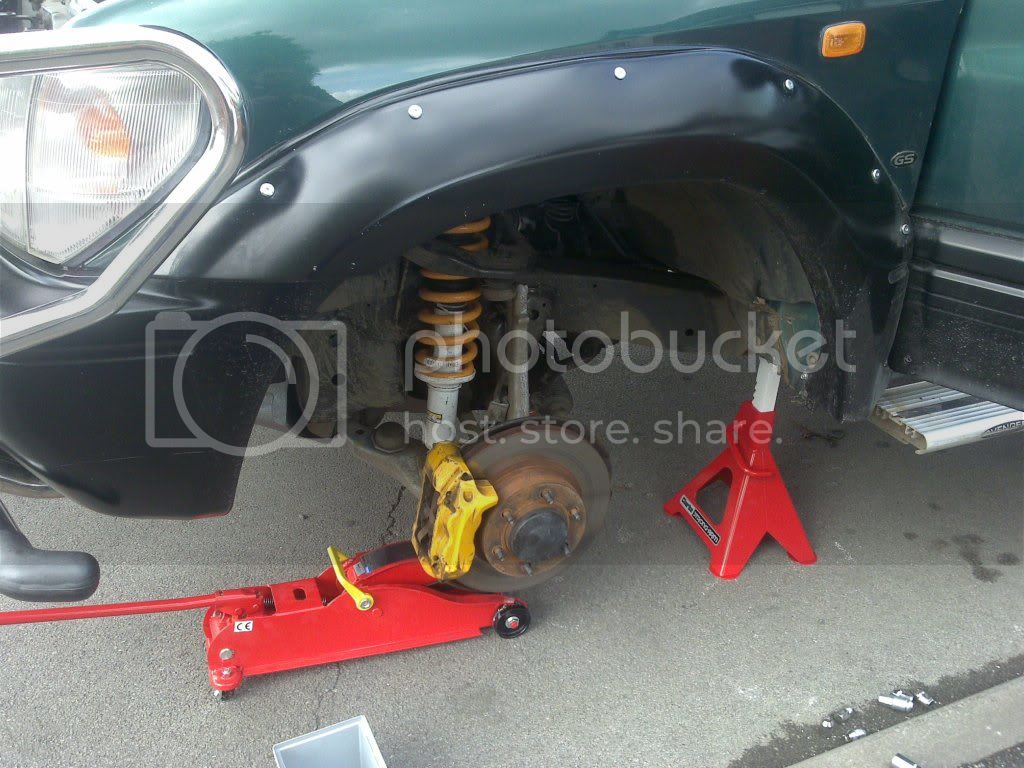


All that came off


How she sits at the moment


and how she should look after the front is on. (Please excuse the tiny tyre)
 
Most interesting. A few questions arise though..

The driveshaft angles look a little extreme, no?

Is that 90 a manual or automatic? V6? used to be Full time, what transfer case was installed?

That 90 looks like she has been well used, any specs?

Where are you from, if one may ask??

Cheers,

Luis


Hi Luis.

Thanks for the interest.

Drive shaft angle is fine. I had a similar question on another forum regards the panard. Please bear in mind that the pics have been taken with the truck 5 foot up in the air on the lift so the back axle is sat at full droop.

The 90 is mine and is a manual with the 1KZ-TE. It did used to be full time 4wd but having to swap out the transfer box for a Hilux surf one to get the front prop down the drivers side has ment I will loose that.I actually have the full 80 that the axles came off sat in my yard and you would no believe how hard I tried to get the 4.2 lump under my bonnet but it just would not go. so if anyone has any ideas of which V6 or even V8 I might get squeezed in there I may look at an engine swap in the near future but it would have to have the pretty bomb proof reliability of the 1KZ and 4l plus.

As for the spec on my truck.

Christ Did she really used to look like this.

10012010094.jpg


Wow, How skinny are those tyres. I gave 2k for her and she drove lovely. No rust as far as I could see and even had a fully functioning not broken center console lid.

IIRC the first thing to go on was the 265/70/R16 GG AT2's on some nice Compomotive Alloys. They had done less than 1000 miles when I got them for £250

22022011019.jpg


Next on the mods list was a Bull Bar because the wife likes them and a full set of fairings because the wheels and tyres didn't fit in the arches

21042011066.jpg


21042011065.jpg


11042011063.jpg


11042011062.jpg


Then Took her to pick up little Bro's Vitara

P100311_1750.jpg


And did quite a bit of laning with her

P1000779.jpg


P090611_1201_01.jpg


P090611_1203.jpg


2011-12-04105616.jpg


This is when it was decided to get a bit of lift

So on went the Iron Man Kit

17052011101.jpg


and then some more Laning

2011-12-04122508.jpg


By this time I had well and truely got the LC bug and decided it was time to attend our club meet at lincomb. However preparations were needed for this (Plus everyone else said they look crap) so off came the bullbar

2012-09-28110003.jpg


(Oh just realised a winch went in there somewhere along the line on one of J66P's Hidden Mounts.)

And Apparently the back windoe didn't feel like being a back window anymore (2 days before Lincomb)
So I Taped it up and off we went with the promise of a new door from Karl when we got there.

2012-10-01165602_zpsc0fa41bf.jpg


Got a little bit muddy at Lincomb and really impressed myself for a "Lincomb Virgin" (Probably drank way too much beer and definately ate far to much pork)

2012-10-06144532.jpg


Did a bit more laning

2012-10-20152333.jpg


2012-10-20152355.jpg


IMG-20121020-WA0000-1.jpg


2012-10-20174337.jpg
 
643970_10152263516105063_1085843979_n.jpg


And then decided I didn't like the Red Door

DSCN0366.jpg


So Put the green one back on instead.

DSCN0371.jpg


Tread Plate instead Glass will stop that window deciding it doesn't want to be one again. (Side Windows Next)

Did Some More Laning


Then whilst Checking things over for a Coast to Coast trip I noticed my rear springs had collapsed So On went 80 series Springs at the back and some test drive springs and shocks at the front.

DSCN0491_zps660041a5.jpg


DSCN0493_zps78055ba4.jpg


Parked her up in the new configuration next to Standard 90 for comparison

2013-01-23091014.jpg


2013-01-23091031.jpg


And got some nice articulation shots

DSCN0490_zps0e8dc81e.jpg


DSCN0487_zpsd9cc161d.jpg


DSCN0462_zpsad3e688f.jpg


DSCN0465_zps056640e5.jpg


DSCN0478_zps181843e7.jpg


DSCN0472_zps043248fd.jpg


Then did a quick test fit of some 35's

2013-01-28182411.jpg


2013-01-28183856.jpg


2013-01-28183928.jpg


In the last couple of days I have covered my hand built center console

2013-02-06154346_zpsbaae5ba5.jpg


And wired the winch up to the Ariel up/down switch in the cab.

HHHHHMMMMMMM Future mods

35's for a start, Extend the Rear upper and lower control arms, Adjustable Panhard, Few more interior lights, Rear Bumper (Possibly with winch If I can find space.) The list really is endless.

Thanks For Looking

Chris
 
Big day today guys. Very nerve racking to say the least. Stripped out all the IFS and the steering rack. Not too much of a big deal but then come out the grinder and the plasma. Guess there is no going back now. Took plenty of pics but left the camera at the unit so will pop them up tomorrow. Just wanted to keep you all informed.
 
Well Guys Pics as promised.

First one all the IFS off apart from the Lower wish bones. Quick tip here if you are going to cut through the camber adjust bolts be careful not to have anything infront of them. They will pop and fire out at quite a rate of knots.


Well thats all of the IFS Bolt on components off. Not let the chopping commence.


Say goodbye to the front ARB brackets.


Then the rear crossmember for the lower control arm. I did wonder how much strength I would loose by cutting these away. Had a look under the 80 and there is nothing between the front cross member and the gearbox one. so that put my mind at rest a little. I might add one once the axle is in and i can see the clearances properly.


Then away with the front x-member for the IFS and everything is gone. Looks kinda naked under there.


Chassis all cleaned up. I have left the spring cup on for the moment just to give me an idea as the where the axle should sit in relation to the wheel arches. These will have to come off just not quite yet.


This is the bracket for the hocky sticks on the 80. Believe it or not the 90 chassis at this point is more than 100mm wider than the 80.This means that these mounts will sit on the inside of the rails.


These are the ones I have fabbed up.


Getting quite excited at the moment. Once these brackets are on that is a big leap. Nearly done I think. Well, Apart from......

upper spring cups
shock mounts
panard bracket
steering box
re-install gearbox
fabricate new exhaust
figure out locker wiring

hmmmm list not as long as I thought it was. whoop whoop
 
At Last. Back to a rolling truck. All the bracketry is done and just needs the welding finished up but though you all might like to see some pics of what a 90 looks like with a solid front axle.


And a couple of quick shots of the Spring and damper mounts.


On with the steering tomorrow which means I'll have some plumbing to do. Gearbox back in on Thursday and new exhaust to be built on Friday so I guess that means MOT on Saturday then. lol. If only things where that simple.
 
Sorry for not updating this one sooner guys but I have just been soooo busy. I have loads and loads of pictures and will do a full write up at some point in the near future but hope you will all be happy with a few pics of the (pretty much) finished product. Just need to finish off my bumpers now. The 3 measurements are 28" to underside of sill, 45" to underside of front arch trim and 46" to underside of rear arch trim........ENJOY.......


Nice preparation.
 

Users who are viewing this thread

Back
Top Bottom