
Since my 2002 LX 470 w/ factory nav and integrated climate controls didn’t come with factory iPod integration (no cars did in 2002 I assume), I wanted to add it to this car’s stereo. I also wanted to be able to hide the iPod itself in the lower part of the center console so that it was out of sight but still accessible. After heavy research, I determined what I needed in order to accomplish this (while maintaining maximum sound quality) was the USA SPEC iPod Adapter.
This module allows you to add an input source to the factory head unit by way of the CD changer. The nice thing is you don’t have to remove your CD changer or anything, plus you can use the factory head unit’s controls to change the song while using the iPod source. You can also switch between head unit mode and manual mode in case you’d like to just use the buttons on the iPod like you normally would. The only downside I have found so far is that no iPod text information displays, so you can’t see the song title, artist, playlist name, or anything like that, but I was ok with that compromise.
One other thing you will need to make the USA SPEC iPod Adapter work is the corresponding CAS-LEX Adapter harness. I bought both items from Crutchfield and when I added the iPod module to my cart, it told me I would need the special adapter harness too. Thanks Crutchfield! As I’ll explain later, you simply remove the factory harness from the factory head unit, plug in the CAS-LEX adapter to the factory head unit, and then plug the factory harness into the CAS-LEX adapter.
USA SPEC PA15-TOY ($150): http://www.crutchfield.com/p_581PA1...terface-for-Toyota-Scion-Lexus-and-Isuzu.html
USA Spec Lexus Adapter ($30.00): http://www.crutchfield.com/p_581CASLEX/USA-Spec-Lexus-Adapter.html
I AM NOT A CERTIFIED AUTO MECHANIC, TECHNICIAN, OR ELECTRICAL EXPERT. PROCEED AT YOUR OWN RISK.
Preparation
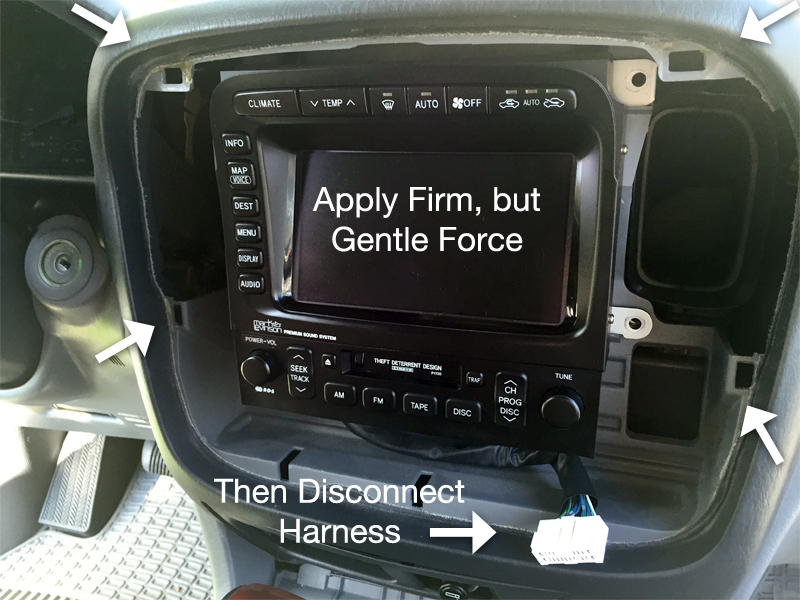
1) Remove the wood trim bezel that surrounds the head unit. I put a rag over a flathead screwdriver. Try and pry the bezel from the four points highlighted with arrows in the photo. That’s where the retaining clips hold it in. Mine was stubborn, but not too hard.
2) In order to fully remove the trim, I believe there is a wiring harness you’ll also need to disconnect from it that supplies wiring for some other buttons like the power antenna and ext. thermometer.

3) Remove the piece below the head unit that houses the ash tray, cigarette lighter, and 12v plug. Again, pop it out where I placed the arrows. You may be able to remove the trim piece without disconnecting the two wiring harnesses since they may be adhered together. You’ll have plenty of room.
4) Remove the trim that surrounds the shifter, again by popping it out. I was able to leave the shift knob on. Be sure to other things you have to do is disconnect the wiring harnesses for the heated seats, PWR and 2ND drive buttons, etc.
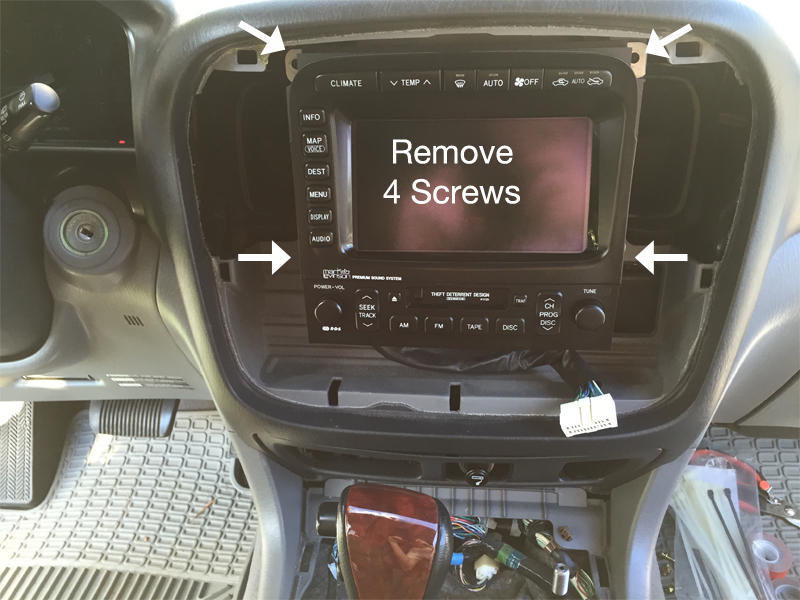
5) Remove the four phillips head screws indicated by the arrows and slowly pull the head unit out. I placed a cloth on my shift knob and was able to balance/rest the head unit on that due to the tension of the wiring harnesses (that we won’t be messing with here).
iPod Module Install
1) Remove the factory wiring harness on the left side (if you’re looking at the rear of the head unit) and replace it with the CAS-LEX adapter as shown in the photo. Then, plug the CAS-TYi cable into its corresponding opening of the CAS-LEX adapter, followed by plugging factory harness into the other corresponding opening.
2) Decide where you want to place/mount the iPod Module. I placed mine in the space underneath where the cupholders are. I wanted a flat space that would be relatively easy to run cables to, but also in a place where I saw a way to fasten it.
3) IMPORTANT — DIP Switch setting on iPod module. Per the instructions that came with the iPod module, set the DIP switch accordingly. I honestly can’t remember how I set mine, I should have written it down, but be sure to test the unit before go any further to make sure it works as it’s supposed to so you don’t have to tear the front apart again. Meaning, when you select disc 5, it puts the iPod in Direct mode and when you select Disc 6, it puts the iPod in Manual mode. I can’t remember if the "1" switch stays down or you need to move it up, but follow the options the instructions give you in case the designated option according to the provided chart doesn’t get it to work.
4) Run the CAS-TYi cable behind where the head unit resides, down behind the sections below the head unit, and underneath into the area below where the shifter trim panel resides. Connect the CAS-TYi to the iPod module.
5) If you’re going to place your iPod in the lower part of the center console like me, then you’ll need to drill a hole big enough to fit the one end of the CB-PA105 cable (that connects the iPod to the iPod module. I believe I used a 1/2 inch drill bit and attacked the lower console from the side of the cup holders. It was kind of a pain to get good leverage, but it’s possible.
6) Run your CB-PA105 cable through the hole you just made in the lower center console to make sure it fits and then connect the end that goes into the iPod adapter.
7) Now that you’ve got your iPod module module in place and your wires and adapter harness connect, clean up and mess you made. In my case it was vacuuming out plastic from the drilling process as well as all of the crap accumulated and left behind by the previous owner.
8) Fasten the iPod module some how to reduce future movement and rattling that could cause either of the connected cables to become dislodged or damaged. I zip tied mine to some metal brackets that lay underneath where the cupholder section goes.
9) Replace the trim panels for the shifter console and then tuck the wiring connected to the back of the head unit neatly behind it so when you screw the head unit back in there’s no tension or risk of anything coming loose, not to mention it fits flush the the trim bezel fits properly back over it. Don’t forget the harness that goes back into that wood trim bezel either.
This module allows you to add an input source to the factory head unit by way of the CD changer. The nice thing is you don’t have to remove your CD changer or anything, plus you can use the factory head unit’s controls to change the song while using the iPod source. You can also switch between head unit mode and manual mode in case you’d like to just use the buttons on the iPod like you normally would. The only downside I have found so far is that no iPod text information displays, so you can’t see the song title, artist, playlist name, or anything like that, but I was ok with that compromise.
One other thing you will need to make the USA SPEC iPod Adapter work is the corresponding CAS-LEX Adapter harness. I bought both items from Crutchfield and when I added the iPod module to my cart, it told me I would need the special adapter harness too. Thanks Crutchfield! As I’ll explain later, you simply remove the factory harness from the factory head unit, plug in the CAS-LEX adapter to the factory head unit, and then plug the factory harness into the CAS-LEX adapter.
USA SPEC PA15-TOY ($150): http://www.crutchfield.com/p_581PA1...terface-for-Toyota-Scion-Lexus-and-Isuzu.html
USA Spec Lexus Adapter ($30.00): http://www.crutchfield.com/p_581CASLEX/USA-Spec-Lexus-Adapter.html
I AM NOT A CERTIFIED AUTO MECHANIC, TECHNICIAN, OR ELECTRICAL EXPERT. PROCEED AT YOUR OWN RISK.
Preparation
1) Remove the wood trim bezel that surrounds the head unit. I put a rag over a flathead screwdriver. Try and pry the bezel from the four points highlighted with arrows in the photo. That’s where the retaining clips hold it in. Mine was stubborn, but not too hard.
2) In order to fully remove the trim, I believe there is a wiring harness you’ll also need to disconnect from it that supplies wiring for some other buttons like the power antenna and ext. thermometer.
3) Remove the piece below the head unit that houses the ash tray, cigarette lighter, and 12v plug. Again, pop it out where I placed the arrows. You may be able to remove the trim piece without disconnecting the two wiring harnesses since they may be adhered together. You’ll have plenty of room.

4) Remove the trim that surrounds the shifter, again by popping it out. I was able to leave the shift knob on. Be sure to other things you have to do is disconnect the wiring harnesses for the heated seats, PWR and 2ND drive buttons, etc.

5) Remove the four phillips head screws indicated by the arrows and slowly pull the head unit out. I placed a cloth on my shift knob and was able to balance/rest the head unit on that due to the tension of the wiring harnesses (that we won’t be messing with here).
iPod Module Install
1) Remove the factory wiring harness on the left side (if you’re looking at the rear of the head unit) and replace it with the CAS-LEX adapter as shown in the photo. Then, plug the CAS-TYi cable into its corresponding opening of the CAS-LEX adapter, followed by plugging factory harness into the other corresponding opening.

2) Decide where you want to place/mount the iPod Module. I placed mine in the space underneath where the cupholders are. I wanted a flat space that would be relatively easy to run cables to, but also in a place where I saw a way to fasten it.

3) IMPORTANT — DIP Switch setting on iPod module. Per the instructions that came with the iPod module, set the DIP switch accordingly. I honestly can’t remember how I set mine, I should have written it down, but be sure to test the unit before go any further to make sure it works as it’s supposed to so you don’t have to tear the front apart again. Meaning, when you select disc 5, it puts the iPod in Direct mode and when you select Disc 6, it puts the iPod in Manual mode. I can’t remember if the "1" switch stays down or you need to move it up, but follow the options the instructions give you in case the designated option according to the provided chart doesn’t get it to work.
4) Run the CAS-TYi cable behind where the head unit resides, down behind the sections below the head unit, and underneath into the area below where the shifter trim panel resides. Connect the CAS-TYi to the iPod module.

5) If you’re going to place your iPod in the lower part of the center console like me, then you’ll need to drill a hole big enough to fit the one end of the CB-PA105 cable (that connects the iPod to the iPod module. I believe I used a 1/2 inch drill bit and attacked the lower console from the side of the cup holders. It was kind of a pain to get good leverage, but it’s possible.

6) Run your CB-PA105 cable through the hole you just made in the lower center console to make sure it fits and then connect the end that goes into the iPod adapter.

7) Now that you’ve got your iPod module module in place and your wires and adapter harness connect, clean up and mess you made. In my case it was vacuuming out plastic from the drilling process as well as all of the crap accumulated and left behind by the previous owner.
8) Fasten the iPod module some how to reduce future movement and rattling that could cause either of the connected cables to become dislodged or damaged. I zip tied mine to some metal brackets that lay underneath where the cupholder section goes.

9) Replace the trim panels for the shifter console and then tuck the wiring connected to the back of the head unit neatly behind it so when you screw the head unit back in there’s no tension or risk of anything coming loose, not to mention it fits flush the the trim bezel fits properly back over it. Don’t forget the harness that goes back into that wood trim bezel either.
