
Call Josh at Source Automotive and see if they will let you dyno it. Josh is a buddy of Brian and I. Source is a Cummins performance shop. I bet they would love to see it!
Navigation
Install the app
How to install the app on iOS
Follow along with the video below to see how to install our site as a web app on your home screen.
Note: This feature may not be available in some browsers.
More options
You are using an out of date browser. It may not display this or other websites correctly.
You should upgrade or use an alternative browser.
You should upgrade or use an alternative browser.
This site may earn a commission from merchant affiliate
links, including eBay, Amazon, Skimlinks, and others.
More options
Who Replied?- Thread starter
- #2,282
I'll have to give them a ring once I settle down on a tune. I did buy the odd sized HE351VE exhaust gasket from them and they're not far from my house.
Boost is starting to stumble a little. So I finally got a new filter on order and it's just a little bigger and should max out all available space. I'll probably make a heat shield for it too.
Ordered my air filter from R2Cperformance. Part number: CO 10525 in their Performance Series (white media)
Boost is starting to stumble a little. So I finally got a new filter on order and it's just a little bigger and should max out all available space. I'll probably make a heat shield for it too.
Ordered my air filter from R2Cperformance. Part number: CO 10525 in their Performance Series (white media)
Last edited:
- Thread starter
- #2,283
So backing up a little. I had a thinning oil event from fuel getting into my crankcase through the front seal on the injection pump. I pulled the IP and replaced the seal thinking that fixed it and changed the oil. I then played around with a gauge to read fuel pressure. Even with a needle valve in front of the gauge it bounced excessively because it was hard mounted to the engine. I grabbed a section of fuel line and pulled the gauge off the bleeder valve.

But unfortunately it was too late for that gauge and it wasn't reading true anymore.
At the same time I noticed the oil looking thinned again. I must still be leaking through the front IP seal which means I must be running too much fuel pressure. With this 6bt piston lift pump I had swapped out the internal spring to bring the pressure down to 15psi thinking that would be enough but what I didn't think about was the extra volume from this piston lift pump. I hunted through the spring drawers at the local hardware store and found something that might work.
The original internal spring on the left. The $50 "15psi" spring in the middle. A local $2 spring on the right cut down to the length as the others.
I did this internal spring change at the same time as hooking up a new pressure gauge. At idle I am now getting 9psi with it increasing to a max of 10psi when I rev the motor. The beauty of having the fuel pressure gauge is that I could try out a couple different springs to see what they were producing psi wise but I got lucky on the first spring I tried. I changed the oil and the thinning stopped. Lesson, to be safe don't exceed 10psi on the fuel pressure for a VE injection pump. Maybe my seal is a little weakened now but it was definitely leaking with 15-20psi of fuel pressure.

But unfortunately it was too late for that gauge and it wasn't reading true anymore.

At the same time I noticed the oil looking thinned again. I must still be leaking through the front IP seal which means I must be running too much fuel pressure. With this 6bt piston lift pump I had swapped out the internal spring to bring the pressure down to 15psi thinking that would be enough but what I didn't think about was the extra volume from this piston lift pump. I hunted through the spring drawers at the local hardware store and found something that might work.
The original internal spring on the left. The $50 "15psi" spring in the middle. A local $2 spring on the right cut down to the length as the others.

I did this internal spring change at the same time as hooking up a new pressure gauge. At idle I am now getting 9psi with it increasing to a max of 10psi when I rev the motor. The beauty of having the fuel pressure gauge is that I could try out a couple different springs to see what they were producing psi wise but I got lucky on the first spring I tried. I changed the oil and the thinning stopped. Lesson, to be safe don't exceed 10psi on the fuel pressure for a VE injection pump. Maybe my seal is a little weakened now but it was definitely leaking with 15-20psi of fuel pressure.
- Thread starter
- #2,285
Unfortunately the two thinned oil events did seem to cause some additional problems. My hazing gradually got a little worst and turned a little more into smoking mostly when idling. With emissions testing coming up this year along with a Rubicon trip planned for the end of July I yanked the head off to get it checked out by a good shop down the street.
Then, while I'm there ....
I'm doing a ring job as well. I've got the cylinder's honed and ready; luckily they weren't trashed and a hone job cleaned them up. I've got the pistons cleaned up and ready for install. I'm replacing the rod bearings and at least my thrust bearing on the crank shaft. I had some bronze colored sludge in the bottom of the oil pan that looks like excessive wear on the thrust bearing. Due to previous damage I think the thrust bearing will be a weak spot that I'll just need to replace every couple of years. So it's basically a minor rebuild or a major refresh. I'm hoping to have it running by next weekend if the parts show up. And then I'll start the break in process.

Then, while I'm there ....

I'm doing a ring job as well. I've got the cylinder's honed and ready; luckily they weren't trashed and a hone job cleaned them up. I've got the pistons cleaned up and ready for install. I'm replacing the rod bearings and at least my thrust bearing on the crank shaft. I had some bronze colored sludge in the bottom of the oil pan that looks like excessive wear on the thrust bearing. Due to previous damage I think the thrust bearing will be a weak spot that I'll just need to replace every couple of years. So it's basically a minor rebuild or a major refresh. I'm hoping to have it running by next weekend if the parts show up. And then I'll start the break in process.
Last edited:
!!!
Things get very serious very quickly in this thread. We went from tuning compounds to adjusting lift pump pressure and then boom, the entire engine is apart! You even took the rockers off of the rocker wrist pins!
Things get very serious very quickly in this thread. We went from tuning compounds to adjusting lift pump pressure and then boom, the entire engine is apart! You even took the rockers off of the rocker wrist pins!
- Thread starter
- #2,287
Yeah, peace of mind is a funny thing. I wanted to look at parts to see if there was deeper damage and "while I'm there" is pitching in. Overall it looks like I caught it before anything serious happened. I'm sure if I continued to run it peace of mind would have cost more later. I was just happy I was able to get the exhaust manifold off without taking the turbos apart. I've done enough of that this year.
Head was flat so I just ordered a standard sized head gasket kit. Should be here next week.
Head was flat so I just ordered a standard sized head gasket kit. Should be here next week.
Are you going to have the pistons coated or anything fancy done while you're in there?
The "while you're in there" argument is a rabbit hole. Next thing you know you have mahle pistons and other performance parts, then a 6bt. Love this thread.
- Thread starter
- #2,290
Luckily "while I'm there" is in a death match with the hole in my wallet, sprinkled with some cheap-a$$ness to keep it in check.
With the twins running cool, the pistons aren't seeing crazy temperatures so I hadn't even considered coating. I was hoping to finally get some rear drawers set up before the trip so my engine fanciness will probably be kept to a minimum. I do want to fix a thing or two with the valve covers and my intake tube though.
With the twins running cool, the pistons aren't seeing crazy temperatures so I hadn't even considered coating. I was hoping to finally get some rear drawers set up before the trip so my engine fanciness will probably be kept to a minimum. I do want to fix a thing or two with the valve covers and my intake tube though.
- Thread starter
- #2,291
New rings have been installed and aligned on the pistons and those are now installed in the cylinders with new rod bearings. I ordered a head gasket set for my 4bt last week but instead a lower end gasket set for a 6bt showed up yesterday. Communicated with the seller and he's sending out the correct set today. I can get the bottom end buttoned up this week with hopefully the head install next week.
Hey Boots! 50 lbs of boost! You're crazy! I'm at a about 12! I've been off of the forum for a while, but I've had some downtime lately and finally got read up on your thread. I wish I would have read it sooner and I might could have saved you some time. I went through the whole lift pump replacement thing about a year ago, and I had to dig up a solution to the bouncing fuel pressure gauge too. For my lift pump I'm running a 12 psi spring, it's waay more than enough for my application. In fact I'm worried it may blow my ip pump seal (although it hasn't in over a year) and might try to find or make a weaker spring like you did. For my fuel pressure gauge I installed a needle valve and used the grease gun hose trick. This has gotten ride of almost all the bounce.
Before you tore down your engine, did you notice any benefit from the soundproofing you put on the tappet cover or oil pan? I think about covering my oil pan, valve covers and tapper cover all the time. I'm sure it will help with the noise.... I'm just searching for the right material.
Before you tore down your engine, did you notice any benefit from the soundproofing you put on the tappet cover or oil pan? I think about covering my oil pan, valve covers and tapper cover all the time. I'm sure it will help with the noise.... I'm just searching for the right material.
- Thread starter
- #2,293
Beans welcome back. Using the needle valve and then isolating the gauge from the engine with some fuel line eliminated my bouncing needle. The new gauge is reading solid. Maybe one day I'll get a gauge for inside the cab but this will at least help provide more info for troubleshooting stuff in the future.
For noise control I didn't notice much of a difference but I'm going to blame the thinning oil as the main culprit. Plus it was just stuff I have laying around so getting the right material would probably help more. I do hope to notice a little more reduction after the rebuild. I think covering the IP and the valve covers would also help quiet it down even more; maybe some kind of cover like the newer vehicles but have insulation on the underside to absorb sound. I did the side cover because that cover on the newer 6bts is insulated.
For noise control I didn't notice much of a difference but I'm going to blame the thinning oil as the main culprit. Plus it was just stuff I have laying around so getting the right material would probably help more. I do hope to notice a little more reduction after the rebuild. I think covering the IP and the valve covers would also help quiet it down even more; maybe some kind of cover like the newer vehicles but have insulation on the underside to absorb sound. I did the side cover because that cover on the newer 6bts is insulated.
- Thread starter
- #2,294
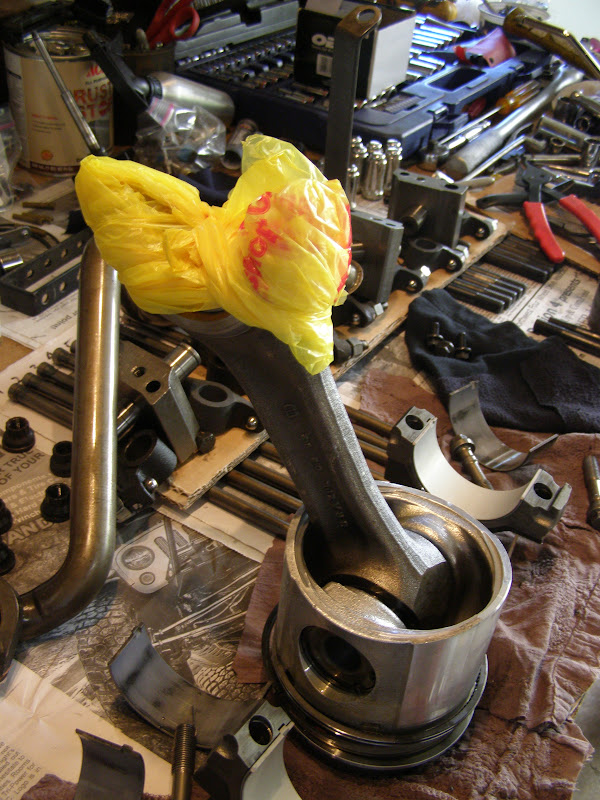
To insert the pistons by myself and not worry about the rod contacting and scratching the cylinder walls I wrapped the ends in plastic bags. This worked great.
The correct package arrived for my head gasket kit. Part number 3804869
I chose this kit because it had the improved valve seals compared to the old design. In order to use them my head needed to be modified to accept them.
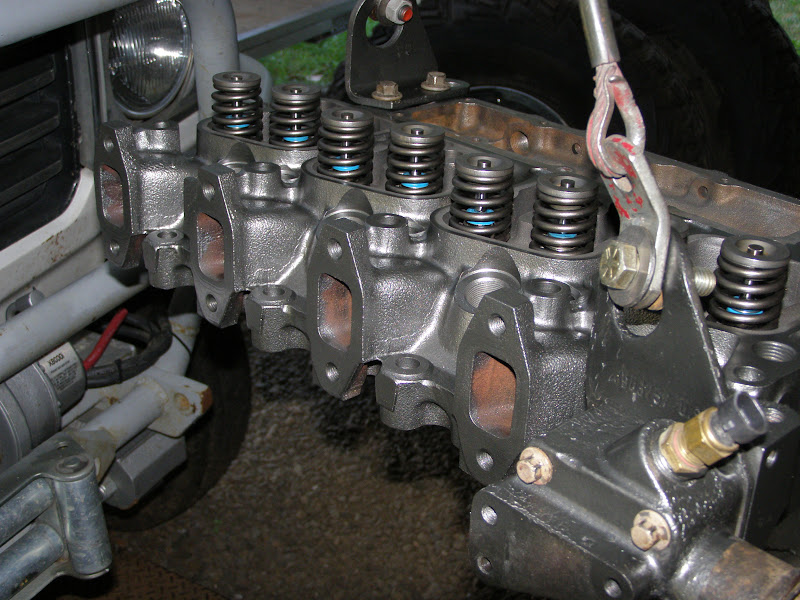
They said the head was in overall good condition. No cracks but they did end up doing valve seats which may be where some of my smoking was coming from. You can see those new seals installed. They have to make a relief cut to let the base of the seal sit correctly and they've done a bunch of these so it was in good hands. I painted it a cast iron color because at first I couldn't find cummins beige.
With the head back it was time to put it back on the block. I'd read both sides about using copper gasket spray on a head gasket and decided that because I didn't surface the block (only cleaned it) I wanted the copper to help seal imperfections in the surface. I put two coats on both sides of the head gasket and while it was drying I cleaned off the block surface one last time and installed the studs back into the block. They are hand tight per the instructions.
Got some help from the to guide the head back onto the studs and safely onto the block as I lowered it down. Once it was seated I started the torque sequence. I used arp ultra fastener lube along with a little drop of lucas assembly lube and tightened to 60, 85, 115, and then 135ft.lbs. Then I started back in sequence and one by one loosen the nut and re-torqued back to 135ft.lbs. I've done two rounds of the re-torqueing and want to do one more round before I close it up. This will help settle in the studs to provide equal clamping force. Not sure if this will do too much since I've already been running these stud but I figure I'd give it a try. I also plan to re-torque a fourth time after I get through my break in. I think I was running 125ft.lbs before so I'm increasing it a little bit more for the twins. My arms were a little tired after all that.
The correct package arrived for my head gasket kit. Part number 3804869

I chose this kit because it had the improved valve seals compared to the old design. In order to use them my head needed to be modified to accept them.

They said the head was in overall good condition. No cracks but they did end up doing valve seats which may be where some of my smoking was coming from. You can see those new seals installed. They have to make a relief cut to let the base of the seal sit correctly and they've done a bunch of these so it was in good hands. I painted it a cast iron color because at first I couldn't find cummins beige.

With the head back it was time to put it back on the block. I'd read both sides about using copper gasket spray on a head gasket and decided that because I didn't surface the block (only cleaned it) I wanted the copper to help seal imperfections in the surface. I put two coats on both sides of the head gasket and while it was drying I cleaned off the block surface one last time and installed the studs back into the block. They are hand tight per the instructions.

Got some help from the
to guide the head back onto the studs and safely onto the block as I lowered it down. Once it was seated I started the torque sequence. I used arp ultra fastener lube along with a little drop of lucas assembly lube and tightened to 60, 85, 115, and then 135ft.lbs. Then I started back in sequence and one by one loosen the nut and re-torqued back to 135ft.lbs. I've done two rounds of the re-torqueing and want to do one more round before I close it up. This will help settle in the studs to provide equal clamping force. Not sure if this will do too much since I've already been running these stud but I figure I'd give it a try. I also plan to re-torque a fourth time after I get through my break in. I think I was running 125ft.lbs before so I'm increasing it a little bit more for the twins. My arms were a little tired after all that.
Last edited:
- Thread starter
- #2,295
One of the things I wanted to change this time around was stud clearance on my valve covers. It's been said that to run head studs one will need to have the rocker pedestals machined. This ends up being kind of expensive. I had also read that one could grind the webbing on the inside of the valve cover to gain clearance and this is what I did last time. However, for my set up it wasn't quite enough clearance. I cracked a valve cover trying to get it to seal and then it would leak out the crack. I picked up another set of used valve covers and ground one out but the same thing has happened. I tighten it too much to get it to seal and then the cover gets a crack. I briefly checked into getting the pedestals machined this time but it's still expensive. I decided to try something else out that I'm hopeful will work.
Using one of the cracked valve covers I used the imprint of the stud on the underside to determine where to drill. After a test fit I transferred this location to 4 good valve covers.
I also smoothed out the webbing on the underside that the drill bit didn't get.
This gave me clearance for the top and body of the stud.
Now I had a hole I needed to cover and seal. As I thought about what I could use freeze plugs came to mind and I ended up finding some at Napa that would work for what I wanted to do. These ones are 25mm (almost 1 inch), inexpensive, and gave me a little clearance pocket that the top of the stud could occupy. I did pick these up before I drilled the actual hole so that helped determine how big of a hole I could drill.
I used JB Weld to fix the freeze plugs to the valve covers. I dipped the edge, placed it on the valve cover and then filled a bead around the plug. Once set I cleaned them up and painted the covers. I found beige at Napa after I had already painted the head so I decided to go with a two tone affect.
The other thing I wanted to do was to adjust my intake tube. I added a little more length and angled it better to line up with the 45 degree silicone elbow I'm using. I coated the welds with JB weld to help seal any pin holes that could cause boost leaks.
I'm running a little behind but I hope to get it finished up this week and start the break in. I might take a day off to just go drive it around.
Using one of the cracked valve covers I used the imprint of the stud on the underside to determine where to drill. After a test fit I transferred this location to 4 good valve covers.

I also smoothed out the webbing on the underside that the drill bit didn't get.

This gave me clearance for the top and body of the stud.

Now I had a hole I needed to cover and seal. As I thought about what I could use freeze plugs came to mind and I ended up finding some at Napa that would work for what I wanted to do. These ones are 25mm (almost 1 inch), inexpensive, and gave me a little clearance pocket that the top of the stud could occupy. I did pick these up before I drilled the actual hole so that helped determine how big of a hole I could drill.

I used JB Weld to fix the freeze plugs to the valve covers. I dipped the edge, placed it on the valve cover and then filled a bead around the plug. Once set I cleaned them up and painted the covers. I found beige at Napa after I had already painted the head so I decided to go with a two tone affect.


The other thing I wanted to do was to adjust my intake tube. I added a little more length and angled it better to line up with the 45 degree silicone elbow I'm using. I coated the welds with JB weld to help seal any pin holes that could cause boost leaks.

I'm running a little behind but I hope to get it finished up this week and start the break in. I might take a day off to just go drive it around.
Last edited:
If you end up needing a set of pedestals machined send me a set and I will do it for you
Last edited:
That is an innovative solution, I like it.
- Thread starter
- #2,298
If you end up needing a set of pedestals machined send me a set and I will do it for you
Thank you for the offer.
TLC Norway
woodwelder
Sweeet! The two tone turned out good!
When I weld pipes/exhaust, I put a light inside to see any tiny leak spots.
Never tried jb weld, can't get a good product over here.
When I weld pipes/exhaust, I put a light inside to see any tiny leak spots.
Never tried jb weld, can't get a good product over here.
- Thread starter
- #2,300
Wrapped up the motor. Fed it oil, coolant and fuel and it's back to life. I was able to complete my first two phases for break-in this weekend. These were pretty much mellow freeway driving sessions keeping it around 60-65 mph which ranged from 1700-1900rpm, and kept total boost below 20psi. I also reduced the timing just a little for a little less cylinder pressure.
Phase 1 was light load, no idling, put on 75 miles.
Changed oil and oil filter. Checked out a few oil and fuel leaks that showed up. May end up replacing the pan gasket and main fuel filter in the near future.
Phase 2 was the same, light load, no idling, put on 125 miles.
Need to change the oil and filter again and do another inspection. Hoping to do that this afternoon after work to prep for Phase 3
Next, Phase 3 will be hooking up my trailer and exercising my right foot for the next 5-800 miles. This will help seat the rings and prep the engine for normal use.
After that an oil change and then onto normal driving and oil change intervals.
Users who are viewing this thread
Total: 2 (members: 0, guests: 2)