What have you done to your 200 Series this week? (44 Viewers)

This site may earn a commission from merchant affiliate
links, including eBay, Amazon, Skimlinks, and others.

I am looking and presently spin San Antonio but I feel they are asking too much. :(

Nice.

Man, the prices are all over the place on these things. I paid $150 a wheel, and I know Arich just paid around $100 per wheel, IIRC.

I paid $500 for mine and another $1,100. Brand new you would be out well over 2.5k. Ebay sometimes has good deals, but usually sales prices are over $1,500 plus shipping.
 
Just got to be patient.
 
Extended FrontRunner Rack, added 240w curved light bar, changed out light force for 185w each 19,000 Lumen lights. Have 68,400 led lumens. It's bright. Will get better pics later.
ImageUploadedByIH8MUD Forum1425522894.946795.jpg
ImageUploadedByIH8MUD Forum1425522923.633655.jpg
 
I paid $500 for mine and another $1,100. Brand new you would be out well over 2.5k. Ebay sometimes has good deals, but usually sales prices are over $1,500 plus shipping.

I flew to San Antonio this would have to ship home anyway. $1500 is a nonstarter for me and I see no value in discontinues 15k mile BFG AT tires. I missed an opportunity at one point on a set of 5 that were fairly well priced. Was not certain I wanted these wheels at that point.
 
I figured that while I had all my skid plates off, I would go ahead and get to work on doing my first oil change. I am at 10,000 miles since my last change, and it is time. I went ahead and ordered a 5-pack of OEM filters on Amazon, and also ordered the Aluminum oil drain assembly, in addition to a Fumoto valve for both the 200 and my wife's Impreza.

While I am down there, I am going to be installing the diff drop kit I purchased from @aMiR904.

My Slee KDSS relocation bracket kit also came with some spacers, and new stainless steel bolts for the skidplate, so I will install those too.
 
Extended FrontRunner Rack, added 240w curved light bar, changed out light force for 185w each 19,000 Lumen lights. Have 68,400 led lumens. It's bright. Will get better pics later. View attachment 1040442View attachment 1040443

Are those the new Lightforce LEDs? I have been reading about them on an Oceana Forum, and people are saying they blow the ARB Intensities out of the water. Better in almost every single way.
 
Ha ha you rock dawn
 
Are those the new Lightforce LEDs? I have been reading about them on an Oceana Forum, and people are saying they blow the ARB Intensities out of the water. Better in almost every single way.

No, I looked at those new Light Force- near replica of the ARB. Then I did quite a bit of research and landed on the ones below. These are the XPS Cree bulbs. 5 watt each bulb for a total of 185 watts of power for each light. This is 19,000 lumens each as compared to 8,200 lumens on the ARB each. Comes in in Black or Red Trim with 5 sets of lenses in different colors. Very well made. You can get the lower powered ones much cheaper, but I went for the high output. but these two are the same cost as one of the ARB. These are extremely bright. Really they are the brightest light for the size out there. True Zombie lights and IAP167 water and dust certified.

http://pages.ebay.com/link/?nav=item.view&alt=web&id=181655384452
ImageUploadedByIH8MUD Forum1425603641.268011.jpg
 
Last edited:
Wicked.

That is really nice.

I am interested in how they hold up. I may be in the market in the not too distant future.
 
Updated Switches to go with all my lights.
ImageUploadedByIH8MUD Forum1425702235.886907.jpg
 
Also did spark plugs. My mileage dropped to 15.5 which is low for me even on winter blend. Fresh oil, fresh air cleaner, tire pressures all good so I figured it had to be plugs.


Checked the gaps on the NGK 6619 Iridiums. (Amazon - $58 for the set) They are all pregapped and all came out to .044 which is spec!


Pop the hood, disconnect battery and pull engine cover (it just lifts straight off)


Coil packs look easy to get to, but every single one had an obstruction of some sort. You will need a variety of extensions and will need to unclip and move things around.


Unbolt the coil pack (10mm nut) and unclip the connectors. I used needle nose pliers to make it easier.


After pulling the coil, I used some compressed air to clean out the tube before pulling the plugs. Use a spark plug socket with the rubber insert to help pull it out of the tube.

1st plug on drivers side out. The washers are captive on the plugs. Also, be sure to inspect the coil packs and rubber seals. Some of the plugs are really in there. You will feel like you unscrewed a 24" bolt on some of them.


Checked the gap. .0525. Could explain things. (all of the plugs gapped in this range)


Factory next to replacement


Dont forget your anti-seize before reinstalling. (Hand thread it first, then torque it) Repeat for rest of plugs. You will need to open the fuse box and slide up the wires to get to 1 of the plugs. Push the coil packs on hard and bolt the 10mm bolts back on. Make sure you get a positive click on the wire connectors as well.


Passengers side. Much more difficult. Pull the air cleaner and set to side. This lets you get to the front 3 plugs pretty easily.


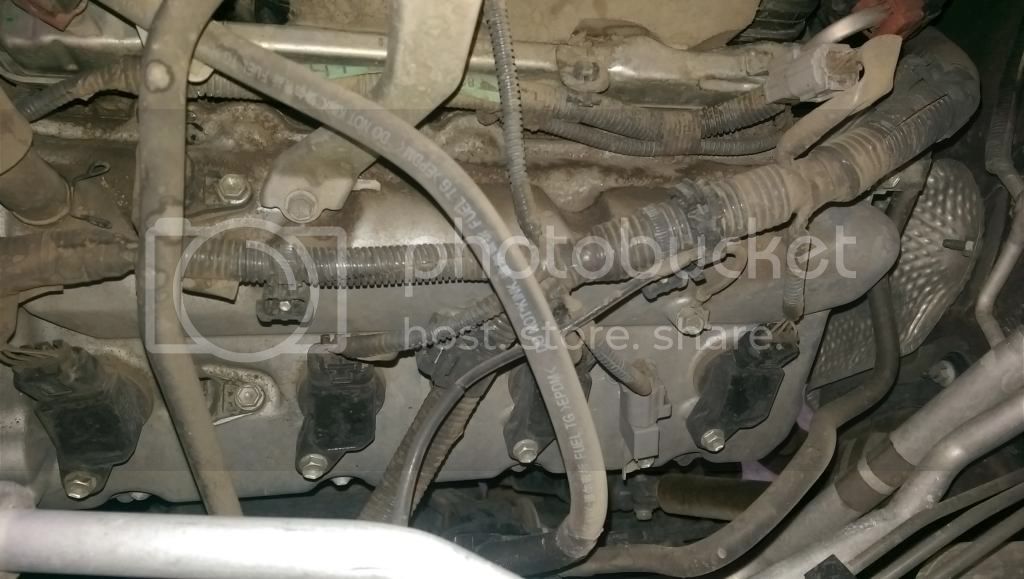
Now, the firewall plug on the passenger side. Very hard to do. You have to unconnect the 3 heater hose brackets since they route directly over the plug.

10mm bolt, easy to undue. In between front 2 plugs.


12mm bolt at back of the head. Yeah, not easy. You have a very small degree of movement to get the hose out of the way to undue the bolt. You also need long needle nose pliers to unplug this clip. (top of the engine shot)


Heater hose bolt 12mm in very back of the head has to come out. About 14" of extensions and a swivel socket while trying to maneuver a wrench under the cowl.


See this really thick black wire bundle over the 2 silver tubes? Yup, the plug is under all of that and none of it wants to move.


So my tips. - Take your time, you will need to maneuver, twist and turn to get some of the coil packs out.
If you drop a socket/tool and it doesnt hit the deck, you will likely need to pull a skid plate to get to it. (I used a long mechanics magnet for the 1 socket I dropped.)

So all done. Double check your connections, make sure all of your tools are picked up, reconnect battery and start her up.

All the tools needed. Job took 3 hours with most of it on the last plug. Dealer quoted @ $350 for the job (parts and labor)


So here is where I was after last fill up. Lets see if this helps get those mpg's back up.
 
Nice write up. Thanks
 
Video of 2 acceleration runs to see how the gears shift now. ***Note that it's the 4.6L motor not a 5.7 not as quick off the line***

 
Ventured out for a couple of hours.

20150314_183701_HDR.jpg


Also pic of the wireless receiver mounted in the bumper
20150314_125439.jpg


Remote held with velcro on the dash.
20150314_125323_HDR.jpg
 

Users who are viewing this thread

Back
Top Bottom