duggy's build thread: 1998 Land Cruiser #SAS100 (1 Viewer)

This site may earn a commission from merchant affiliate
links, including eBay, Amazon, Skimlinks, and others.

Would love to hear some real-world feedback on those ORIs....

I have a set on my long-term build but haven't had a chance to drive on them yet. I was considering adding the small reservoirs as well since my truck is going to be a heavy sucker! :)

-G

I cannot comment on long term ride quality just yet but what I can tell you in the 250 miles of highway driving they are really nice. You can setup the bottom and upper chambers to get you in the range of compression/rebound, ride height and then really fine tune the compression with the adjuster at the bottom of the shock.

One thing I really found is that I now find the rear ride quality does not match the front with the ORIs. I am looking into either put a sway bar on the back, or throw some ORIs in the rear also :)
Good to hear.

I was really careful to follow the ORI guidance and have the correct amount of chrome showing at ride height (front and rear) so that I would be on the softest initial stage of dampening that the strut has...

Running 14" fronts with 6.5" of chrome and 16" rears with 7" of chrome.... Hoping for a really soft and comfortable ride but still stiff enough that I don't have to add sway bars later on.


-G
 
I've been pumping away at getting the rig back on it's feet, but also working on a few items that I felt were necessary upgrades to make life a bit better.

A few mods I have installed are an sPOD, ARB Outback rear drawers, TMAX dual battery kit and of course getting the rig back on it's feet with new brackets and joints.

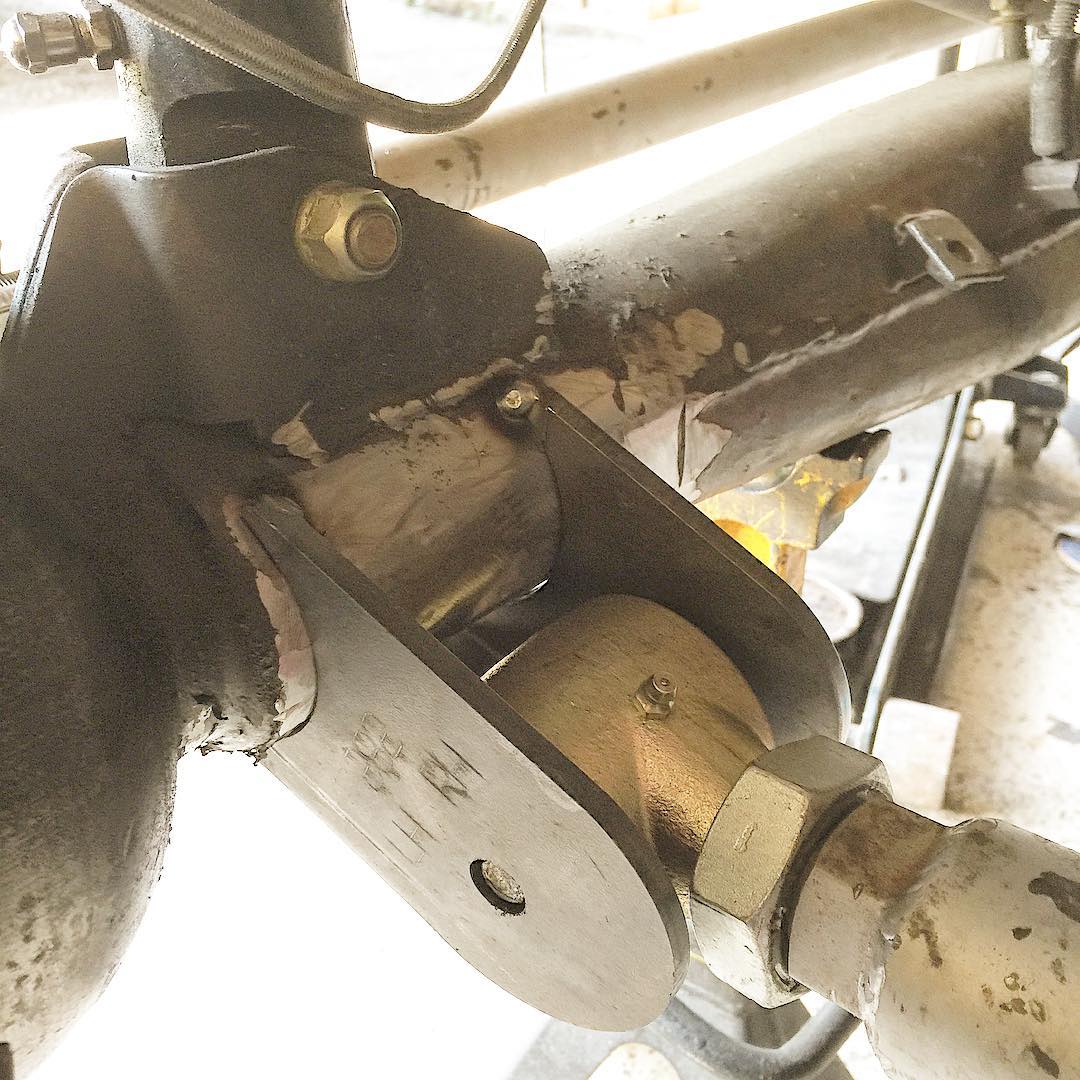
First off, I found out why the previous setup failed. The poly bushings I used provided no flex when articulating so the weakest point were the mounts and they let go. After weeks of deliberation, I went with 2 5/8" Johnny Joints for the lowers and went with some super beefy lower and upper control arm mounts.

Lower tacked in with JJ
13534043_806610859439948_2125847586_n.jpg


Uppers tacked in
13671936_306418506361153_1051002283_n.jpg


Upper and lower setup complete
13636191_1275210005852763_1042723997_n.jpg
 
I installed "The Source" sPOD system which is a waterproof and weather sealed system. The basic premise of this system is that you run one wiring loom into your cab and hook up the switches, run ground and power to the box, and then run all of your accessories to the box. This makes it uber simple to wire up any new accessories.

It also allowed me to lose a ton of wiring in the truck, which honestly was a fire hazard and a pain in the ass to look at everyday.

13671223_300927190255479_611970969_n.jpg
 
I picked up a set of ARB drawers from a member in Dallas with dual roller tops. I had a dual drawer system before but was simply not pleased with it. The ARB system is top notch quality and I also got rid of the ARB fridge slide which was no longer needed.

13706841_164789573932629_1268419211_n.jpg


I mounted my blue seas fuse block on the back of the drawers and now just need to wait for my subwoofer box to come in to complete the rear storage area. The subwoofer is a requirement for me on long trips since it makes the drive bearable :)
1136x852.jpeg.d7b43133bf0a491bac0af36efb56f0e0
 
Looks nice, glad to see you continuing to dial in the suspension system. I have the same drawers and would advise you to trim up the extra thread on the bottom of the fridge anchors as tight as possible. I left a few extra threads exposed under the roller top and its a good knuckle scraper when you reach in the drawer below. BTDT! :hillbilly:
 
Working on final tweaks on the suspension to get it perfect. I included the rear sway bar in the rear which made a huge difference in ride quality on the freeway. I purchased a Tatton double cardon driveshaft which should be here this week since I was getting a "grrrr" drone on the freeway when I would let off the gas due to weak spline engagement on the slip yoke.

I did also perform a full timing belt service including the following parts below. The cooling system refresh definitely made a difference as I can tell my AC is no longer tired and works very well now.

Aisin timing belt kit includes Mitsoboshi timing belt, water pump, tbelt tensioner and idler pulley
Crank seal
Camshaft seals
Serpentine belt
Upper and lower radiator hoses
Koyo radiator

It's been nice driving this rig around. With the new electronics I installed such as the sPod and Tmax dual battery system, things are starting to mesh together pretty well. I leave for Ouray and Moab next week so I am super excited for that trip as I've never been before.

14034773_1193290274055889_6163970394127347453_n.jpg
 
@Bomar I picked it up from Amazon which is badged as a TYC. I had used these before on other rigs and when I go to pull them out of the box they are labeled Koyo. Keep in mind that I have also been sent TYC radiators buying from the same vendor, but when comparing the 2, they are exactly alike and perform and function flawlessly. One thing I will say that I had to ream out 1 mounting bolt for the side mounts that get transferred from the old radiator, but it wasn't that big of a deal, especially at this price point.

https://smile.amazon.com/gp/product/B000IYNUNC/ref=oh_aui_detailpage_o04_s00?ie=UTF8&psc=1
 
Duggy, this beast is amazing and has been a very inspiring read! I love the 80 series but currently having a 4th gen 4runner I don't think I can give up my 4.7 V8 so this has my wheels turing greatly...:) Thank you for sharing and documenting with many great pictures. Look forward to keeping my eyes on this! Have fun with that beauty!
Alex
 
I installed "The Source" sPOD system which is a waterproof and weather sealed system. The basic premise of this system is that you run one wiring loom into your cab and hook up the switches, run ground and power to the box, and then run all of your accessories to the box. This makes it uber simple to wire up any new accessories.

It also allowed me to lose a ton of wiring in the truck, which honestly was a fire hazard and a pain in the ass to look at everyday.

Where did you place the sPOD box in the engine bay and where did you place the sPOD switch in the cab? I am still trying to find a good place both, overall, to mount. If you have pics and time, thanks in advance!
 
That rig is awesome!!
 
Where did you place the sPOD box in the engine bay and where did you place the sPOD switch in the cab? I am still trying to find a good place both, overall, to mount. If you have pics and time, thanks in advance!

I'll get you some pictures. Depending on what year you have, there are 2 places you can put the sPOD module in the engine bay. My 98 has the charcoal canister in the engine bay right behind the battery so I wasn't able to put it there, so I put it on the firewall.

I re-purposed the "sunglass/garage door opener" in the overhead console to hold a Blue Seas 6 switch holder.

Thanks, 2002 is the year - I've heard others use the door opener location, just wasn't sure how it would look. Any pics would be great. thanks.
 
Here are the promised pictures.

The wiring bundle included with the sPOD is pretty thick so I had to become pretty creative on how I stuffed everything up there. I basically coiled everything around the perimeter of the sun glass holder and stuff the rest back into the head liner. This picture is before I got everything epoxied and glued down.
IMG_0100.JPG


sPOD module
IMG_0101.JPG
 
Is there a benefit to doing 100 series calipers and rotors? Are they not the same size? I have 80 knuckles. I was wondering if I should get 100 series stuff. I have a 4Runner sport that came with bigger brakes so I know my master cylinder can handle it
 
Is there a benefit to doing 100 series calipers and rotors? Are they not the same size? I have 80 knuckles. I was wondering if I should get 100 series stuff. I have a 4Runner sport that came with bigger brakes so I know my master cylinder can handle it

The 100 caliper is slightly larger and can fit the 100 series pads better. Keep in mind that I started off with a 93 non-ABS axle which came with significantly smaller rotors, pads and calipers and this upgrade nets me a larger up front brake setup.
 
I want to throw up some pictures of my trip to Ouray and Moab last summer.

Top of the World in Moab
14240575_1187487824628391_1440780831_n.jpg


Heading up to Black Bear Pass in Ouray
14240891_152230591893419_1409641870_n.jpg


Imogene Pass
14294705_507896179405078_1241927250_n.jpg
14360177_1782595662029778_1350572179_n.jpg


Moab
14099391_1278105202213947_1076302771_n (1).jpg
 

Users who are viewing this thread

Back
Top Bottom