
I can't even let my random Amazon deliveries sit unopened, how you manage to let all of that LC gear sit on your floor is beyond my comprehension. Start turning wrenches soon!
Navigation
Install the app
How to install the app on iOS
Follow along with the video below to see how to install our site as a web app on your home screen.
Note: This feature may not be available in some browsers.
More options
You are using an out of date browser. It may not display this or other websites correctly.
You should upgrade or use an alternative browser.
You should upgrade or use an alternative browser.
Builds Project Fauxverlander 200 Series Land Cruiser Build Thread (1 Viewer)
- Thread starter cruiseroutfit
- Start date
This site may earn a commission from merchant affiliate
links, including eBay, Amazon, Skimlinks, and others.
More options
Who Replied?- Thread starter
- #42
I can't even let my random Amazon deliveries sit unopened, how you manage to let all of that LC gear sit on your floor is beyond my comprehension. Start turning wrenches soon!
The sad reality is too many irons in the fire. I've got a couple other personal builds I'm working on too but I'm restraining from even starting a build thread until I get this one done

- Thread starter
- #44
Personal builds have to take a back seat to paying customers too I'm sure.
Absolutely... but they pay for my parts so it's all fair
Markuson
SILVER Star
Hey Kurt,
Just wanted to tell you that I appreciate that you are not only covering what you are putting into your build...but ALSO your rationale behind each choice and option you considered/are considering. This is extremely helpful for those of us less experienced. Many times we simply see installations of various parts here or there, but it's great to see your thinking as you've prepared for this. Your build is almost identical to the pieces I had in mind for my 200, with only a couple of exceptions...but as I say...I've only built one 100 Cruiser...one time...and I'm no mechanic or major installer... so it's great to peek into your brain as you go.
Thanks.
Markuson
Wow, considering the season, that image of all those parts really should have a Christmas tree in it!
Like Markusson stated, I'm enjoying the rationale you've added to your product list and am looking forward to the build.
Like Markusson stated, I'm enjoying the rationale you've added to your product list and am looking forward to the build.
- Thread starter
- #47
Hey Kurt,
Just wanted to tell you that I appreciate that you are not only covering what you are putting into your build...but ALSO your rationale behind each choice and option you considered/are considering. This is extremely helpful for those of us less experienced. Many times we simply see installations of various parts here or there, but it's great to see your thinking as you've prepared for this. Your build is almost identical to the pieces I had in mind for my 200, with only a couple of exceptions...but as I say...I've only built one 100 Cruiser...one time...and I'm no mechanic or major installer... so it's great to peek into your brain as you go.
Thanks.
Markuson
Thanks for the kind words Maruson and I'm glad to hear you've found it useful. I don't desire or intend to sway anyone one way or the other rather clarify whey things work for me and perhaps that will lend some rational to their decisions. Post a link when you get going on your 200, would love to see it!
- Thread starter
- #48
Wow, considering the season, that image of all those parts really should have a Christmas tree in it!
Like Markusson stated, I'm enjoying the rationale you've added to your product list and am looking forward to the build.
My wife has made it quite clear that my Christmas is going on the 200... and she get's something special
Does ARB make jewelry? 
Markuson
SILVER Star
Does ARB make jewelry?
I don't think ARB makes jewelry...but Leatherman does.... Give her one of these:

Then when its too big for her wrist...be the hero and volunteer to wear it "in her honor!"
Believe it or not...the thing is actually useful, too!
Markuson
That's great!
Sub'd
- Thread starter
- #54
Stage Three - The Install Process
My initial plans were to do a marathon build similar to those we've done here in the past (fun video of the 100 build) but it just wasn't in the cards this year. We've been busy in the shop and I've been in an out of town a fair bit with work and play so I just couldn't put all the pieces of the puzzle together for a 48 hour build. I had hoped to get it ready enough to use as a chase rig for our Baja 1000 race a few weeks back but that too just wasn't in the cards. Fast forward a bit and I'm happy with the decision, the 100 worked perfectly in Baja and with 4 dudes living out of it for a week it was more appropriate than the clean interior of the 200. Really though, with a handful of new to me installs including the OME BP51 system, it just made more sense to take my time and really get to know the vehicle.
Project numero uno was getting rid of those nasty 22" wheels in favor of something more appropriate, like a lot more appropriate. The TRD Rock Warrior wheels feature a removable trim ring, some call it a bead protector (let me be clear it is not a beadlock), I call them beauty rings. You can either run them in their native bare aluminum finish or paint or coat them to a different flavor of your liking. Not if but when they get rock rash, you can remove them and re-coat, ensuring a nice finish for years to come. I opted to have mine power-coated with a little bit of flare, hydrographics. One of our local powder-coaters (Armor Coatings) is offering some neat hydrographic options which is basically a decal that is applied over the top of a powder-coated piece and then clear coated to lock the graphic into place. It has some really neat potential and adds a neat aesthetic flare, not typically my flavor but I figured this 200 needed something to make it stand apart from the other Sequoias on the road.
We decided on a candy red powder finish with a black/grey digital camo hyrdrographic. A few days later they had them finished up and I rushed over to check them out. I must say I was super happy with the end product. Again different and not for everyone but I dig the flare and if my appetite for them wears in the future, I know a sandblast and powder-coat guy.
Next up was the suspension. A Sunday morning freed up and a couple of good pals offered to come help rock out the suspension, Dave (DMC), Johnny (WildYoats), both of whom are 200 Series owners and Micah (Micahman) came over and helped make fairly quick work of the process. There were a few learning curves with the mounting of the BP51 reservoirs and front coilovers. As my units were some of the very first into the US we found some minor variance that we had to addressed, the most important being to chase the holes on the top plates of the struts. The BP51's use a bolt into the upper strut mount rather than the typical stud/nut configuration on the stock. We fought the 1st side for a bit of time before we concluded the holes were tapped prior to the anodizing and thus the bolts would start and seat approx. half way before stopping dead in their tracks. It's possible we could have drove them home and cut the threads a bit in the softer aluminum. We pulled the coilover assemblies, gave them a quick chase with the tap and reinstalled with minimal affair. The rear was very straightforward, shocks and coils. The reservoir mounts took a minute to sort but in the end the fit and finish were impressive. The KDSS sway bar system does add a few additional steps in the install process, make sure you're up to speed on the system prior to working on it.
Front OMD BP-51's with Light Racing Upper Control Arms
Rear OME BP-51 Suspension
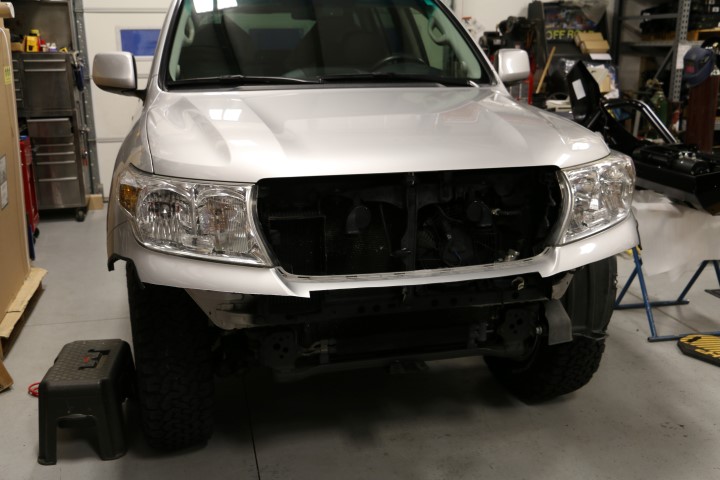
While the front suspension was coming apart for the suspension, the stock front bumper was coming apart as well. The 200 Series ARB winchbar fitment requires reuse of the upper portion of the front bumper cover. This allows for a tidy look and a winchbar that doesn't have to have an awkward top deck trying to match the curvature of the fenders, headlights, grill. We called it a day with the completed suspension and I picked up on the bumper install a few nights later that week. In the meantime, I needed to get some rubber installed. We work closely with our local Big-O, they've been taking care of our tire and alignment needs for the last 10 years and I can't say enough about their solid service. The mounted up the tires and those 22's were a thing of the past... finally.
Trimming the front bumper isn't much of a task with the supplied templates but as always, measure twice, cut once. A paint matched front bumper cover isn't cheap, measure a third time. I used masking tape to mark the template cut lines as well as protect the finished pieces that will be utilized to finish the install. The plastic cuts really cleanly without much effort and any exposed edges finish off with an edge trim included with the bumper fitting kit.
Marking the front bumper cover to trim
Trimmed bumper cover installed
The stock bumper isn't the only trim item, in fact by the time the suspension is completed you'll have a nice assortment of plastic bits that you can toss in the trash. I mounted the VR10000-S, modified the lower frame mounts with a drain hole. The inner fender liners will require trimming, the 200 winchbar has a very nice system for retaining the now trimmed liner with cage nuts that leave it with a clean finish.
Mounting the Warn VR10000-s
Left over parts from trimming
Wiring complete to the fog and turn signals using weatherpack connectors.
Spooling the synthetic rope on the winch
Finished up
Now it was time to start stretching it's legs and see what this BP-51 is all about. Sorry video isn't super tight on the action, it was really an impromptu run as we were out testing Monica (the Canguro 200). I started making some passes on a light whoop section and bringing up the speed as it felt comfortable. At this point... super impressed!
Next up, snorkel, steps, side rails and rear bumper
My initial plans were to do a marathon build similar to those we've done here in the past (fun video of the 100 build) but it just wasn't in the cards this year. We've been busy in the shop and I've been in an out of town a fair bit with work and play so I just couldn't put all the pieces of the puzzle together for a 48 hour build. I had hoped to get it ready enough to use as a chase rig for our Baja 1000 race a few weeks back but that too just wasn't in the cards. Fast forward a bit and I'm happy with the decision, the 100 worked perfectly in Baja and with 4 dudes living out of it for a week it was more appropriate than the clean interior of the 200
. Really though, with a handful of new to me installs including the OME BP51 system, it just made more sense to take my time and really get to know the vehicle.Project numero uno was getting rid of those nasty 22" wheels in favor of something more appropriate, like a lot more appropriate. The TRD Rock Warrior wheels feature a removable trim ring, some call it a bead protector (let me be clear it is not a beadlock), I call them beauty rings. You can either run them in their native bare aluminum finish or paint or coat them to a different flavor of your liking. Not if but when they get rock rash, you can remove them and re-coat, ensuring a nice finish for years to come. I opted to have mine power-coated with a little bit of flare, hydrographics. One of our local powder-coaters (Armor Coatings) is offering some neat hydrographic options which is basically a decal that is applied over the top of a powder-coated piece and then clear coated to lock the graphic into place. It has some really neat potential and adds a neat aesthetic flare, not typically my flavor but I figured this 200 needed something to make it stand apart from the other Sequoias on the road.

We decided on a candy red powder finish with a black/grey digital camo hyrdrographic. A few days later they had them finished up and I rushed over to check them out. I must say I was super happy with the end product. Again different and not for everyone but I dig the flare and if my appetite for them wears in the future, I know a sandblast and powder-coat guy.

Next up was the suspension. A Sunday morning freed up and a couple of good pals offered to come help rock out the suspension, Dave (DMC), Johnny (WildYoats), both of whom are 200 Series owners and Micah (Micahman) came over and helped make fairly quick work of the process. There were a few learning curves with the mounting of the BP51 reservoirs and front coilovers. As my units were some of the very first into the US we found some minor variance that we had to addressed, the most important being to chase the holes on the top plates of the struts. The BP51's use a bolt into the upper strut mount rather than the typical stud/nut configuration on the stock. We fought the 1st side for a bit of time before we concluded the holes were tapped prior to the anodizing and thus the bolts would start and seat approx. half way before stopping dead in their tracks. It's possible we could have drove them home and cut the threads a bit in the softer aluminum. We pulled the coilover assemblies, gave them a quick chase with the tap and reinstalled with minimal affair. The rear was very straightforward, shocks and coils. The reservoir mounts took a minute to sort but in the end the fit and finish were impressive. The KDSS sway bar system does add a few additional steps in the install process, make sure you're up to speed on the system prior to working on it.

Front OMD BP-51's with Light Racing Upper Control Arms

Rear OME BP-51 Suspension
While the front suspension was coming apart for the suspension, the stock front bumper was coming apart as well. The 200 Series ARB winchbar fitment requires reuse of the upper portion of the front bumper cover. This allows for a tidy look and a winchbar that doesn't have to have an awkward top deck trying to match the curvature of the fenders, headlights, grill. We called it a day with the completed suspension and I picked up on the bumper install a few nights later that week. In the meantime, I needed to get some rubber installed. We work closely with our local Big-O, they've been taking care of our tire and alignment needs for the last 10 years and I can't say enough about their solid service. The mounted up the tires and those 22's were a thing of the past... finally.
Trimming the front bumper isn't much of a task with the supplied templates but as always, measure twice, cut once. A paint matched front bumper cover isn't cheap, measure a third time. I used masking tape to mark the template cut lines as well as protect the finished pieces that will be utilized to finish the install. The plastic cuts really cleanly without much effort and any exposed edges finish off with an edge trim included with the bumper fitting kit.

Marking the front bumper cover to trim
Trimmed bumper cover installed
The stock bumper isn't the only trim item, in fact by the time the suspension is completed you'll have a nice assortment of plastic bits that you can toss in the trash. I mounted the VR10000-S, modified the lower frame mounts with a drain hole. The inner fender liners will require trimming, the 200 winchbar has a very nice system for retaining the now trimmed liner with cage nuts that leave it with a clean finish.

Mounting the Warn VR10000-s

Left over parts from trimming

Wiring complete to the fog and turn signals using weatherpack connectors.

Spooling the synthetic rope on the winch

Finished up
Now it was time to start stretching it's legs and see what this BP-51 is all about. Sorry video isn't super tight on the action, it was really an impromptu run as we were out testing Monica (the Canguro 200). I started making some passes on a light whoop section and bringing up the speed as it felt comfortable. At this point... super impressed!
Next up, snorkel, steps, side rails and rear bumper
Awesome Kurt.
theferg
SILVER Star
Looking great!
Lemme know if you need an extra hand, I'd love to help out.
Next up, snorkel, steps, side rails and rear bumper
Lemme know if you need an extra hand, I'd love to help out.
Markuson
SILVER Star
Heh. Up close the rings looked odd to me at first...but the wider shot of the truck makes it look like a good match with the ARB red-ringed lights up front.
- Thread starter
- #59
Looking great!
Lemme know if you need an extra hand, I'd love to help out.
I'll take you up on that. Not sure when that will be but I'm thinking an evening next week for the snorkel?
Nice looking end results. Congrats
Similar threads
Users who are viewing this thread
Total: 2 (members: 0, guests: 2)