Yet another rear bumper build (1 Viewer)

This site may earn a commission from merchant affiliate
links, including eBay, Amazon, Skimlinks, and others.

Cdaniel

Undocumented Mechanic-I Am Not CDAN
SILVER Star
Joined
Sep 29, 2004
Threads
228
Messages
2,657
Location
AZ
Website
zot-art.com
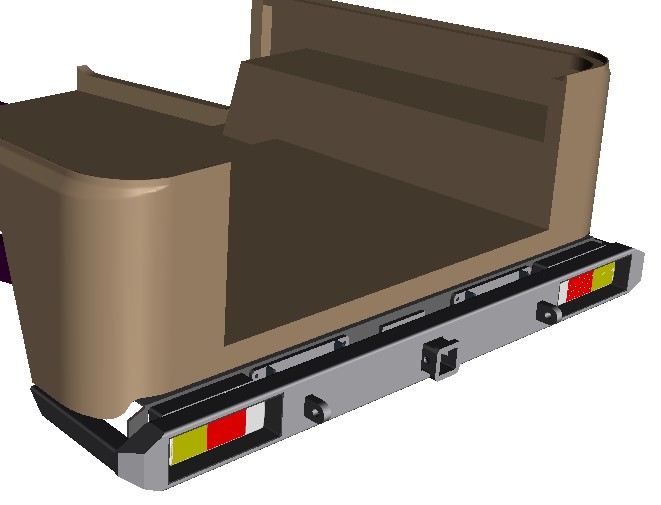
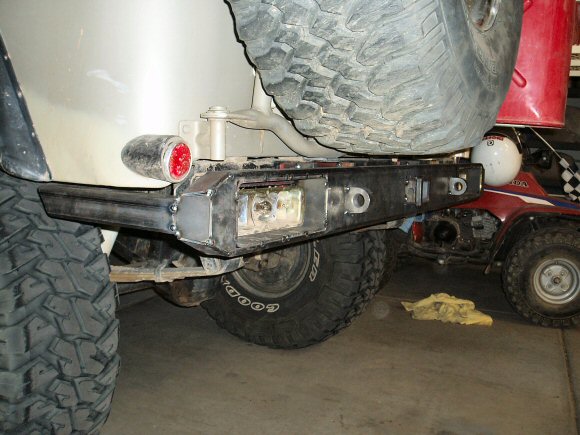
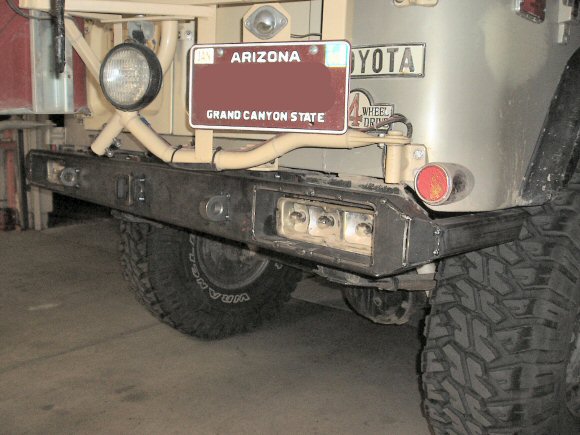
Ok here's my contribution to the myriad of FJ40 rear bumper designs. To be used by the brethren for ridicule or inspiration. You can see the beginnings of the design here https://forum.ih8mud.com/showthread.php?t=34436 where I received much enlightenment and input from the local brain trust. I'll give the blow by blow build up with pics here.

(the narrator chimes in) "stay tuned as Cliffy struggles to meet the build deadline and tempers flare over stupid mistakes. Will he get it done in time for the SEMA show?" :confused:

Yeah right :rolleyes:
 
Here's the picture of what it's supposed to look like when I'm done.
tub_frame_bumper_5a.jpg
 
Here's the old bumper from the previous owner. Stout but in the way, and getting very abused from years of use. Not much for anchor points either.

It has served nobly protecting my tailights though.
oldsmall.jpg


Old brackets welded to the frame being removed.
oldbrktsmall.jpg
 
Last edited:
Here's the pile of raw steel that may look like a bumper some day
About $120 worth
rawmatlsmall.jpg
 
Notching for the end treatment.
fab1small.jpg

fab2small.jpg

fab3small.jpg
 
Last edited:
Cutting the windows for lights and such. I did the two big ones with the jig saw. Man what a slow pain in the ass. Finally my neighbor came home, the one with a plasma cutter! :cheers:
Man that tool kicks ass! Instant butter knife for steel, I finished the rest of the holes in 15 minutes :D
fab5small.jpg

fab4small.jpg
 
Bringing the bumper to the brackets for the 1st time. Oh yeah, brackets are 3/8 plate with standoffs made from 1/4x1 1/4 channel. Bolts to the stock bumper holes and pintle mount drilled out for 1/2 hardware.

Lesson #1
Leaving enough space between the bracket and the bumper to get a welder tip into might be a good idea. :doh:

"Cliffy may have to have a talk with Blueboob about this later. But right now the impossible schedule is more important"
fitup1small.jpg


"Yet another problem for the build team. It seems someone forgot to take tire and cooler carrier latches into account. Cliffy pulls an all nighter to correct another Blueboob mistake."
fitup2small.jpg
 
Corner protection in place, test fit for tail light housings, receiver fitted.
Another word to the wise, generous clearance for tail light housings seems to remove material required to mount them. :censor:

Adding material back sucks :crybaby:
nearly1small.jpg

nearly2small.jpg

nearly3small.jpg


Still got to figure out those latches. :eek:
 
Looks like she is going to come out clean and metal is a good medium to add/remove material from the important part was getting your turn signal cut-outs even with each other...
 
Cdaniel said:
Here's the pile of raw steel that may look like a bumper some day
About $120 worth

and i thought the cost of steel was high on the right coast.
that might have been 40bucks from my place of employment.

looks good so far, don't screw it up :grinpimp:

mine is "designed" very simuliar to your's. in fact i might have to think about "sinking" my lights as well.
 
brian said:
and i thought the cost of steel was high on the right coast.
that might have been 40bucks from my place of employment.
.............

Yep it seems there is no end in site for steel prices. Plus I had to pay for a few cuts because I didn't buy all 20ft of it.
 
IanB said:
Looks great man! :beer: :beer: :beer:

What are those recovery points made out of?

Steel barstock 1x2. I got them pre made from crawltech

Crawltech link
 
Last edited:
That looks really good!

What did you use to do the 3d drawing you showed up near the top?
 
Ditto on the drawing -

Pretty fancy, nice corner protection too -
 
GetsUThere said:
That looks really good!

What did you use to do the 3d drawing you showed up near the top?

Thanks!

The drawing is from the student version of the software I use at work everyday, Pro Engineer.
 
Update: Long weekend progress

So after much study and contemplation :confused: I decided to just relocate the stock latches instead of trying to find replacements. Fab work would have been required in either case, and this way I didn't have spend money on new ones.

Newly created catch plate bolted to the original holes
latch1small.jpg


Latches moved to the top of the tube and supported with an angle bracket
latch2small.jpg

latch3small.jpg


Trail testing will tell?
 
More updates

Final fit up, all smoothed off with lights attached
fit1small.jpg

corner1small.jpg

corner2small.jpg


Inside corner brace
bracesmall.jpg


A few final welds to go, and a little clearance on a couple of mounting holes (I swear it fit once before I welded it all up :confused:) I wonder if heating it to solar temperatures had anything to to with it? :grinpimp:

Next up, powdercoat.
 
You did your homework & executed it to perfection. It looks well designed & beefy enough to take hits from rocks. I know that bumper took allota time to fab up. You could put some LC bumper suppliers outta work with that work of art. Nice craftsmanship dude!
 

Users who are viewing this thread

Back
Top Bottom